First, look our Guide for Epic Seven for beginners.
[su_button url=”https://bstk.me/op6ZKOGzK” target=”blank” style=”flat” background=”#ef2d47″ size=”7″ center=”yes” icon=”icon: heart” icon_color=”#ffffff” rel=”nofollow”]Play Epic Seven FREE on PC[/su_button]
GENERAL TIPS
TO UNLOCK RAID: Beat 5-9 World in Story Mode.
- Raid Tutorial
You must move fight and defeat Devourer Arahakan, in the top left, before the rest of the raid dungeon will be unlocked.
The other paths stay unlocked when you enter again after reset in the following weeks. (Except Queen) - Weekly Reset
Raid resets on a weekly basis. Any mobs, mini bosses or raid bosses that you kill will remain dead on subsequent entries until reset.
It is recommended if you have spare morale after killing a boss, that you clear some trash for your next entry. - Manage Your Morale
Similar to Labyrinth, managing your morale is key to helping you keep an advantage over enemies.
Pay attention to your morale and optimize your best conversations for recovering morale. - Unlocking Queen
In order to unlock the path to fight Queen Azumashik, you need to first defeat at least two Raid Bosses for the current week.
[su_button url=”https://bstk.me/n2pIfLeaA” target=”blank” style=”flat” background=”#ef2d47″ size=”7″ center=”yes” icon=”icon: heart” icon_color=”#ffffff” desc=”Download for free and play on PC & Mobile” rel=”nofollow”]Like Epic Seven game? Play it on PC![/su_button]
Team Composition
- Each raid boss fight has mechanics that might need favour a certain party composition. Doing some prep work and planning before entering the raid can make fights much easier.
- Immune and/or Cleanse effects (Skill or Wonderous Potion Vial) are a requirement as nearly every fight will have some kind of nasty debuff that you want to avoid.
- Defense Break can be used in every boss fight and is extremely valuable debuff. Include at least one way in your party to apply this.
- All bosses are immune to poison. This is both good and bad as damage skills that inflict poison can be used on bosses that punish debuffs.
Mini Bosses
- While most of the trash mobs are fairly easy, the mini bosses can cause problems because they can deal a large amount of burst damage. Be careful not to lose party members before you even get to the boss.
It doesn’t have to be over if you don’t want it to be
- If you are defeated in a fight during the Raid, you will have the option to:
- Try Again – Same as yielding. Refunds your entry and restarts from when you entered the raid.
- Retry (Free for the first time per raid, 10 Skystones after that) – Respawns your party in the square before the fight. Keeps your morale and Souls from when you died.
- If your run isn’t going well, abandon the run by yielding in the menu.
Any current progress will be lost but your your entry fee is refunded.
Sap-Covered Items
- All equipment drops are hidden as Sap-Covered Items. These are only revealed when you exit the Raid.
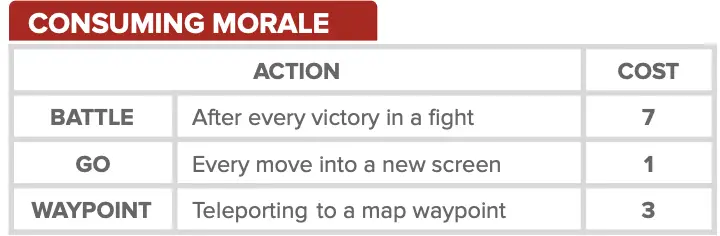
MORALE
STARTING MORALE / MAX MORALE is 70
Morale Bonuses
Calculating Morale
- Plan ahead by routing your path in the Raid based on your team’s potential morale.
- Use a morale/friendship calculator to maximise your team’s morale and better understand your pathing limitations.
- Example: ULMO’s Camping Simulator
Morale Management
- Clearing the Raid requires multiple entries per week due to the limitations of the Morale mechanic. Planning ahead and using your morale efficiently will let you maximize each trip.
- Look for reoute opportunities where you can kill multiple bosses in a single run. This will reduce the number of trips and entry fees needed to clear the entire raid.
Maximize The Killing
- After killing a raid boss, while your morale is still above -31, you can teleport back to the waypoint and kill additional trash mobs and mini bosses.
- Clearing the trash now, will save you morale in future runs and allow you to attempt bosses at higher levels of Morale for the Health bonus.
RAID LAYOUT — RAID MAP
WHO DO I KILL
When you first enter Azmakalis Raid, you will need to do the Raid Tutorial. Only the path to Devourer Arahakan will be open. You will need to kill him before the other paths will unlock.
After that initial kill, and every week after, the paths to the four non-Queen bosses will be unlocked and you can plan which bosses you want to to tackle.
There is no set order to fight the bosses. The choice heavily depends on your team comp and current investment into heroes.
The Raid Bosses have a monster level that gives a general estimate of their relative difficulty and complexity.
If you can’t beat a boss, feel free to attempt any other boss. There is no requirement to kill all the bosses. Defeating at least two bosses is enough to unlock the path to fight Queen.
Level 48 – Devourer Arahakan (Dark)
The tutorial fight. It is a good entry level fight that should not be too difficult to handle. Being dark element means that any DPS should be usable in the fight.
DEFEAT TO UNLOCK OTHER PATHS
Level 48 – Executor Karkanis (Fire)
Karkanis fight is simple as long as you obey the mechanics.
Should be on the same difficulty level as Arahakan
NEEDS AOE ATTACK
AVOID BRINGING EARTH HEROES
Level 50 – Secretary Vera (Earth)
While Secretary Vera is harder and has a bunch of mechanics, the goal of the fight is very simple.
Deal as much single target damage on Secretary as possible.
BRING STRONG SINGLE TARGET DPS
Level 50 – Julevee Council (Light)
Juleeve Council is the most complex fight before Queen.
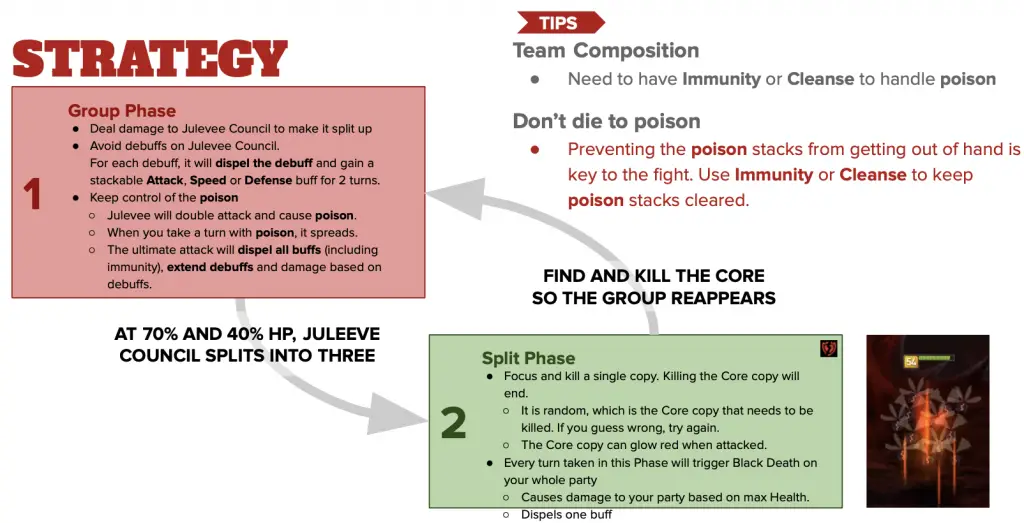
It also has some tricky requirements such as: No debuffs and must be able to handle the poison debuff.
BRING ALL THE IMMUNE / CLEANSE
Level 60 – Queen Azumashik (Light)
The Queen fight is hard. Possibly harder than some later levels in the Abyss. You will need at least 10k+ HP on your entire party to feel comfortable in the fight.
BE TANKY
DEVOURER ARAHAKAN

- Devourer Arahakan
48 Dark Warrior (90k HP) - Azimanmus Hunter (2)
48 Fire Warrior (11k HP Initial)
48 Fire Warrior (7k HP Summoned)
Actions and tips
Dash
Dashes towards the enemy and attacks,
with a 75% chance to stun for 1 turn
STUN
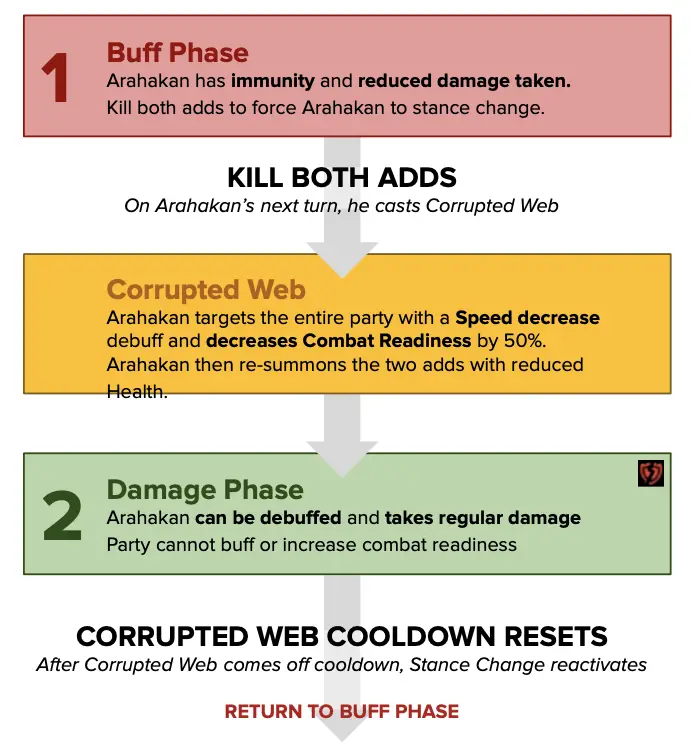
Corrupted Web (3 Turn Cooldown)
Sprays a Corrupted Web at all enemies, decreasing Speed for 2 turns and decreasing Combat Readiness by 50%,
before summoning two Azimanmus Hunters.
This skill can only be used after all allies except for the caster have died.
▼ SPEED (DEBUFF)
▼ COMBAT READINESS
Stance Chance
If Corrupted Web can be used, grants immunity that cannot be dispelled and dramatically decreased damages received.
If Corrupted Web cannot be used, all enemies are inflicted with an unable to be buffed debuff that cannot be dispelled and is not affected by immunity. Cannot receive Combat Readiness increase effects.
IMMUNITY (BUFF)
▼ DAMAGE TAKEN (BUFF)
NO BUFF (DEBUFF)
UNABLE TO INCREASE
COMBAT READINESS
Incubate Venom
Increases Attack and Speed of the Caster at the end of each turn.
If Corrupted Web can be used, caster is granted stackable increased Attack and Critical Hit Chance.
▲ ATTACK
▲ SPEED
▲ ATTACK (BUFF)
▲ CRIT CHANCE (BUFF)
Crisis Response
Caster is granted an extra turn and skill cooldowns are reduced by 3 turns if attacked when Health is less than 50%.
Corrupted Web’s skill cooldown is also reduced by an additional 1 turn after it is used if Health is less than 50%.
ENRAGE MECHANIC
JUST KILL
STRATEGY
Team Composition
- Recommended to have Immunity or Cleanse to fight the Speed debuff
Fight around the Corrupted Web cast
- Timing your buffs and debuffs so they that can land is the key to the fight.
- Buff up before the turn where Arahakan casts Corrupted Web. Have debuffs ready to cast afterwards.
- Avoid the Speed debuff if possible by using Immunity to block, or Cleanse.
Burn everything during Damage Phase
- Cast defense break in Damage Phase when Arahakan can be debuffed.
- Since phase duration is based on Corrupted Web’s cooldown, Kise / Judge Kise cooldown push can extend the Damage Phase.
- Cleave the adds during this phase if you want to trigger Corrupted Web for another Damage Phase
EXECUTIONER KARKANIS
- Executioner Karkanis
48 Fire Thief (108.9K HP) - Karax Scout (2)
54 Earth Ranger (71.1K HP)
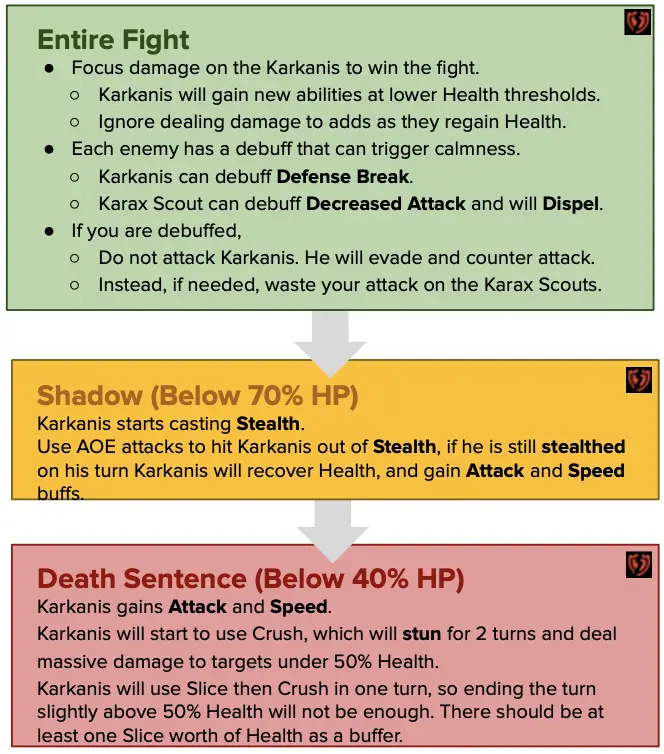
Slice
Cuts the enemy, decreasing Defense for 2 turns
▼ DEFENSE (DEBUFF)
Crush (2 Turn Cooldown)
Rushes towards the enemy and attacks, stunning for 2 turns.
If the target’s Health is less than 50%, they will lose 99% of their current Health.
If silenced, this skill will not be activated and cooldown will be increased.
The skill only activates when the caster’s Health is less than 40%.
BERSERK
STUN
Calmness
When attacking, caster is granted stackable increased Attack and Speed.
Increases chance of evading attacks from debuffed enemies, and counterattacks following a successful evasion while dispelling any debuffs inflicted on the caster.
Counterattack will make a Critical Hit.
EVASION
COUNTERATTACK
DO NOT ATTACK WHILE DEBUFFED
Death Sentence
Increases Attack and Speed of the caster permanently when Health falls below 40%. Activates Crush after using Slice if cooldown of Crush is reset.
BERSERK
▲ ATTACK
▲ SPEED
Shadow
If the caster’s Health is less than 70%, caster is granted an extra turn and casts stealth for 2 turns at the end of the turn.
If the caster is stealthed at the beginning of the turn, recovers Health and grants permanent stackable Attack and Speed increases.
Stealth effect can only activate once every 2 turns.
STEALTH
▲ ATTACK (BUFF)
▲ SPEED (BUFF)
STRATEGY
Team Composition
- At least one AOE hero to break Stealth.
- Avoid Earth heroes if possible as they have natural chance to miss due to elemental disadvantage.
- Silence to stop Karkanis from casting Crush.
Do the mechanics
- Do not attack Karkanis when you have debuffs.
- You will get messed up.
- Break stealth as soon as possible with an AOE Attack (Guardian attack will not work)
Stay healthy before getting into Death Sentence.
- Karkanis’ first Crush will be on your leader. Make sure they are above 50% HP and can afford to be stunned.
- Buff / Debuff as you please
- Karax Scouts can dispel your buffs though when they attack you
SECRETARY VERA
Enemy 1
- Secretary Vera (Worm)
54 Earth Mage (105K HP) - Azimanus Watcher (4) → Azimanus Scout
54 Light Warrior (6.9k HP Egg)
Relevant ability: Hatching
54 Light Warrior (11.0k HP Hatched)
Spew Rock
Spits a pile of stones at two random enemies, with a 50% chance to stun for 1 turn.
STUN
HITS TWO
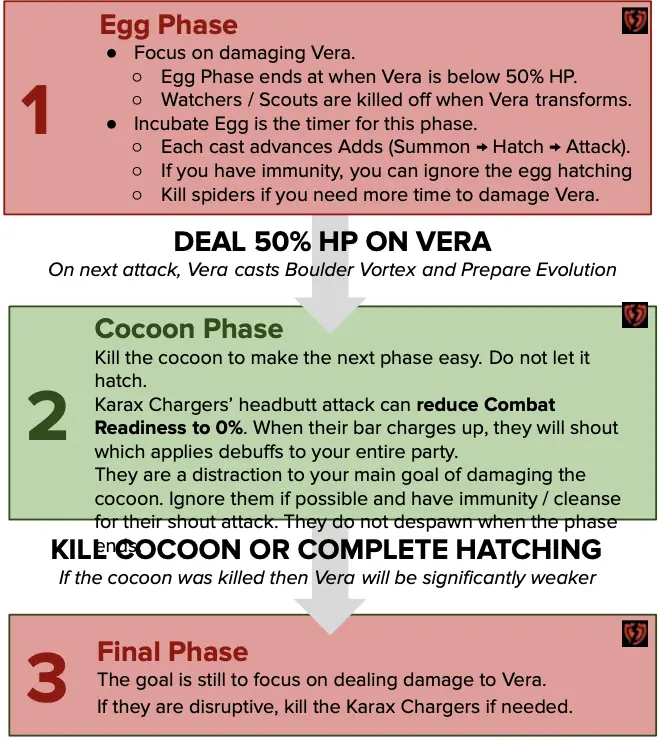
Incubate Egg (2 Turn Cooldown)
Summon Azimanus Watcher. If a summoned monster already exists, decrease its skill cooldown by 3 turns and grants an extra turn.
SUMMONS
Mystery of Life
Increases Attack and Speed of the caster each time an Azimanus Watcher hatches,
and increases Combat Readiness of the caster each time an Azimanus Water takes damage.
▲ ATTACK (BUFF)
▲ SPEED (BUFF)
▲ COMBAT READINESS
Prepare Evolution
Transforms into a huge cocoon and summons two Karax Chargers if attacked when Health is less than 50%.
PHASE CHANGE
Hatching
Summons an Azimanus Scout and inflicts all enemies with a random debuff for 3 turns.
The caster dies after using this skill.
RANDOM DEBUFF
Enemy 2
- Secretary Vera (Cocoon)
54 Light Warrior (62.4k HP) - Karax Charger (2)
54 Light Knight (30.9k HP)
Relevant ability: Headbutt
Enemy 3
- Secretary Vera (Worm)
54 Earth Mage (49.0k HP If Reduced)
54 Earth Mage (66.6k HP If Hatched)
Fetal Movement
Recovers the caster’s Health. If the caster is already at max Health, grants continuous healing for 1 turn instead.
Complete Hatching (4 Turn CD)
Summons Secretary Vera with increased Attack, Defense and Speed.
If the caster dies before using this skill, Secretary Vera is summoned with decreased Attack, Defense, Speed and max Health.
PHASE CHANGE
DPS CHECK
Headbutt
Butts the enemy, decreasing the enemy’s Combat Readiness by 100%.
▼ COMBAT READINESS
Spew Rock
Spits a pile of stones at two random enemies, with a 50% chance to stun for 1 turn.
STUN
HITS TWO
Boulder Vortex (2 Turn Cooldown)
Stirs up a Boulder Vortex to attack all enemies, with a 75% chance to decrease Attack for 2 turns.
▼ ATTACK
AOE ATTACK
Final Evolution
Grants the caster stackable Attack, Defense, and Speed increases every turn after hatching from a cocoon.
SOFT ENRAGE
STRATEGY
Team Composition
- Immunity (Or Cleanse) lets you skip debuff mechanics and spend more time on dealing damage.
- Strong single target DPS is required to focus and burn down Vera.
The goal is to deal damage to Vera
- Dealing as much damage as possible to Vera is the key to the fight. If you can deal enough damage, you can ignore the adds. Only deal with the adds if you need additional time due to low damage.
- Eggs despawn when Vera turns into a Cocoon
- Arky Guardian attack can damage adds in Egg Phase to make them easier to kill if you need the time.
- Karax Scouts do not despawn after Cocoon phase but are just a little annoying.
Buffs / Debuffs
- Vera can stun or decrease attack
- Block debuffs to allow your damage units to spend more time dealing damage.
- Each phase has a delayed party-wide debuff cast
- Azimanus Watchers’ Hatching ability
- Karax Chargers’ Shout ability
- There is no limits / restrictions to buffing or debuffing in this fight.
- Use defense break at all times if possible.
JULEEVE COUNCIL
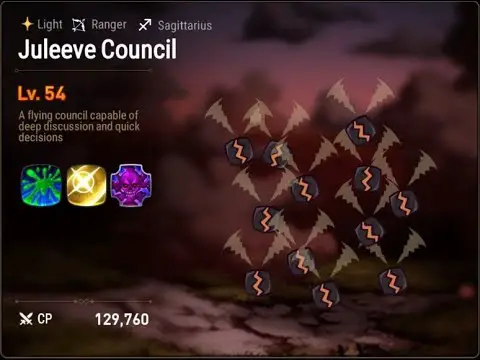
Juleeve Council
- 54 Light Ranger (157.3K HP)
Juleeve Council – Split (3)
- 54 Light Ranger (25.6K HP)
Spread Disease
Attacks the enemy, inflicting poison for 2 turns, and granting stackable increased Attack and Speed to the caster. Grants the caster an extra attack with the same skill.
POISON
DOUBLE ATTACK
▲ ATTACK (BUFF)
▲ SPEED (BUFF)
Group Ambush (3 Turn Cooldown)
Attack all enemies, dispelling all buffs, and extending the duration of debuffs by 2 turns. Damage dealt increases proportional to the number of debuffs.
AOE ATTACK
DISPEL ALL BUFFS
EXTEND DEBUFFS
▲ DAMAGE PER DEBUFF
Black Death
Caster splits into three when Health falls below 70% and 40%.
Deals damage to all enemies proportional to the max Health of the target and dispels one buff from all enemies every time the enemy begins a turn if the core monster is not killed.
When reappearing after splitting, reappears with the 70% or 40% Health they had before splitting.
AOE DAMAGE
DISPEL BUFF
Inflict Curse
If the caster is attacked while debuffed, grants random buffs for 2 turns before dispelling all debuffs.
Number of buffs granted increases proportional to the number of debuffs, up to a maximum of three buffs.
DO NOT DEBUFF
▲ ATTACK (BUFF)
▲ SPEED (BUFF)
▲ DEFENSE (BUFF)
Plague
Poisoned enemies will poison another enemy for 2 turns at the beginning of the turn.
Effect does not occur while splitting.
POISON
STRATEGY
QUEEN AZUMASHIK

- Queen Azumashik
60 Light Warrior (160.7K HP) - Azimanus Watcher (2) → Devourer Arahakan
60 Light Warrior (13.2k HP Egg) Immune, Invincible
60 Dark Warrior (24.4k HP Hatched)
Relevant ability: Dash (stun) - Azimanus Manager (2) → Raqix Flying Troop
60 Light Warrior (13.2k HP Egg) Immune, Invincible
60 Light Ranger (30.2k HP Hatched)
VIDEO HOW TO KILL QUEEN AZUMASHIK GUIDE – TIPS and STRATEGY!
Hellish Cut
Attacks the enemy, dispelling all buffs before increasing skill cooldown by 1 turn. If the target’s Health is less than 50%, grants an additional AOE attack.
DISPEL ALL BUFFS
▲ SKILL COOLDOWN
AOE ATTACK
Death Trap (2 Turn Cooldown)
Attack all enemies, inflicting stackable Defense and Speed decreases. Damage dealt increases proportional to the caster’s lost Health. This skill can only be used when the caster’s Health is less than 50%
▼ SPEED (DEBUFF)
▼ DEFENSE (DEBUFF)
▲ DAMAGE PER LOST HP
Queen’s Servant
After taking damage for the first time, attacks all enemies before hatching two eggs to summon two Devourer Arahakans.
If the caster’s Health is less than 50% after taking damage, uses Death Trap before hatching two eggs to summon Raqix Flying Troop.
Queen Azumashik absorbs some of the damage taken by the summoned Devourer Arahakan and Raqix Flying Troop.
Raqix Flying Troop has a 30% chance to counterattack whenever Queen Azumashik takes damage.
Eggs are invincible and immune before hatching.
HATCHES EGGS ON DAMAGE
HATCHES EGGS AT 50%
ABSORBS PARTIAL DAMAGE FROM ADDS
COUNTERATTACK
Queen’s Terror
Decreases the target’s Attack, Hit Chance, and Speed as the Health of enemies decreases.
At the beginning of the caster’s turn, stuns targets with less than 30% Health for 1 turn.
▼ ATTACK
▼ HIT CHANCE
▼ SPEED
STUN IF BELOW 50%
Queen’s Authority
Grants increased Attack and Defense for 2 turns at the beginning of every turn, and grants a stackable Attack increase buff at the end of each turn.
If attacked when inflicted with more than three debuffs, the caster is granted an extra turn and all debuffs are dispelled.
▲ ATTACK
▲ DEFENSE
▲ ATTACK (BUFF)
NO MORE THAN 3 DEBUFFS
STRATEGY
BASIC
Team Composition
- Required Immune or Cleanse for egg hatching debuffs.
- Your party should be tanky in order to survive. (10K+ HP)
Under Pressure
- Any party member falling below 50% HP can cause the fight to go bad quickly. Being able to sustain through the damage and keeping healthy is the key to the fight.
- Getting your heal casts off is hard in this fight
- Devourer Arahakan can stun a target
- Hellish Cut (Queen) will dispel all buffs and increase cooldowns by 1 turn.
- At the start of Queen’s turn, Queen’s Terror will stun any heros that are below 50%
- If needed, cast Immune on the final turns of the previous fight to have it up at the start of the Queen fight for the first set of egg hatches.
Track Queen Health to manage phases
- Killing both Arahakans should deal enough damage to Queen to bring her to almost 50% HP.
- If you use any additional AOE attacks or Guardian attacks, Queen will hatch the Raqix and start Phase 2 before the second Arahakan is dead. (See Anti-counterattack strategy)
Sustain Strategy
- The majority of the damage in the final phase comes from the Raqix Flying Troops.
- If you are confident in your sustain, you can extend the fight by focusing down each Raqix Flying Troops first.
- After the Flying Troops are dead, then the Queen should be relatively easy to mop up.
- Since the Devourer Arahakan are dead, there is no longer a threat of getting stunned on hit. (You still need to stay above 50% HP)
Anti-counterattack strategy
- By you using guardian attacks or AOE attacks during Phase 1,
- Raqix Flying Troops will hatch before the both Devourer Arahakans are dead.
- This will keep at least one of the Devouerer Arahakan alive.
- By damaging the Devourer Arahakan, you can avoid triggering the counterattack from Raqix Flying Troops. Giving you a safer way to deal damage to Queen.
- After killing off the Devourer Arahakan, you will have a lower health pool on Queen that you need to burn down.
Tips
Dealing Damage
- Prioritize Defense Break as one of the three allowed debuffs on Queen
- Spamming Guardian attacks can help deal the burst damage needed to kill the Queen.