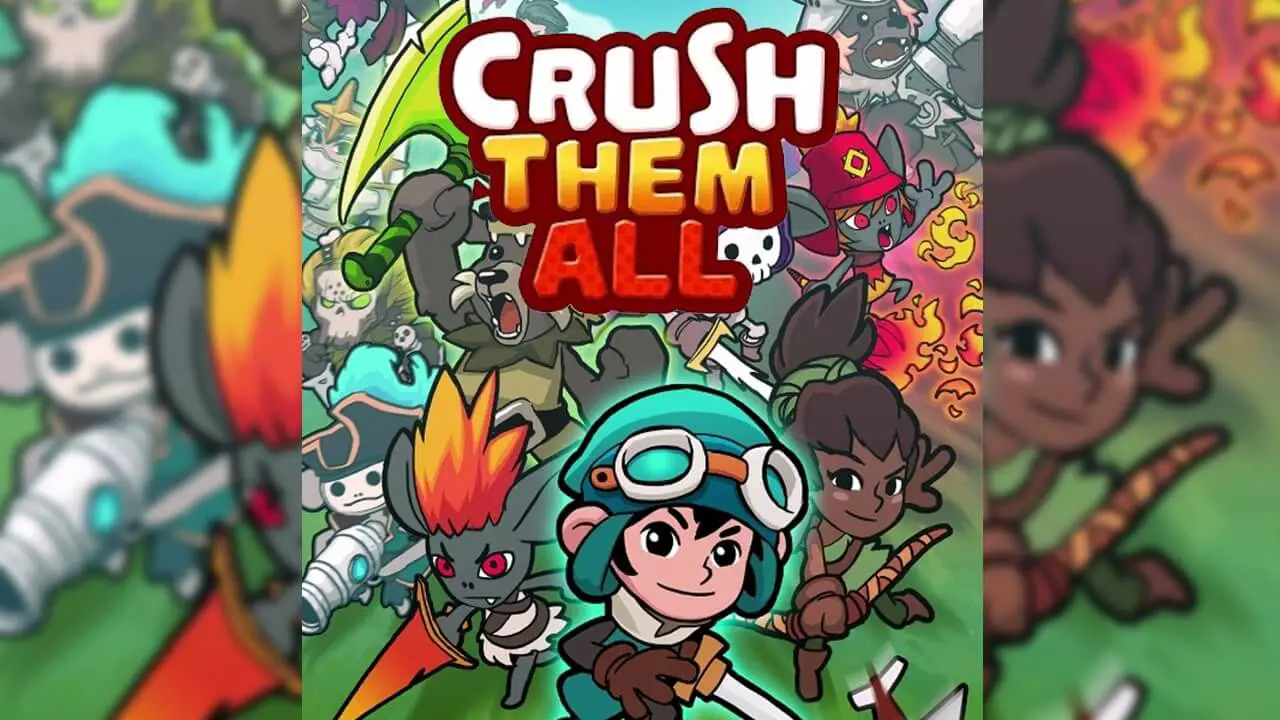
Hello everyone! I’m writing this to try to explain the best way to progress through the main part of the game: your quest to save the Princess! This Crush Them All Guide and Tier List 2020 will explain how to level up what heroes, what to upgrade, and when to Ascend. Here we go!
Short Guide about Crush Them All for Beginners — 26 tips
First, let’s have a look at the screen. From the top left:
- Ascend: A dark blue circle with what looks like a Tri-Force and “Ascend” written on it. This is a major part of the game and will be the mechanic that gets you through more difficult stages. It will be explained in more detail below.
- Speed Boost On/Orff Switch: When you are using a Speed Boost, this switch appears so you can turn it on and off whenever you wish.Stage Number: What stage you are currently going through. Each has a number of minions that you must defeat with your heroes to progress to the next level. There are a total of 8000 stages (!!!) Good luck!
- Menu: A brown rectangle with three black horizontal lines, tap this to access a bunch of stuff.
- Friends: A list of friends that you’ve invited to join in your endeavors. For each new friend you invite to play you’ll get bonuses up to 65. The first 5 will grant you a 2% prism bonus, followed by the next 10 granting you 10% shop revenue, and lastly the last 50 will grant you 25 flooz each.
- Mail: Here you’ll be able to access mail from the developers, mostly tournament rewards or update notifications. You’ll also be able to collect gifts from various Events.
- News: Has a list of all upcoming Events, usually ones coming in the next 3-4 days.
- Lucky Spin: You will receive one token a day to spin a slot machine that gives you chance to earn flooz, as well as Monki Roboti chests. You will get 3 tokens on Sundays.
- Challenges: A list of your unique challenges that you receive daily. Complete one challenge and receive 5 flooz, and complete all five to get a prize (which is the same for all players on that day).
- Library: A list of passive power ups that you can obtain by spending orbs you receive overtime you level up. More details below.
- Login Reward: This contains rewards for each day you play the game. Rewards for this include; prisms, chests, raid tickets, 2x speed boosts, medals for a specific hero, and flooz! The login rewards do not reset if you miss a day.
- Guide: A simple guide in case you forget something, or want to learn a little more. You can see everything here, but at least you won’t have to exit the game 🙂
- Stats: A number of stats that show you your current buffs, career achievements and rankings.
- Settings: Various settings to manage your socials, help and support as well as sound effects.
- The ACTION: This is where all the action is taking place. Tap the bottom left or right of this area to instantly scroll to the ends of the stage.
- Gems: There are two per stage, one being yours and one being your enemies. Destroying the enemy Shape will allow you to advance through to the next stage. If yours is destroyed you will go back one stage. This is also where your heroes and minions spawn. A set number is usually spawned, but if you spend too long destroying the Shape, more minions will spawn. On a boss level, the boss will replace the Shape.
- Heroes and Minions: These tiny little guys are the ones fighting each other. Make sure your heroes are stronger than the minions, and use them to destroy the enemy Gem.
- Chests: Coming in brown or gold varieties, these chests give you gold or flooz. Brown chests give you gold equal to your gold per second amount, or 1, 3, or 5 flooz. Gold chests, after playing an ad, will give you 2, 4, 6, or 10 flooz. The amount of flooz you get is completely RNG dependent.
- Tomb Stones: These show your Friends max stage. Tapping it will get you gold or flooz, equivalent to brown chests.
- Tips Line: Scrolls constantly with handy tips and shows you the most recent chat message in your guild chat room.
- Flooz Count: Precious pink gems you can use to upgrade and purchase a number of things in the game. These can be earned as rewards, collected from chests, or bought with $$ Cash Money $$.
- Prisms Count: The number of unused Prisms you have. These can be used to give a more permanent power up to heroes you have in your party. These can be gained from Ascending or through your login card for every 5 days you play.
- Guild Coins Count: Coins that can be used to buy medals to evolve heroes or to buy energy to fight Raid Bosses. Can be earned by defeating bosses in events or received as gifts and rewards.
- Gold Count: Used to level up your heroes and upgrade your Village. Can be obtained by collecting it from your Village, killing minions or opening chests.
- Objectives: Shows the next stage where you can receive a reward.
- Max Stage while offline: The highest stage you can reach while staying offline. Tap and hold to look at how fast you’re advancing through the stages, how long it will take to get to the highest stage and tips to go higher. All offline bonuses are additive.
- Daily Challenges: Shows your progress towards completing your daily challenges.
- Skills: Also called Ultimates, activated skills that have a cool down, but are very powerful. Tap the wrench to change what skills you would like to have set. You can have a maximum of 5 skill slots.
The row of buttons on the bottom will have their own little guides later on. A short description of each below.
- Heroes: A list of your active heroes. You can have a maximum of 10 hero slots.
- Village: Your Village and your main gold production area.
- Artifacts: Various items that power up your heroes or increase your gold, among other special effects. Currently you can have a maximum of 22 Artifact slots.
- Battle: This tab contains Daily Dungeons, Blitz, Expeditions, and Arena. These contain a lot of the resources you’ll need to upgrade and purchase various items in the game.
- Shop: Here you can get speed boosts activate various boosts you’ve obtained, purchase more flooz, use your guild coins to purchase medals for heroes, and buy event artifacts or open event chests.
- Guild: The red button gives you access to your Guild, the chat room, Events and the Guild Shop.
Getting Started to Jorney
When you first start the game, you’ll have Luka, the Water type Rogue hero. The game from there will give you some more heroes to continue through the game; what heroes you get is anyones’ guess. You should Ascend as soon as you can, as this will unlock the rest of the game that is locked, including Artifacts, Dungeons and the Guild.
- Ascend as soon as you can: The Artifacts and Dungeons section is locked out until you Ascend for the first time. What Ascending does will be explained later on.
- Every time you Ascend, your Village gets a gold production buff of +25% for a maximum of +4000%. You also gain a shop level bonus that increases by +5 per ascend to a maximum of +600.
- Concentrate on levelling up one hero at a time: As you go through the stages, you’ll come across bosses that are only weak to one element. Here’s a list:
- Stage 100: Weak to Water
- Stage 600: Weak to Water
- Stage 700: Weak to Earth
- Stage 800: Weak to Fire
- Stage 900: Weak to Light
- Stage 1000: Weak to Darkness
- And it will continue to loop like that. The first few stages you only have to focus on one hero, but as you get higher, you’ll need to diversify. Power up a hero of the element that will help you defeat the next boss; one hero from each element will suffice. You can get strong heroes by buying Chests of Rare Heroes. Here are some tips.
- Buy Chests of Rare Heroes: Using flooz that you’ll collect from both Chests and Golden Chests, buy Chests of Rare Heroes to ensure you’ll get a strong hero. You should be buying these, as well as buying hero slots to accommodate for your new heroes. *Once you have a good hero from every element, you should stop buying chests for a while*.
- Don’t forget to buy Artifacts and go through Dungeons: These Artifacts will give you the edge you need to go through more stages and deal more damage to bosses. The different types of Artifacts will be explained later on.
- Use Skills: You can use skills to quickly destroy the Gem, allowing you to advance faster. This is a useful strategy for tournaments.
- Daily Gift: Each day your receive a gift that contains a Chest of Common Heroes, a Lucky Token (or 3 on Sundays), 10 Raid Tickets and a Princess Dream.
The Gold level and Prism level are the same: A Gold level 101 Luka will be the same as a Prism level 100 Luka. Illustrating this here: http://imgur.com/a/n0vJx
Your Max Stage will be quite close to the level of your strongest hero. Thus, if you need to pass a certain stage, you should have a hero that has a combined gold and Prism level equal to that stage.
Here, I will go through each element of the main game to hopefully explain everything you need to know. First up, the Village.
Crush Them All Tier List — Best Heroes 2020
Tier A
| Angelica | Light | Legendary | Support | All: +500% HP | Amazing support. Very slow unit, so no staging. Revive could be meta for arena. |
| Dark Hunter | Dark | Rare | Ranger | All Enemies: -50% ATK | Fast ATK, fast move speed, and long range. Arena – Reduces ATK at 4*. Great all around unit |
| Furiosa | Fire | Rare | Knight | Fire: 3% chance of Frenzy | Raid Crusher – Anti burn, anti freeze, high all around stats, and can generate frenzied fire units |
| Vlad | Dark | Epic | Support | All Enemies: -10% ATK Speed | Two healing moves AND life steal for team. Can heal multiple heroes. May out heal Merlinus |
Tier B
| Alda | Fire | Epic | Ranger | All: +300% Crit DMG | Causes burn. Solid buff for arena. A bit slow for staging. Raid for survivability. |
| Atlantus | Water | Rare | Lancer | Water: +200% Crit DMG | Raid Crusher – Only viable for raids and arena bonus. |
| Groovine | Earth | Rare | Magician | Earth: +200% ATK | Raid Crusher – Slows enemies ATK. Ult. gives Earth ATK to all but Fire, but only viable in raids. |
| Kage | Dark | Rare | Samurai | All Enemies: -50% HP | Modereate movement speed, high ATK rate. Team buff is good for arena and very good for raids. |
| Kasai | Fire | Rare | Samurai | Fire: +400% ATK | Modereate movement speed, high ATK rate. Decent in arena. |
| Kasumi | Dark | Epic | Rogue | All Enemies: -10% ATK Reload | Very fast. High damage. Warps behind enemies making her ideal for staging and arena. |
| Leaf Blade | Earth | Epic | Knight | All: +400% DEF | Expensive medals. Great area DEF unit due to buff, knight shield, and special Auto-Shield at low life. |
| Luka | Water | Rare | Rogue | Water: +25% Move Speed | Best Water stager, hands down. Not much viability outside of that. |
| Merlinus | Light | Rare | Support | Light: +500% HP | Healer – amazing for arena and raid survivability |
| Monki King | Fire | Rare | Lancer | Fire: +10% ATK Reload | Limited Unit (LNY ’18) – Flying lancer, tends to stun frequently avail in Arena Shop |
| One Eye | Light | Rare | Rogue | Light: +10% ATK Reload | Raid Crusher – Chance to dodge both hit and gunner bullets. High stats. 4* buffs atk speed. |
| Petunia | Earth | Epic | Magician | All: +500% DEF | Team Buff is current best All DEF, so good for arena and raid. ATK is slow, but special is good CC. |
| Pirato | Water | Rare | Gunner | Water: +400% ATK | Solid speed. Splash damage. Generally solid unit. |
| Robin Hood | Earth | Rare | Ranger | Earth: +200% Crit DMG | Slow, but with fast ATK speed. 2* is Multi-Shot. Situational usefulness. |
| Rufus | Water | Rare | Gunner | Water: +400% DEF | Piercing damage, ignores DEF. OK in raids. 4* Arena – Pair w/ 4* Black Beard/Ice Cube for crazy DEF. |
| Scud | Fire | Epic | Gunner | All: +400% ATK | Great in the arena. Does AOE damage. Team Buff affects team. |
| Sorrow | Dark | Rare | Gunner | Gunners: +400% ATK | Raid Crusher – Stuns, pierces, and ignores DEF. High dmg. Great in arena. |
| Tesla | Light | Epic | Magician | Self: +800% ATK | Stuns and causes splash damage. Solid unit all around, but top tier magician at 4*. |
| Thor | Light | Rare | Barbarian | Light: +400% ATK | Limited Unit (Xmas ’17) – Stuns, warps, and has very high stats. Arena King. Avail in Blitz Shop |
| Valkyrie | Water | Epic | Ranger | All: +300% Crit DMG | Great ATK speed, but relatively slow. Also has a freeze effect. Good in arena, and some raids. |
Tier C
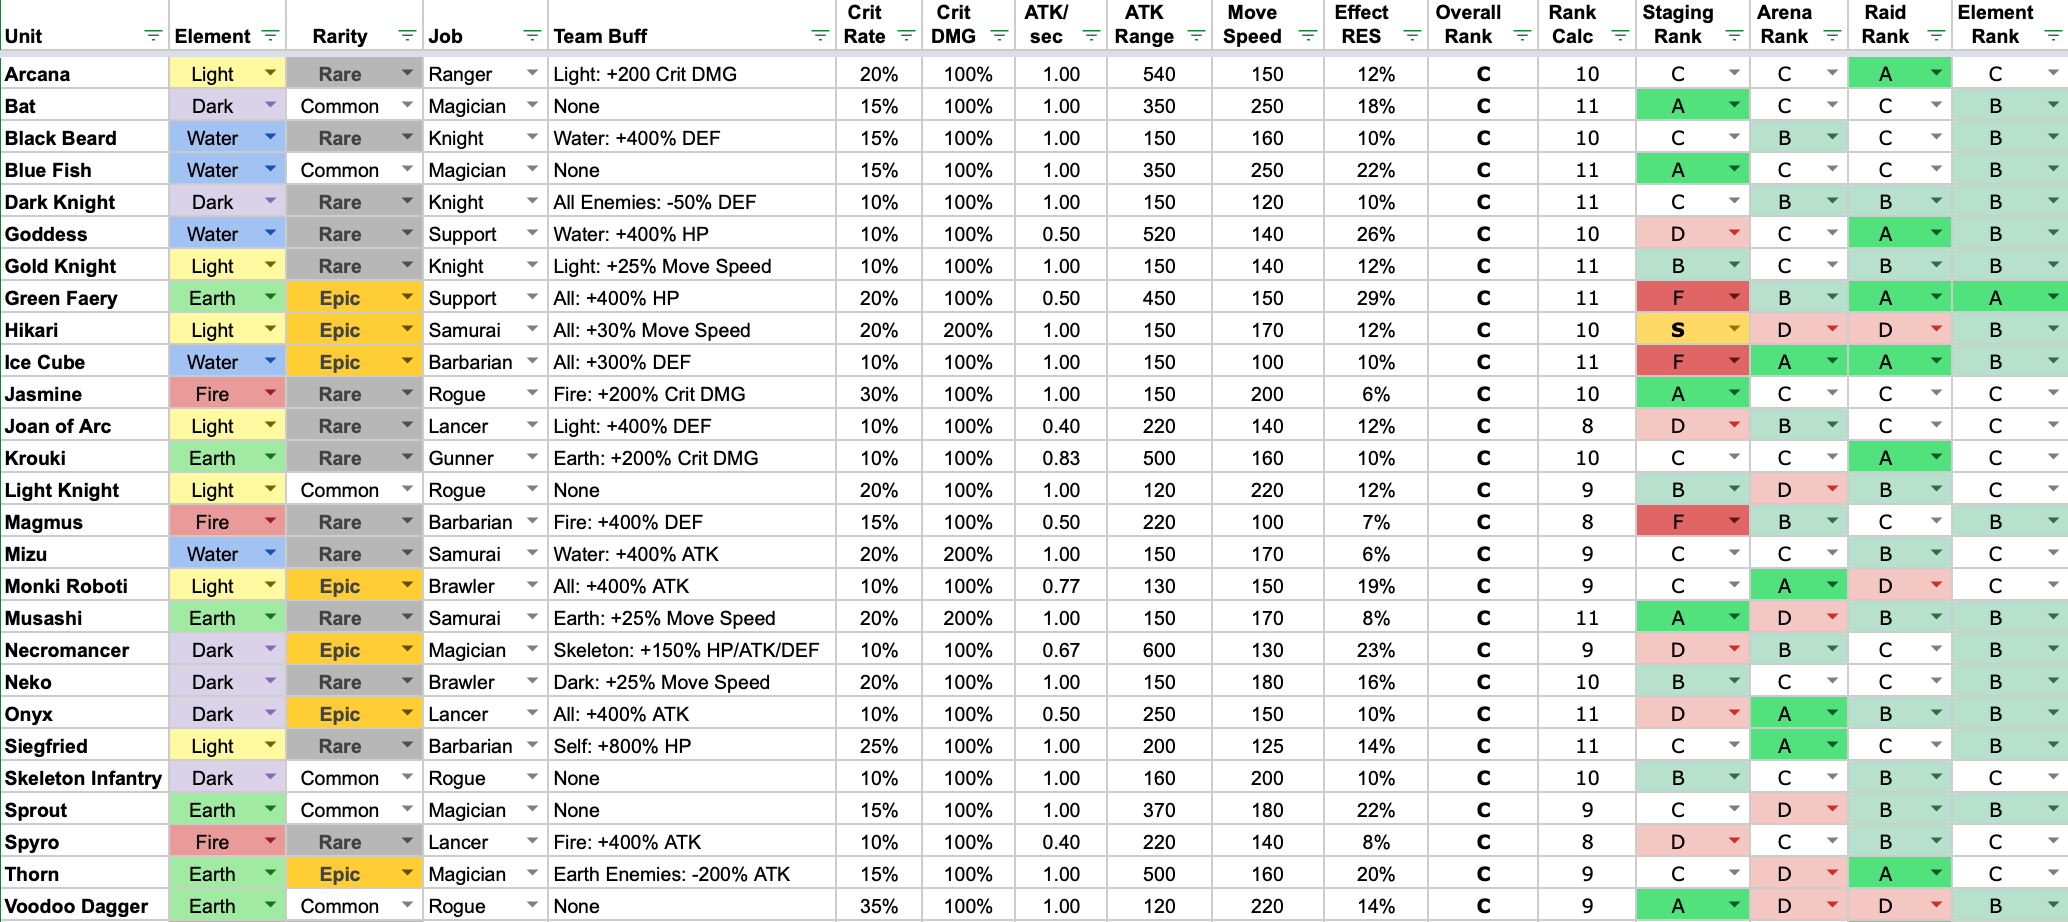
| Arcana | Light | Rare | Ranger | Light: +200 Crit DMG | Solid ranger. Outclassed in most situations. Good against Dark raid mini boss (Beetle) |
| Bat | Dark | Common | Magician | None | Easy medals. Fast ATK and M. Speed. Great for staging. Good vs Frostwing raid only w/ Groovine. |
| Black Beard | Water | Rare | Knight | Water: +400% DEF | Slower, but high DEF. 4* Arena – Pair with 4* Rufus/Ice Cube for crazy DEF. |
| Blue Fish | Water | Common | Magician | None | Easy medals. Fast ATK and M. Speed. Great for staging. Good vs Frostwing raid only w/ Groovine. |
| Dark Knight | Dark | Rare | Knight | All Enemies: -50% DEF | High stats, high ATK speed, but slow. Team buff good for arena. |
| Goddess | Water | Rare | Support | Water: +400% HP | 2* move pushes people back & ult. is a Water shield. Raid surive strat. |
| Gold Knight | Light | Rare | Knight | Light: +25% Move Speed | Slow, but buffs Light speed at 4*. All around valuable unit, but nothing crazy. |
| Green Faery | Earth | Epic | Support | All: +400% HP | Raid suvivability unit. Random shield could be good in arena plus all HP boost |
| Hikari | Light | Epic | Samurai | All: +30% Move Speed | Best Light stager. Meta unit for staging when 4* and up. Should be a top priority to get to 4* |
| Ice Cube | Water | Epic | Barbarian | All: +300% DEF | No knock back, can freeze. 4* buff is hands down best tank in arena. Raid for survivability. |
| Jasmine | Fire | Rare | Rogue | Fire: +200% Crit DMG | Great unit for staging. Situational usefulness outside of that. |
| Joan of Arc | Light | Rare | Lancer | Light: +400% DEF | Slow unit. No AOE. Situational usefulness. Possible Arena tank at 4*. |
| Krouki | Earth | Rare | Gunner | Earth: +200% Crit DMG | Pierces armor and ignores DEF. Solid option in niche situations. |
| Light Knight | Light | Common | Rogue | None | Easy medals, and solid stats, but directly outclassed by One Eye. |
| Magmus | Fire | Rare | Barbarian | Fire: +400% DEF | Extremely slow. Most seen as a tank in arena. |
| Mizu | Water | Rare | Samurai | Water: +400% ATK | Modereate movement speed, high ATK rate. Decent in arena. |
| Monki Roboti | Light | Epic | Brawler | All: +400% ATK | Stuns. Team Buff affects arena. |
| Musashi | Earth | Rare | Samurai | Earth: +25% Move Speed | Modereate movement speed, high ATK rate. Buffs Earth speed, so good for staging support. |
| Necromancer | Dark | Epic | Magician | Skeleton: +150% HP/ATK/DEF | Summons extra units at caster level. Huge arena potential. Slow unit and ATK speed. |
| Neko | Dark | Rare | Brawler | Dark: +25% Move Speed | Solid stats. Good speed, and good boost at 4*. Valuable paired with other Dark for staging. |
| Onyx | Dark | Epic | Lancer | All: +400% ATK | Excel in the arena. Stuns and does AOE damage. Team Buff affects arena. |
| Siegfried | Light | Rare | Barbarian | Self: +800% HP | High HP, and 4* buff makes him a great Arena tank. |
| Skeleton Infantry | Dark | Common | Rogue | None | Fast, but no team buff. Directly outclassed by Bat and Kasumi. Solid filler, but still no mats. |
| Sprout | Earth | Common | Magician | None | Fast ATK. Fine for staging, but slow. Aligns to raid (Frostwing) element and type. |
| Spyro | Fire | Rare | Lancer | Fire: +400% ATK | Overall, very slow. Not a lot of use. |
| Thorn | Earth | Epic | Magician | Earth Enemies: -200% ATK | Medals are hard to get. Low viability. Aligns to raid (Frostwing) element and type. |
| Voodoo Dagger | Earth | Common | Rogue | None | Best Earth stager. 2nd fastest speed. Fastest ATK rate. Easy medals |
| Xak | Fire | Rare | Support | Fire: +25% Move Speed | Fire shield as Ult. Can stun whole groups. Solid general use. Shield is used in the raid surive strat. |
Tier D
| Big Eye | Light | Common | Magician | None | Slow Flyer. No team buff. Doesn’t really do well anywhere. No Mats |
| Bugonaut Archer | Water | Common | Ranger | None | Substitute stager. No team buff. No mats. |
| Bugonaut Spear | Water | Common | Lancer | None | Aligns to raid (Undead Samurai) weaknesses. Not much other use. |
| Chaos | Dark | Rare | Barbarian | Dark: +400% DEF | Extremely slow. Most seen as a tank in arena. |
| Fire Monk | Fire | Rare | Magician | Fire: +400% HP | Nothing notable. Possible situational usefulness. |
| Gladiator | Earth | Rare | Barbarian | Earth: +400% HP | Decent arena tank at 4*. Replaceable by other tanks. |
| Krunk | Light | Rare | Gunner | Light: +400% ATK | Tanky gunner. Too slow to use most of the time. Niche usefulness. |
| Natura | Earth | Rare | Lancer | Earth: +400% | Slow and hits hard. Pierces enemies in a row. Situational usefulness. |
| Oceana | Water | Rare | Magician | Water: +400% HP | Overall, pretty middle ground. Nothing excelling.Arena – Valuable 4* buff with other water units. |
| Skeleton Ranger | Dark | Common | Ranger | None | Lesser version of Dark Hunter. Easily replaceable with Bat for most situations. |
| Spark | Fire | Rare | Ranger | Fire Enemies: -200% ATK | Nothing great. Debuff only works on fire, meaning no element advantage. |
| Tiny Dragon | Fire | Common | Magician | None | Slow Flyer. No team buff. Doesn’t really do well anywhere. No Mats |
| Voodoo Archer | Earth | Common | Ranger | None | Easy medals. General filler unit. Quickly replaced. |
| Wolfie | Earth | Rare | Barbarian | Earth: +400% ATK | Slow ATK & move speed. Situational tanking. Not the best in arena. |
Tier F
| Bugonaut Fighter | Water | Common | Rogue | None | Worst rogue, arguably worst unit. Use Luka. |
| Bugonaut Giant | Water | Common | Barbarian | None | Too slow, and no team buff. No mats should be used on this unit. |
| Dark Wolf | Dark | Rare | Magician | All Enemies: -25% Move Speed | All around slow. Only useful in particular circumstances. |
| Skeleton Giant | Dark | Common | Barbarian | None | Too slow, and doesn’t align to raids. No mats |
| Voodoo Spear | Earth | Common | Lancer | None | Easy medals. Slow ATK speed & move speed. All around not very useful. |
| Vulcan Fighter | Fire | Common | Rogue | None | Terrible unit. Replace asap. |
| Vulcan Hammer | Fire | Common | Barbarian | None | Pretty much no use with exception to specific advantages, e.g. Undead Samurai |
Basic Crush Them All Guide
Village
The Village is your money making machine. It is the main way to gain gold to level up your heroes and to upgrade the various shops in the Village.
Using the gold you get from the Village, you can upgrade shops that you have bought and buy new ones. You cannot buy the next shop until you have bought the previous one. The amount of money your village makes per second is directly related to the gold drops of enemy minions and the Gem. When you complete a stage, you receive gold equal to the village profit per second. Each minion drops one-fifth of that amount. Killing a boss will reward you with approximately 15 times your profit per second. (Not sure if this stuff is true exactly with the new update, but destroying gems and killing bosses do give you lots of money. Staying online will always give you more gold than staying offline.)
As you upgrade the shops, they will make more money. Every 25 levels, there will be a large boost multiplying the profit by 2, 5, or 10. The first 9 shops gain auto-collect at level 50, shops from “Shipwright” will gain auto-collect at level 100, and shops from “Falconer” auto-collect at level 150; usually you have to collect the money from the shops by tapping on them, but this will allow money to be collected automatically, even if offline. It is usually a good idea to stop upgrading the shop at this point.
Every time you Ascend, the Village gets a +25% gold production buff for a maximum of 4000%, as well as a +5 shop level bonus that increases your villages starting shop levels up to a maximum of 600. This does not include any buffs from Artifacts. Your village buff can be seen in the stats screen.
Unfortunately, you cannot upgrade your Village forever; it will eventually become too hard to level up your heroes and upgrade the village as you will be making too little money. This is when you should Ascend.
Let’s go through Ascending.
Ascend
At some point, you’re going to have to Ascend. You WILL be unable to get through a certain stage because your heroes aren’t strong enough. Ascending will fix that.
Taken from the game, the description of Ascending is:
Ascending is the best way to get stronger permanently. You will earn prisms which is another way to level up your heroes. You will have to start from the beginning but since your heroes progress while you are away you can reach a high stage quickly
By choosing to Ascend, you have the opportunity to make your heroes stronger. By advancing into higher stages, you will gain more Prisms to strengthen your heroes. Not only that, you will be increasing the amount of gold your Village is able to produce as well as what level your village shops start off at. Both of these have caps however. You will also increase your Player Level. Therefore, progression will look like this:
Start adventure -> Get to highest stage possible -> Ascend and power up heroes -> Repeat
When’s the best time to Ascend? Usually when you can’t advance any higher. If you’re struggling to beat a stage where you’re using all your skills and it would take you ages to level up your heroes using gold, then it’s time to Ascend.
So that’s one part of the game. Use gold you gain from your Village and defeating minions to level up your hero to go through as many stages as you can, and once you can’t get any further, Ascend. Simple.
As you go up in Player Levels, you will receive one orb; Blue, Green, Yellow, Purple, Red, and Grey. You will receive them in that order. You can use these to make yourself more powerful, as will be explained now…
Library
The Library is where you can make yourself more powerful by using your orbs. Here’s a list of buffs you can earn:
- Prism Bonus: Increase the Prism rewards per ascend by 10% per level.
- Skip Stage: Chance to randomly skip a stage by 1.5% per level.
- Game Speed: Increase the game speed by 5% per level.
- Offline Speed: Increase the offline progress speed by 15% per level (~10 stages per hour).
- Princess Dream Duration: Increase the Princess Dream duration by 5% per level (~12 minutes).
- Dungeon Tickets: Increase the dungeons max tickets by 1 per level (max of 10 tickets, or up to level 7.
- Dungeon Rewards: Increase the dungeon rewards by 10% per level.
- Guild Energy Max: Increase the Energy max by 10% per level (50 Energy per level).
- Guild Energy Charge Speed: Increase the Energy recharge speed by 2% per level (~4 minutes quicker per level).
- Expedition Rewards: Increase the expedition rewards by 10% per level.
- Expedition Num Slots: Increase the number of hero slots available for expeditions by 3 per level.
What should you be buffing? If you are very active and don’t sleep, improve Dungeon Rewards and Guild Energy Charge Speed. Otherwise, Dungeon Tickets and Guild Energy Max could be better. If you want more time in Raid Event fights, improve Game Speed, otherwise buff Skip Stage. I would also recommend improving Offline Speed over Princess Dream Duration. Expedition Num Slots for the first few 5 or so orbs followed by Expedition Rewards all 10 upgrades, then back to the Num Slots.
Daily Challenges
Daily Challenges are a variety of challenges that you can attempt each day. You get five challenges: complete one for 5 flooz or 5 common weapon catalysts, or complete all 5 for an even better reward. Here’s a list of possible challenges:
- Kill X enemies with an Ultimate
- Open X chests in game
- Upgrade shops X number of times.
- Upgrade X shops to auto-collect
- Beat X stage (Between -10 and +10 of your max Stage).
- Kill X guild bosses
- Ascend X time(s)
- Finish X guild boss battles with 3 Stars
- Collect shops X times
- Beat X daily dungeons
- Consume X Energy attacking guild bosses
- Defeat X stage bosses
- Complete X arena battles
- Complete X blitz battles
- Reach X% in your arena league
It is possible to get an elemental chest (30 medals from any hero of a particular element), 30 flooz, 5 Lucky Tokens, or 2 Rune Chests from completing all Daily Challenges. The Challenges reset at the beginning of a new day (0:00 UTC).
The Shop
The Shop (with capital letters) is where you can buy a bunch of stuff with flooz, ads, or $$Cash Money$$. The Shop is split into multiple sections: Event, Guild, Items, and Flooz.
- Event: Shows a list of all available Event Artifacts. Each Raid Boss has their own tab, which then shows their Event specific Artifacts. You can also open Event Chests here.
- Guild: You can use your Guild Coins here. This is where you can buy hero medals, Speed Boosts, and Energy.
- The Shop has a Common, Rare, and Epic hero in the Shop each day. Common heroes cost 50, Rare heroes cost 200, and Epic heroes cost 1000. The price goes up every time you buy a medal by 50, 200, and 1000 respectively. The heroes and cost for the medals refreshes each day.
- Items: Here you can buy items with ads or flooz.
- Speed Boost x2: Watch an ad to multiply your speed by two.
- Speed Boost x3: Pay 20 flooz to multiply your speed by three.
- Free Gold: Watch an ad (15 minute cool down) to earn free gold, which scales with your Village.
- Princess Dream: Add 500% to your offline speed for 4 hours and collect Prisms when you reach your max stage.
- Big Pile of Gold: Spend 20 flooz to get one hours worth of gold (Absolutely useless don’t do it).
- 300 Energy: Spend 40 flooz to gain 300 Energy, with a limit of two purchases a day.
- 600 Energy: Spend 80 flooz to gain 600 Energy, with a limit of one purchase a day.
- Flooz: The Flooz shop allows you to spend $$Cash Money$$ to buy flooz, the premium currency. It also allows you to buy one-time only start packs, as well as daily packs that give a small amount of flooz for a few days as well as a lasting Speed Boost x2.
VIP System
The VIP system is designed to reward all players with quality of life improvements. The more you play, watch ads or buy packs, the more VIP points you get.
- 1 VIP point per ad watched. This includes the gold chest ads, 2x speed ad, and the instant gold ad.
- 10 VIP points per day you play
- 100 VIP points per spent currency unit. You can see how many VIP points you get in the description of the packs.
The first VIP level is extremely beneficial to anyone playing the game because it provides a 20% prism bonus which is the primary method of increasing your overall power in the game and will help you advance faster. There are other bonuses provided however the prism bonus is highly considered to be the best. Below you will find the benefits for each level. This information can be seen in game by going into the shop>flooz>VIP Benefits. Note: The 30 day Login Rewards listed below show the total values you will receive and don’t add together from previous VIP rewards.
VIP 1
- VIP Status
- 20% Prism Bonus
- 55 min Artifacts refresh delay
- 100 Lv Shop Bonus at Ascend
- 22 mins per Speed 2x
- One time reward of 1 Premium Chest
VIP 2
- 50 min Artifacts refresh delay
- 200 Lv Shop Bonus at Ascend
- 24 mins per Speed 2x
- One time reward of 1 Premium Chest and 1 Epic Rune Chest
VIP 3
- 45 min Artifacts refresh delay
- 300 Lv Shop Bonus at Ascend
- 26 mins per Speed 2x
- +1 more Chests and Boosts on the 30 day Login Rewards
- +30 more medals of featured Hero on the 30 day Login Rewards
- One time reward of 2 Premium Chests and 1 Epic Rune Chest
VIP 4
- Super VIP Status
- Upgrade All Shops button
- 40 min Artifacts refresh delay
- 400 Lv Shop Bonus at Ascend
- 30 mins per Speed 2x
- One time reward of 2 Premium Chests and 1 Epic Rune Chest
VIP 5
- 35 min Artifacts refresh delay
- 500 Lv Shop Bonus at Ascend
- 35 mins per Speed 2x
- One time reward of 1 Epic Chest and 1 Epic Rune Chest
VIP 6
- 30 min Artifacts refresh delay
- 600 Lv Shop Bonus at Ascend
- *40 mins per Speed 2x
- 2 more Chests and Boosts on the 30 day Login Rewards
- 60 more medals of featured Hero and the 30 day Login Rewards
- One time reward of 1 Epic Chest and 2 Epic Rune Chests
VIP 7
- 700 Lv Shop Bonus at Ascend
- 45 mins per Speed 2x
- 50% more Flooz on the 30 day Login Rewards
- 1 more Premium Hero Chest on the 30 day Login Rewards
- One time reward of 2 Epic Chests and 2 Epic Rune Chests
VIP 8
- 800 Lv Shop Bonus at Ascend
- 50 mins per Speed 2x
- 2 more Premium Hero Chests on the 30 day Login Rewards
- One time reward of 2 Epic Chests and 2 Epic Rune Chests
VIP 9
- 900 Lv Shop Bonus at Ascend
- 60 mins per Speed 2x
- 3 more Chests and Boosts on the 30 day Login Rewards
- 90 more Medals of featured Hero on the 30 day Login Rewards
- 3 more Premium Hero Chests on the 30 day Login Rewards
- One time reward of 3 Epic Chests and 3 Epic Rune Chests
Guild
The Guild menu is unlocked once you Ascend, and allows you to either find a guild to join, or create your own for 90 flooz. I recommend looking for a guild: You’ll be able to reap the rewards right away if you do. You can use the search function to look for a specific guild.
On the main screen, you will either see a blank red screen, or the details for a Raid Event (more information below). Tap the bottom left “Guild” button to access details about your guild.
- Flooz, Guild Coin and Energy Count: Shows your current flooz, guild coins and Energy.
- Guild Details: Shows your guild emblem, tag, name, description, leader, number of members, total strength of all members, and settings to change the details of the guild.
- Settings: Allows the Leader (R5) and Captain(s) (R4) to change the tag, name, description, main language, privacy (open or invite only), minimum power requirement, and emblem. Invite only allows non-members to apply rather than join straight away, and the leader and captain(s) can choose to accept them. Members can also leave the guild through this screen.
- Members: Shows a list of members. You can see their name, rank, current online status (green for online, yellow for inactive) and power.
“Chat” allows you to talk to all of your members, “Events” brings you to the main screen for Events, and “Shop” brings you to the Shop.
Member rankings are as follows, from most to least powerful: Leader (R5), Captain (R4), First mate (R3), Boatswain (R2), and Sailor (R1). The Leader can change details of the guild, promote, demote, kick all members in the guild, and activate the Star Fever. Captains can do everything the Leader can do except promote, demote, or kick other captains. First mates the ability to promote and demote up to Boatswain. Leaders that have been inactive for 7 days will automatically be replaced by the Captain or the member with the highest power.
Events
Max Stage Tournament
The rules are simple: Advance through as many stages as you can in one day. The best thing about this tournament, is that no matter how strong you are, you can get to the top of the leaderboard. This tournament is a test of how long you can play the game for.
The best way to get a high score is to Ascend as soon as you feel you are slowing down. You need to be able to rush through the stages, and if you’re going slowly, Ascend to get back down to the low stages to beat more stages quickly. Whether or not you beat high-level stages or low-level stages is irrelevant. Here are some tips and tricks to get you a high position on the leaderboard:
- Get Started Early!: You need to Ascend to start competing. Check the News for the start time, and be ready to Ascend as soon as it starts.
- Use Skills: Use your Skills to destroy the Gem quickly. This makes advancing through the stages quicker.
- Use High Mobility Heroes: Samurai, Gunners, Archers and especially Flying Heroes are good choices. When your skills are on cooldown then you need your heroes to get through stages themselves. You can see a list of recommended heroes in the “Heroes” section.
- Use Speed Boosts: Watch an add and get the x2 Speed Boost to help you fly through stages. If you want to spend Guild Coins or Flooz, get the x3 Boost.
- Ascend Quickly: There’s no point slogging through higher stages and wasting time. Ascend and get back to shredding stages.
This is the quickest way of advancing through Stages.
- Using a x3 Speed Boost.
- Keeping the game open (unless your Princess Dream is faster than your online time).
- Having 5 Skill slots to destroy gems quickly (Strike, Spear, Arrow, or Rain type Skills are useful here).
- Having a high Game Speed or high chance to Stage Skip.
- Ascending at Stage 60 (the first few stages do not spawn Flyers and have fewer enemies).
Using this method, you can get through approximately 1800 stages per hour. This depends on the skills you use, as well as how many skill slots you have. If your skills are on cool down it’s wasted time.
X2 Prism Per Ascend
Relatively self-explanatory, you get double the Prisms every time you Ascend! To take full advantage, hover around your max Stage before the event starts.
X2 Flooz In Chests
DOUBLE FLOOOOOOOOZ!!!!!
All Dungeons and Double Resources
For two days, all Dungeons are open regardless of the day, and defeating the Dungeon Bosses will not only give you double the materials, but will also give you 4 Hero Medals! Take advantage to get even more materials and medals.
And the most important Event of all…
A Guide to Raid Events
What is a Raid Event?
A Raid Event is a guild event that happens about once a week, and lasts 3 days. The goal is to defeat as many bosses as you can, earning rewards and trophies along the way. You must work together with your guild mates to defeat tough enemies, and you can use the rewards to gain exclusive Artifacts with special effects! This is copied from the guild rules that can be found on the top right of the Event page.
Guild Boss Rules
- Raid bosses with your guild mates, earn loot and craft powerful artifacts.
- As you progress the bosses will become harder, and the more you will need the help from your guild mates to defeat them.
- Each boss gives you points (trophies) based on its level. At the end of the week, the players and the guilds with the most points will earn amazing rewards.
- Heroes’ Gold and Prism Lv are ignored during the battle, only the stars and artifacts are taken into account.
- Each boss has its strengths and weaknesses, make sure you have the best team to defeat them.
- Each successive battle on the same boss will grant an extra DMG buff.
The goal is to get as many points as you can, for yourself and your guild, while you also gain materials to obtain Artifacts. You can also get rewards for your guild by killing a boss, which sends a mail to all your guildmates that can contain guild coins or material chests.
Page Overview
Let’s now go over the page and what it means to you. Starting from the top we have:
- Flooz and Guild Coin Count: The amount of flooz and guild coins you currently have.
- Energy: This is what you need to actually fight the bosses. The natural maximum amount of Energy you can have is 500. You recover about 2 energy per minute, or 4 hours to recover 500 Energy. You can also buy it using guild coins or flooz, although this is limited to twice a day. You can increase your maximum amount of Energy, as well as its recharge time in the Library.
- Time Limit: Self-explanatory, how long you have until the event ends.
- Rankings: Shows your individual ranking. Tapping it allows you to check the top 50 Leaderboard for individuals and Guilds. It also allows you to check your guild members’ trophy count, as well as the Leaderboard Rewards.
- Tiers: You can earn prizes depending on how many trophies you earn. Earning the required trophies for each tier immediately unlocks the rewards described in that tier.
- Tier 5: 6 Flooz, 5000-7000 GC, 2 Raid Chests
- Tier 4: 8 Flooz, 5000-7000 GC, 4 Raid Chests
- Tier 3: 10 Flooz, 5000-7000 GC, 6 Raid Chests
- Tier 2: 12 Flooz, 5000-7000 GC, 8 Raid Chests
- Tier 1: 14 Flooz, 5000-7000 GC, 10 Raid Chests
- Event Shop: You can use the rewards you earn to buy Artifacts that have special effects, as well as access the rest of the Shop.
- Event Pack: You can spend $$Cash Money$$ to get materials, chests and flooz.
- Raid Boss Progression Bar: This progress bar shows how many bosses you and your guild mates need to defeat to have the Raid Boss show up. Once you defeat 3 bosses of any level, the Raid Boss appears. The progress bar will be replaced by the Raid Boss as well as the usual stats that show up. These will be explained below. Once the Boss is defeated, the progress bar will appear again.
Boss Cards
Details about the Boss. You can see the following information.
- Raid Boss Difficulty: Change the perceived level of the Raid Boss. You can choose between the current level, 70% of the level and 40% of the level. While this may reduce the difficulty of the boss, it also reduces the amount of trophies you can receive.
- Boss Level and Name: The leve xxl as well as the name of the boss. The level of the boss is equal to the amount of points you will get when you finish attacking it.
- Timer: How long the boss will stick around for. Try to defeat it before this timer runs out, or at least stay alive for the entire duration.
- Profile Picture: The picture the boss uses for his Facebook profile. Tapping this will reveal information that can help you gauge the toughness of the Bosses.
- Boss Info: Gives information about the boss, such as their weaknesses to classes.
- Difficulty: How difficult this boss is. The level is related to how many stages you can clear relying only on Artifacts.
- Health: The boss’ max health, as well as their remaining health as a percentage.
- Damage Boost: How much of a damage boost you will get when you attempt to attack the boss. This number goes up by 140% for every 100 energy you use to attack the boss. You also gain a 40% DMG boost anytime someone in your guild attacks the boss. Using 300 Energy does not give more damage boost.
- Ally Attacking: This pops up when a guild mate is attacking the boss. You might want to wait until they finish so that you can start attacking another boss if they defeat it.
- Rewards: The rewards you will get for attacking the boss. Left to right is most likely to least likely. I have only ever gotten flooz once or twice.
- Battle: Spend 100 Energy to attack the boss.
- 5x DMG: Spend 300 energy to multiply your heroes attack, health, and defence by 5. You will get points equivalent to fighting the bosses 3 times, and also receive rewards equivalent to your energy usage.
- Search for a boss: You can spend 100 Energy to look for another boss to fight. The level of the boss is entirely random, but cannot spawn a Raid Boss.
- Star Fever: A 2000% DMG boost applied to anyone who attacks the boss within the 30 minutes of it being active. The Leader and Captains of the guild have the ability to activate this after building up the required points for it. To get points towards this you have to fight the bosses: 4 points for 3 starring the boss, 3 points for 2 stars, 2 points for 1 star, 1 point for 0 stars. You need a total of 1000 points to be able to activate it and it can be activated multiple times during an event. For the best outcome of using Star Fever be sure to coordinate with your guild members so as many as possible can attack during it.
So that’s the low down on the events page. What actually happens when you attack a boss?
Attacking a Boss
So you’re attacking the boss. Here are some things you need to be aware of.
- The Time Limit: You have 45 seconds to do as much damage as you can. This is a lot less than the 2 minutes you get for dungeon bosses. Things are quick, so you need to have the right tools for the job, namely…
- Ultimates: You need to decide on what ultimates to bring in to the fight. While wave ultimates are certainly powerful, you can only use them once. Will having an ultimate that is less powerful, but can be used twice do more damage to the boss? Some ultimates can also be used to stun the boss and interrupt attacks.
- Your Hero Levels: As mentioned above, Gold level and Prism level doesn’t matter when attacking raid bosses. The only thing that really matters is your heroes Evolution (star) level, artifacts, and runes. Having artifacts and runes that buff up your heroes, especially the ones who are most effective against the boss’ elemental type, will increase your damage output immensely.
- Hero Class: Bosses are not only weak to certain elements, but also to specific classes. You can check weaknesses by tapping on their picture.
So you’ve attacked the boss. What do you get?
- Time Spent on Boss: How much of your available time did you use to attack the boss. If all of your heroes die, then battle is finished. This is then translated into stars, which determine how many points you earn for fighting the boss.
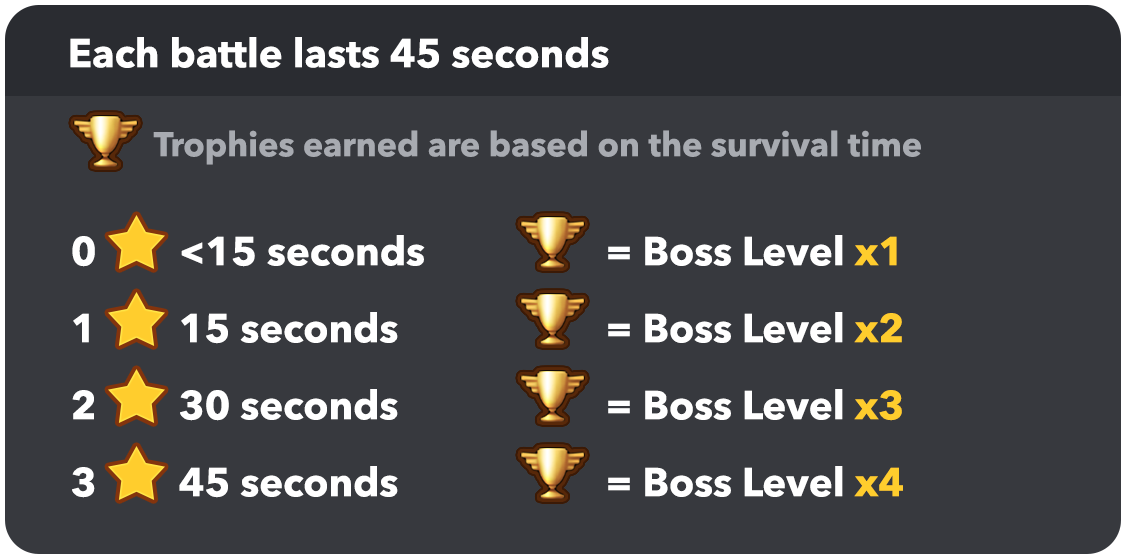
- * If you use 300 Energy you will receive three times the trophies, as if you attacked the Boss three times. You get triple the rewards for a 300 Energy attack.
- Damage Overview: This shows how much damage you did the boss in a percentage. It also shows you how much of a damage buff you will receive the next time you attack the boss.
- Rewards: What rewards you received for attacking the boss.
- Hero Damage Overview: Just like the dungeon bosses, this shows how much damage your heroes have done to the boss.
The Bosses
There are currently 5 Raid Bosses and 10 Sub-Bosses in the various Raid Events. Each event will have one particular Raid Boss (Frostwing, Astrolab, Undead Samurai, Mad King, or Gun Lord) while Sub-Bosses will spawn automatically or via Searching (Sand Claw, Kraken, Odin, Valkan Bot, Beetle, Light Mech, Fire Gorge, Deep Sea King, Haunted Head, Voodoo Tank). This section will detail the class bonuses and percentages for each boss. This information will be linked on the side panel in the form of an image as well.
Kraken
- Knight 200%
- Samurai 100%
- Brawler 100%
- Barbarian 100%
Odin
- Ranger 400%
- Gunner 200%
- Flyer 100%
Sand Claw
- Lancer 400%
- Samurai 200%
- Knight 100%
Valkan Bot
- Gunner 400%
- Magician 200%
- Flyer 200%
Beetle
- Magician 400%
- Ranger 200%
- Rogue 100%
Deep Sea King
- Lancer 400%
- Ranger 200%
- Brawler 100%
Light Mech
- Magician 400%
- Brawler 200%
- Flyer 100%
Voodoo Tank
- Fighter 400%
- Rogue 200%
- Barbarian 100%
Fire Gorge
- Samurai 400%
- Rogue 200%
- Flyer 100%
Haunted Head
- Ranger 400%
- Barbarian 200%
- Gunner 100%
FrostWing
- Magician 400%
- Gunner 100%
- Ranger 100%
- Flyer 100%
Astrolab
- Gunner 400%
- Ranger 100%
- Flyer 100%
Undead Samurai
- Knight 400%
- Barbarian 200%
- Samurai 100%
Mad King
- Lancer 400%
- Barbarian 200%
- Samurai 100%
Gun Lord
- Rogue 400%
- Samurai 200%
- Magician 100%
Artifacts
Artifacts, after Prisms, are one of the most important things used to make your heroes stronger and give you an easier time progressing through the game. You can currently have a maximum of 22 Artifact slots.
Artifacts are important because they give you an edge in certain areas. Some give you a buff to your heroes Attack, Defence, and Health stat. Others reduce the production time in your Village or increase Gold earned. Some are special, increasing Prisms earned or increasing offline progression speed. They are also one of the only two factors that determine your damage output when going up against Raid Bosses.
Artifact Table (WIP)
Here is a table (work in progress) listing the different Artifacts in the game.
* Name: The name of the Artifact, as well as if it’s from a Raid Event.
* Stars: The number of stars. The more stars means it’s more powerful, but will cost more to buy and upgrade. The Stars have the following max levels:
- * 1 = 15
- * 2 = 20
- * 3 = 25
- * 4 = 30
- * 5 = 35
- * 6 = 40
* Description: A description of the effects the Artifact has on your heroes, your village etc.
* Materials Needed: The materials you will need to buy the Artifact.
* Effect Increase: How much stronger the Artifact gets per level up.
* Upgrade Cost: The upgrade cost goes up every time the Artifact is levelled up.
* 1 = 5, 10, 15, 20…
* 2 = 150, 300, 450, 600…
* 3 = 15K, 30K, 45K, 60K…
* 4 = 200K, 400K, 600K, 800K…
* 5 = 40M, 80M, 120M, 160M…
* Total Cost: The total amount of materials needed for the Artifact to reach it’s max level.
* 1 = 535
* 2 = 28.8K
* 3 = 4.53M
* 4 = 87.4M
* 5 = 23.88B
* A “?” indicates an unknown value. If you know, send me (DeKirby) a message, or comment on the Artifact Guide thread.
* Max Stats: If you want to find the max stats of a particular Artifact, multiply the effect increase number by the max level minus one, then add to the base stat. e.g. Assassin Knife Max = 240% + (13% x 19) = 487%. For a rough estimate, simply double the base stat.
Battle
Daily Dungeons
You can buy Artifacts using resources obtained from defeating Dungeon Bosses. These bosses can be fought if you have a Dungeon Ticket, which are given to you every 20 minutes for a maximum of 3 (which can be to a max of 10 with the Library). You can choose the Level of the Dungeon Boss you face once you enter, and you can retreat from the fight at any time at no cost if it’s too difficult. For every level you go up, the base reward doubles; if you face a Level 1 Boss, you get 20 resources, Level 2 you get 40, and so on.
Tap their portrait to see the recommended Prism level and the minimum number of heroes at a certain Prism level needed to fight the Boss. The types of Bosses you can face changes each day on a routine, each boss comes around three times a week.
- Monday: Black Rock (Fire), Dark Knight (Dark)
- Tuesday: Gorilla King (Earth), Radiant Knight (Light)
- Wednesday: Click Claw (Water), Black Rock
- Thursday: Gorilla King, Radiant Knight
- Friday: Click Claw, Dark Knight
- Saturday: Black Rock, Radiant Knight
- Sunday: Click Claw, Gorilla King, Dark Knight.
Blitz
To be added
Expeditions
Expeditions are where you get your resources to increase your heroes power. These resources will go towards your hero evolutions/awakenings and weapons/runes. There are a total of 17 different resources you can get from completing expeditions. These are the element gems, class relics, hero medals, flooz, rune chisels, rune dust, common weapon catalysts, rune chests, and magic medals. There are normal expeditions which will always reward 1 resources of element gems or class relics, with a chance to get a secondary reward of flooz, hero medals, rune dust, rune chisels, or common weapon catalysts. Rare expeditions will appear after completing 5 normal expeditions, which will reward you upon completion, rune dust, common weapon catalysts, or rune chests. Each day you will receive a rare expedition that will reward you a magic medal as well as some rune dust. To complete this rare magic medal expedition you will need a specific hero. Whenever you’ve collected your desired amount of a particular gem or relic, there’s a refresh button at the bottom center of the screen you’ll need to use in order to rotate what gems and relics you can obtain. Before doing this be sure to have any expeditions you want to keep running. If you refresh with any expeditions not running they will be replaced for normal expeditions, or removed for rare expeditions. There will be more detailed information added here at a later date.
Arena
Battles and Leagues
Arena is a PVP mode where you battle against other players. Who you fight in that league is chosen at random. You gain 100-300 trophies depending on who you fight. You can fight up to 6 people for free per day. This refreshes at the daily reset time every day. There are a total of 16 leagues presently in the game beginning at Beginner 1 going all the way up to Diamond 3. The higher the league the more difficult the players you’ll face. There are a total of 6 rounds, with 1 day off on Monday of each week. During the last day of arena there’s no moving between leagues, however, you’ll still want to battle for your daily Star Shards and Arena Coins. Each week there is a class bonus where a specific hero class will gain a 300% bonus to their stats, using this bonus will be very beneficial to winning your arena battles.
Star Shards
The main reason for using Arena is to gain Star Shards, which is a necessary resource for awakening your heroes. You gain Star Shards at the end of the arena period, as well as each day you fight in the arena. The amount of Star Shards you receive is related to which league you are in. At the end of the week you’ll gain many more Star Shards than the daily Star Shard rewards. You’ll always receive Star Shards no matter which league you are in so long as you’re actively fighting in arena.
Arena Shop and Coins
The Arena Shop is a shop where you can purchase 6 different items. To get the arena coins required to buy anything in this shop you’ll have to participate in the arena. Each fight you win you’ll gain some arena coins, as well as each day. The 6 items available to purchase are 5 medals for Monki King, 5 medals for Dark Hunter, 5 medals for Luka, 2x prism bonus, Art Stone T5, Art Stone T4. Buying medals for Monki King through the arena shop is the only way to get him originally. Once you buy your first 5 medals though, you can start receiving medals for him through any fire dungeons you complete. The Art Stone T4 and T5 you will not see until you unlock them.
Hero Basic Guide
A guide for all the heroes of the game! These heroes come from all over the place, with many from Godzi Lab’s previous games.
Hero Tab Overview
Here’s an overview of the “Heroes” tab:
- Heroes Tab: Shows all of your heroes in your team. Here you can check their info or level them up.
- Level Up: Spend gold to level your heroes up. The amount of gold you need to level up your heroes increases every time you level them up.
- Manage Team: You can see your current team, your currently stashed heroes as well as their Prism and Star level. You can add or stash heroes using this screen, as well as check their info.
- Heroes Shop: Leads first to the Hero Shop. Here you can collect your free Chest of Heroes every 24 hours, open an elemental chest you may have, or purchase chests. The chests you can purchase are Fortune Chests, Premium Chests, Rune Chests, or Epic Rune Chests. You can also purchase a Legendary Chest here, however this is an end game chest that will likely take months to obtain. Tapping on the Chests will reveal what possible heroes you can obtain.
- Collection: From the Hero Shop you can see your Collection. Shows your heroes as well as heroes you have not obtained yet.
Hero Info Page
Now to check the information page of the heroes, which you can check by tapping on their profile.
- Name: …Duh
- Element: One of the five different elements: Fire, Water, Earth, Light, and Dark.
- EVO: The evolution or Star level of your hero. Heroes with higher Star levels are often stronger and have access to more abilities compared to low level heroes.
- Picture: A picture showing your hero.
- Hero Class: The specific class your hero belongs to. They are, in no particular order:
- Lancer: Lancers have a chance to stun the enemy with each attack. These heroes will be a little behind the frontline. Often have good defence, but are let down by their slow attack speed.
- Rogue: Rogues are really fast runners and can dodge attacks. Each enemy killed will also give 2x more gold. Fights right at the frontline. Usually quite fast, and can be used to clear stages quickly.
- Barbarian: Barbarians have a lot of life, and can resist knock-back effects. Fights right at the frontline. Has high base stats, but is often slow and struggles to reach the frontline.
- Ranger: Archers are good at shooting distant or flying enemies. They will critically hit all flying enemies. Can hit from far away, and their multi-hit has the potential to have infinite range.
- Flyer: This hero flies above the ground and can only be damaged by ranged or flying enemies. Flies above enemies and can hit from quite far away.
- Gunner: Gunners can pierce anything and will ignore the DEF of the enemy. Slightly ahead of Rangers, but behind the rest of the frontline. Bomb type Gunners can do Area of Effect damage, and Pistol type Gunners have the ability to shoot at infinite range.
- Support: Support heroes are really good at protecting or healing the team. Make sure to keep them alive. Stays with the Gunners. Their Shield ultimates are now highly sought after due to how Raid Events work.
- Knight: Knights have a strong shield which will take all the damage until it’s destroyed, which has 20% of the heroes total Health. Fights right at the frontline. Good overall hero.
- Fighter: Regular fighter. Fights right at the frontline.
- Magician: Magicians. Shoots spells from the backline with the Gunners and Support.
- Samurai: Samurai have a higher CTK (Critical) rate than average and will cause massive damage if their CTK hit goes through. Fights right at the frontline. Their critical attacks have the potential to do massive damage, and often move quite fast as well.
- Movement: How the hero moves
- Ground: This hero walks.
- Fly: This hero flies and can only be damaged by ranged or flying enemies.
- Rarity: How rare the hero is. The current rarities include Common, Rare, Epic, and Legendary.
- Weapon Lv: The level of your heroes weapon.
- Runes: This tells you how many runes you are using.
- Attack, Health, and Defence: The values for each stat.
- Affinity: Shows the damage modifiers against different elements or affinities.
- Prism Lv: The current Prism level of the hero.
- Prism Lv Up: Upgrade your hero using Prisms.
The Flip Side
- Flip: Flip the hero information page to reveal the back.
- Detailed Statistics: Displays the hero’s Attack, Health, Defence, Critical Rate, Critical Damage, Attack Reload Speed and Movement Speed. Orange numbers show base statistics, with the green numbers showing the effects of Artifacts, Team Buffs, and Runes.
- Skills: Not to be confused with Skills/Ultimates, these are the actions your hero can take in the field.
- Basic Attack: The basic attack of your hero.
- Special Attack: A chain attack that usually does more damage and occurs less frequently than the Basic Attack. Must be a 2 Star hero.
- Ultimate: An activated ability that must be equipped. Either offensive or defensive, and always powerful. Has a cooldown. Must be a 3 Star hero.
- Passive Ability: This can be a buff to the hero itself, a buff to heroes of the same element, a buff to all heroes, or a debuff to enemies. Must be a 4 star hero. Common heroes do not have a passive ability.
- Send to Stash: Sends the hero to the stash, basically your collection. You get 70% of the Prisms you invested into the hero unless you use a Sleep Potion or spend 25 Flooz.
- Weapon: This will take you into the weapon menu where you can upgrade your weapon and runes and bind/unbind runes from that hero. Will go into more detail in a later section.
- Awaken: This allows you to awaken that hero for a set amount of materials increasing every time you awaken it. Each awaken increases your heroes base stats by 1.5X. The materials for these can be obtained through arena and expeditions.
- Evolve: Evolve your hero to the next Star level. It takes 10 medals to obtain a hero, 20 to get 2 stars, 50 for 3 stars, 200 for 4 stars, 600 for 5 stars, 1500 for 6 stars, and 2500 for 7 stars.
What are Medals?
Medals are essentially shards of heroes that you collect to evolve your hero.
- All Hero Chests have medals for certain Heroes. Chest of Common Heroes has 10 medals for common heroes. Premium Chests have 80 medals for one rare hero and 10 medals for another rare hero. Fortune Chests have 50 medals for one common hero, 50 medals for one rare hero, 30 medals for a second rare hero, and 30 medals for an epic hero for a total of 160 medals. This chest features 4 heroes: 1 common, 2 rares, and 1 epic. You are guaranteed to get the medals of only 2 of the heroes chosen at random, however if you’re lucky you can get the medals for all the featured heroes. Crusher Chests and Blitz Chests will be covered in their respective sections.
- You can request medals for common heroes only through the guild chat every 8 hours. You have the choice of which common hero you want 10 medals for. Every Sunday you will be able to request medals for any hero except ‘featured’ heroes, these include Crushers, Blitz heroes, Thor, Monki King, and Legendary heroes
- Dungeon Bosses drop one medal every time you defeat one, until you hit dungeon level 16, then you will start receiving 2 medals. What medal you get is random, but it will belong to the same element as the boss. When you reach level 16 dungeons, you will always receive one common medal and one random medal. You can only get medals if you have the hero already (Unless they are Common, or they are Luka), and cannot get medals for max evolved heroes.
- You can buy medals from the guild shop for a Common, Rare, or Epic hero you have, which changes daily. They cost 50, 200, and 1000 Guild Coins respectively, with the price going up for every medal you buy; this also refreshes daily.
Here’s a tip: Obtaining more heroes results in more medals for other heroes which slows down the evolution process.
Runes
A detailed guide regarding Runes.
Hero Tips
- The higher the Star level of your hero, the better they are. Always aim to get at least a 3 star hero, but be aware that unless you’re lucky with the Chest of Rare Heroes, it will take a long time to get 4 stars and above.
- Aim to have at least one good hero from each element. This will help you defeat the bosses that only have weaknesses to one element.
- If you want to advance through stages quicacks by minions, as well as being able to hit flying enemies.
Table of Heroes
An explanation of all terms here:
- Heroes: The name of the heroes here.
- Element: Water, Fire, Earth, Light, and Dark.
- Class: The class the hero belongs to, described above.
- Rarity: Common, Rare, Epic, and Legendary.
- Base Attack, Base Health, and Base Defence: The base stats of the heroes. For every evolution, these stats double.
- Critical Rate: How often the hero lands a critical hit.
- Critical Damage: How much more damage the heroes critical hit deals.
- Attack Reload: How much time before each hero attack.
- Move Speed: How fast the hero moves.
- Basic Skill: The heroes basic attack.
- Special Skill: The heroes special attack that activates occasionally. Most special attacks can only target one enemy, and heroes cannot switch targets even after the first target has died.
- Ultimate Skill: The heroes activated skill, which must be equipped to be used. Often very powerful and can turn the tide of the fight.
- Team Skill: A passive ability Rare and Epic heroes have, which can affect the team or the enemy.
* Notes: Any extra notes that may be useful.
Stage Clearing Heroes – Tips
These heroes, while maybe not the strongest, excel at clearing stages quickly. These heroes have fast movement, quick attacks, or special skills to help them advance through the stages very quickly. Some heroes will be better than other depending on their star levels.
- Water heroes: Luka
- Earth heroes: Voodoo Dagger = Musashi 7 star > Sprout
- Fire heroes: Monki King > Scud > Jasmine > Xak 4 star > Tiny Dragon
- Light heroes: Hikari 4 star > One Eye > Light Knight
- Dark heroes: Kasumi > Bat