Bosses in the first levels are fairly easy to pass. But the further you go, the harder it gets. For you, here’s the Grand Chase Raid Guide, where I detail how to defeat each of the bosses, including the final stage 6-7. If you like GrandChase, but can not pass one of the raids, then this guide for you.
Grand Chase Raid Guide
Raid 01 Guide
Raid Stage: 1-1
Tips: A straight forward stage. Clear all the mobs to de-activate the barrier, where you will encounter Rose. You can rush past her and go straight for Captain Bohr at the end of the map
Raid Stage: 1-2
Tips: 3 phases of mob rush, and 1 boss phase. There are a total of 4 unit symbols, 1 at each direction. Head over to one of those symbols to deny that wave of mobs to spawn, and get certain buffs. If none is denied, the phase will spawn all 4 waves. During the boss phase, Bergamot will spawn at the bottom right. Just rush over to him and DPS him quickly to avoid fighting the other enemies
Raid Stage: 1-3
Tips: Boss fight. Relatively easy. Avoid the breath if you are unable to outheal/tank it. Recommend having 1 or 2 units with AoE to quickly kill the mobs that spawn on the left or right or both sides occasionally. If the mobs touches the boss, it will buff and heal the boss.
Raid Stage: 1-4
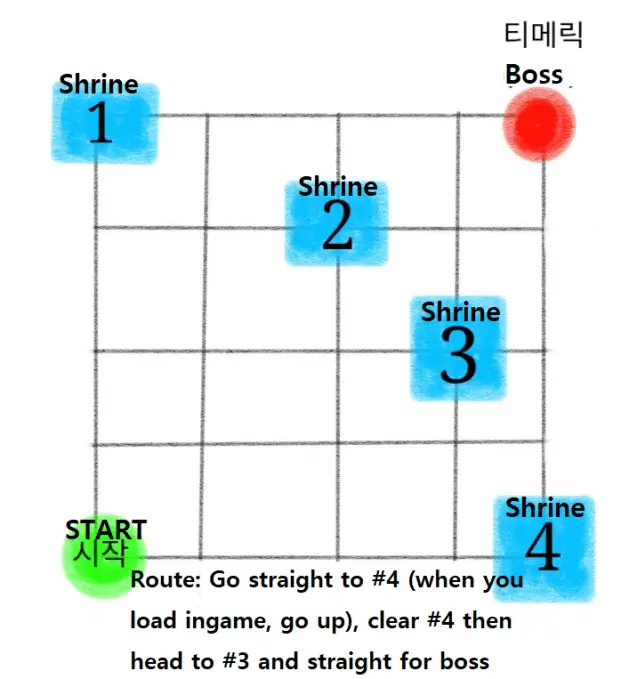
Tips: There are 4 shrines in this map, Offence, Defence, Regeneration and Cooldown. Destroying each of those shrine will weaken the boss attribute based on which shrine you destroyed. Destroying shine also raises the time limit left. If challenging 2minutes and 30seconds mission, just go via the edge and you will reach the boss at top right.
Raid Stage: 1-5
Tips: A straightforward stage. It is similar to PvP, except the player has to fight 3 phases of a PvP team in a row. If failed to kill within the time limit, Sage will help out in the fight, and she is invulnerable. Just ignore her and quickly finish up. The timer and Sage will reset for each phase.
Raid Stage: 1-6
Tips: Sort of a Tower Defense stage.Protect the 5 NPCs as they focus on gathering energy against the wave of mobs. Keep track of the NPCs health on the top of the screen. It is recommended to NOT bring a tank as the 5 NPCs will aggro most of the mobs. Bring a healer just in case, and 3 other DPS. You can ignore the goblin catapults at the top right of the map if you cannot DPS fast enough.
Raid Stage: 1-7
Tips: 3 phases of boss fight. The first boss, Poseidon, has 2 notable attacks, Laser beam and AoE Ripple on the ground. Try luring Poseidon to a corner of the map, and keep her around there, as the Ripple stays on the ground forever, which will hinder your other phases of the boss fight. You will also receive a Frost Debuff throughout the fight.
The next boss phase, Balzac, also has 2 notable attacks, Fiery Tornado, and a full map AoE Attack. Dodge the tornado when you see him charging for it, if you can’t tank or heal enough. THe Frost Debuff you got from Poseidon phase will reduce in stacks over time, and if the stacks get to a low number or gone, you will receive burn DoT, so kill this boss ASAP.
The last boss phase, Beliel, has 3 notable attacks, tornado (similar to Balzac), laser, and suction spin. Watch out for the tornado.
Raid 02 Guide
Raid Stage: 2-1
Tips:
*Recommended Unit(s): Amy / Sage for SP Generation, Lire / Lass / Rufus for (AoE) DPS, Elesis / Sieghart / Ryan for Gathering
Boss Fight with 3 Major attack patterns to lookout for:
- Charged Rush (Charged Attack)
When the boss starts charging, players will be able to see a red line (rectangle) that shows which direction the boss will be charging.
Avoid this at all cost if you have low TAP, as this deals an insane amount of DPS to your team. Boss will be stunned on wall collision - Spit Fall (Star Fall)
Boss will spit out bullets, which will fall on to the field over time. There will be light blue marks to show where it will fall, so players can easily avoid it. - Golem Creation (Summons)
2 phases of Golem Creation at around 2/3 and 1/3 of the boss HP.
The boss will initiate this skill by roaring, which will push the players’ units back, and then fly up to the sky. After a while, golems will drop down.
The 1st phase will have 6 golems, while the 2nd phase will have 8 golems.
Players will need to quickly take them out, as they will inflict a stackable debuff (Curse of the Temple Guardian) over time during the phases.
The longer the player take to finish the mobs, the more stacks of debuff will be applied.
Once the mobs are cleared, the boss will then dropped down, signified by a huge red AoE marking. Stand at the edges of the map to avoid.
*Curse of the Temple Guardian* (Debuff)
This debuff will cause a Physical Damage over Time (DoT) to all units. The more the debuff stacks, the more damage it will deal over time.
It is advisable for players to save their SP for gathering + AoE Skills prior to the Golem Creation skill to quickly take them out to prevent more debuff stacks.
Cannot be cleanse.
Raid Stage: 2-2
Tips:
*Recommended Unit(s): Lass / Olivia for debuff on Molly, Lire for 40 SP Ultimate (combined with Lass Ultimate)
2 phases of Shrine Destruction, 1 phase of Dr. Molly boss.
For the first 2 phase, players have to take out as many mobs and altars as possible.
Each of these 2 phases have 1 min and 20 seconds, and 3 Shrines.
For the last phase, Dr. Molly will spawn in with corresponding buffs of shrines standing, as well as the leftover mobs.
It is advisable to take out all mobs during the phases as they will be brought over to the next wave.
Players who have difficulty taking out shrines, should at least focus on the following:
Phase 1: Once spawn, head straight all the way to the opposite and take out that shrine. (Defence Shrine)
Phase 2: Once spawn, head to the Upper Left shrineand take it out. (Cooldown Reduction Shrine)
Taking out those shrine prevents both Dr. Molly and the mobs from having the defence and CDR buff, which will make the fight easier
*Combo Suggestion on Dr.Molly: Use Null Zone to dispel Molly’s Shield.
Follow-up with Lass Ultimate, and use Lire’s Ultimate immediately after.
Raid Stage: 2-3
Tips:
*Recommended Unit(s): Elesis for Skill Cancel, Ranged / Mage DPS units for Spore Flowers Skill
Boss Fight. This stage is Elesis’s turn to shine (or any other Skill Canceler / Stunner)
3 Major attack patterns to lookout for:
1. Secret Garden (Stun / Immobolize / Damage Over Time)
Flaune will start channeling and once channeled finish, vines will appear in an AoE of the targetted unit, and stun those in the AoE while dealing DoT.
Avoid this skill by using Skill Cancel / Stunning Flaune before he channels finish.
Players can use Cleanse party skill to temporarily avoid the effects. However, once the cleanse buff is over, the vines will immobilise units again.
Once captured by vines, players can only wait for the skill duration to be over to get out of the debuff.
2. Explosive Plant (Damage + Debuff)
A circle mark will appear on the ground to signify the exploding plant landing.
If any units were hit by it, they will receive a debuff (Poison) that can be stacked by getting hit again with another of this skill.
You can remove it with Cleanse party skill.
If no units were hit by this skill, a plant creature (same as the one from the start of battle) will spawn.
3. Spore Flowers (Summons)
Flaune will teleport to the center of the map, and summon around 6 or more Spore flowers.
These flowers will bloom in a few second, and start spitting poison at players’ units.
Recommended to take them out quickly with range attacks,
as they will explode in a melee AoE (which can be very painful against low TAP)
*Poison* (Debuff)
Units affected by this debuff will have reduced Healing Received and takes Additional Damage from Flaune’s skills.
Can be cleanse.
Raid Stage: 2-4
Tips: *Recommended Unit(s): Amy for SP Generation + Heal, Tank + Gatherer, 2 AoE DPS units
An annoying and fustrating stage. There will be a total of 4 blocks of platforms.
Each platform will have a target to defeat within a time limit.
Once the countdown of time limit is finished, or if the target is destroyed within the time limit,
a Large Starfall will prepare to fall, and players will have to quickly move to the next Block to avoid being destroyed with the platform.
Fail to do so, and it’s DEFEAT.
1st Block: 1 minute to destroy the barrier with mobs and 2 different patterns of Star Fall.
2nd Block: 1 minute to destroy the barrier with mobs and 3 different patterns of Star Fall
3rd Block: 1 minute to destroy the barrier with mobs and 5 different patterns of Star Fall
4th Block: 2 minutes 30 seconds to defeat Briel. Briel will revive 2 times.
1st Briel: The Star Falls will be on the upper left.
2nd Briel: The Star Falls will be on the bottom right.
3rd Briel: NO Star Falls, but mobs will spawn in.
Keep avoiding the Star Falls, while gathering mobs and using AoE DPS to quickly take them out along with the barrier.
Leftover mobs can either perish along with the platform, or follow you to the next platform.
Read through Briel’s Skill Descriptions to be prepared for his fight.
Raid Stage: 2-5
Tips:
*Recommended Unit(s): Ronan for easier mechanic dodge (Invulnerable Skill)
Lire for Single-Target DPS, and 40 SP Ultimate (combined with Lass Ultimate)
Endless Growth
2 Phases of Boss Fight.
Phase 1: Gaian + 6 Golem mobs. Defeat all to progress to phase 2.
For the 6 golem mobs, they will spawn in 1 by 1 over time.
It is recommended to seperate them up when you defeat them if you don’t have Ronan, as they turn into blockable rubbles useful in Phase 2.
*If the player has Ronan in the lineup, just defeat them together for easier clear.
Phase 2: Fallen Gaian
4 Major Attack patterns:
1. Death Claws (6-Linear Directional Claw Wave)
If units are hit by the sharks, players will receive a stackable debuff (Hand of the Fallen) for each unit hit.
It is always recommended to avoid being hit by this attack because of the debuff.
The rubble will have flashing mark to signify the Sharks spawning from that rubble, thus it is easy to avoid.
2. Shockwave (Homing)
Gaian teleports to the center, and sends a homing shockwave to the players’ units.
If units are hit by the shockwave, players will receive a stackable debuff (Hand of the Fallen) for each unit hit.
It is always recommended to avoid being hit by this attack because of the debuff, and the final shock deals a burst of damage.
Easily avoid this skill by moving your units behind the rubble facing Gaian. The rubble will be destroyed if blocked successfully.
This is why it is recommended to seperate when defeating the golems in Phase 1, since the AoE of the shockwave is big enough to waste 2 or more rubbles.
*Alternatively, run away from the shockwave and use Ronan’s Invincibility right before the shockwave hits the players’ units for easier mechanic dodge.
3. Death Claws Stampede (Half-map AoE Claw Wave)
At around 3/5 or 3/4 of Dark Gaian’s HP, the Death Claws will upgrade to this attack pattern.
If units are hit by the sharks, players will receive a stackable debuff (Hand of the Fallen) for each unit hit.
It is always recommended to avoid being hit by this attack because of the debuff.
There will be red markings to signify the start of this attack, and able to easily dodge as well.
4. Rage Mode (Below 1/4 HP Activation)
Player units will start receiving a stackable debuff (Curse of the Fallen) over time.
Quickly DPS down Gaian as players will take a huge DoT with the debuff, as well as faster attack frequencies.
*Hand of the Fallen*
Each stack received will increase the Magic Damage taken from Gaian’s Skill by 1% (A 100 stack = 100% increased damage)
Cannot be cleanse.
*Curse of the Fallen*
This debuff will cause a Magical Damage over Time (DoT) to all units. The more the debuff stacks, the more damage it will deal over time.
It is advisable to throw out their Burst DPS Ultimate once Gaian enters Rage Mode.
Cannot be cleanse.
Raid 05 Guide
Raid Stage: 5-1
Tips:
Recommended Units: A balance of Magic and Physical unit Ghost Passengers (Ghosts in purple robes) receive lesser physical damage.
The Train Crew (Wearing the uniform) receive lesser magic damage.
Bounty hunters have no damage reduction.
Overall a simple but long stage, Hyde herself is a pushover.
Raid Stage: 5-2
Tips:
Recommended Units: Ranged units; best would be Arme and Rufus, Mari is viable without summoning Kormet, Ley is terribad
The shaman will summon clones. The shaman receives damage whenever the clones are attacked.
There will be an AoE marked by a red circle surrounding the shaman and the clones.
Units within the AoE will have their life sucked and the shaman will regain HP.
The shaman follows this attacking pattern:
Creating a circle that snares the party > Disappear > Teleport to a unit and leave a clone at where it was previously
Initially, the clones will not move, while the shaman will be able to.
Use Lime’s Glory when the shaman binds the party so that you can prepare to move when the shaman teleports.
Not long after summoning ~ 3 clones, there will be a warning.
The shaman will not move while the clones will be moving towards a specific unit that will be marked.
This will be a good time to get the clones to gather so that it will be easier to attack them all together.
At the end of the gathering, a ‘Underworld’s Touch’ stack will be acquired, which reduces the party’s healing received.
The process will repeat until you defeat the shaman.
Having patience is key to this stage.
Raid Stage: 5-3
Tips: The trains will start coming 40 seconds after the start of the stage.
When the train is coming, there will be a guideline.
Trains will ply at a higher frequency the longer the stage goes.
Try to avoid getting anyone (including enemies) into the train’s path because not only will your units receive high damage,
units run over by the train will be banished from the stage for a while, wasting time.
The Guilty Seven will start coming in waves after each completed wave.
The order follows: Yulia/Fabian > Vega/Altair > BF/Carnello > Kav
Whenever the Guilty Seven members appear, a ‘Fall of Guilty Seven’ stack will be acquired.
Guilty Seven members will receive 7% more damage per stack.
While that makes them easier to clear, be careful of the cannons that will spawn on the left and right of the stage per wave.
Raid Stage: 5-4
Tips:
Recommended Units: Lime, Ronan, Asin
The same damage reduction from 5-1 applies to the mobs here.
In addition, there will be space debris that will fly in periodically.
It will be marked with a guideline, and try to avoid it because it can stun, wasting time.
There are 5 cars of mobs to clear making this a long and irritating stage but use them to gain SP for your ultimates.
Rufus as the boss has some new tricks in this stage.
He do a Bullet Time-esque move with 2 Final Shots fired diagonally from him.
He can also jump backwards and fire normal bullets, and charge right up to a unit and attack with Nether Blade.
Final Shot and Make It Rain will be in their LB forms.
However, Wolf Seal is not in its LB form so it is cleansable.
The most dangerous move Rufus has is his ultimate that he will activate every minute from the moment the boss stage starts.
With Wolf Seal 1.5x multiplier, it will hurt and will most likely kill your archers and mages.
If you’re not confident that you’ll survive Expunge, try to use Lime’s Glory before the ulti so that Wolf Seal will not proc mid ulti.
Alternatively, you can use Ronan’s Magic Guard to grant invincibility to the party, or Asin’s Obliteration to reduce damage dealt.
Raid Stage: 5-5
Tips:
Recommended Units: Ranged units; Ley not advised due to summons dying
A blast from the past – it’s time to fight the train’s engine again.
The engine can reveal its arms to push units away.
It can also send a fireball to a designated area.
The most potent move it has is to send explosions to the area in front of it. Best to avoid it.
The conductor cannot be killed, but he will be be unable to do anything for a while when his HP drops to 0.
There’ll be a timer before the mechanics come.
When the mechanics come, TRY to kill the mechanics before they reach the engine.
Whenever a mechanic reaches the engine, the engine will recover HP, and will gain a stack that strengthens it.
Raid Stage: 5-6
Tips:
Recommended Units:
Guilty Seven returns, now in their transformed forms.
They’ll receive their transformation passives throughout the entire stage.
Every 50 seconds (40 in Challenge), Guilty Seven will gather to perform their sentai-esque ultimate Guilty Buster.
Regardless of where you are in the stage, you’ll definitely be attacked by the beam.
In addition, any fallen members will be revived during Guilty Buster with ~15% of their HP restored.
As such, you have to kill them all together.
However, after each Guilty Buster, Guilty Seven will be immobilized and unable to act.
They’ll also acquire a stack of ‘Fall of Guilty Seven’, the same as it is in 5-3.
Use that time to burst down asap.
Raid Stage: 5-7
Tips:
Recomended Units: Assault units, Rufus, Asin, Ronan
Randy has 3 phases; his normal self, Demon Randy, and Beast Randy. KoG really proves that their middle name is Sadist with this stage
In the first phase, Randy will summon 2 different kinds of clones.
Randy will summon a set of clones (4 for Story, 6 for Normal, 12 for Challenge) around him in the center of the stage.
You’ll have 20 seconds to kill the clones, and there will be a timer on the UI. These clones receive lesser magic damage.
Asin’s Obliteration range is large enough to debuff all of the clones, should they be overwhelming for the party.
Randy will absorb the clones after the timer finishes, reducing damage that he’ll receive and reducing the party’s healing received.
He’ll summon those clones twice during the first phase upon reaching certain HP thresholds.
The second kind of clones he’ll summon cannot be killed.
When he is about to summon those clones, there’ll be a marker tracking a unit.
The clone will be summoned at that position.
It is best to space them out so that you’ll not get hit from them, and for a gimmick during Beast Randy.
When the clone is about to attack, there will be a guideline showing its range.
Upon getting hit, depending on the color of the shot, you’ll receive a stack that increases physical or magic damage received.
There will be a total of 4 of such clones summoned one at a time upon reaching certain HP thresholds.
In the second phase, Randy will transform into a demon.
Randy is capable of these attacks:
- Randy will summon bats and push the party back.
- Randy will transform his arm into a demonic creature and snap at the party, stunning them.
- Randy will mark an area surrounding the party, and a Prickle Gash like move will emerge.
Attacks will be cancelled and summons will be eliminated.
In this form, he will deal magic damage, so beware of the blue stacks attained from the unkillable clones.
In addition, Randy will summon the clones with a timer similar to his normal form 3 times at certain HP thresholds
In the final phase, Randy will be in his beast form.
Randy is capable of these attacks:
- Randy will mark an area and lunge at the area, creating spikes upon landing. The spikes cancel attacks and eliminate summons.
- Randy will mark a unit. He will charge at the unit dealing high damage. However, you can lead him to one of the unkillable clones. Upon striking the clone, Randy will be stunned for some time.
- At certain HP thresholds, Randy will roar, dealing high damage to the party if they are in range. It is best to use Ronan’s Magic Guard to tank the roar if you cannot get out of range in time. Asin’s Obliteration will also reduce damage to a manageable level if too many red stacks are attained.
In Normal and Challenge mode, upon roaring Randy will summon 1 (Normal) or 2 (Challenge) clones of Beast Randy.
Beast Randy is the most powerful among the 3 phases.
He’ll deal physical damage in this phase, so watch out for the red stacks.
Raid 06 Guide
Raid Stage: 6-1
Tips:
A very standard dungeon style raid stage, clear two zones of mobs before facing Yoanna and the faux ‘Zeros’.
Similar to her boss stage at 18-9, Yoanna will summon stars that has several effects depending on the color.
She will also be accompanied with 3 other ‘Zeros’, who are similar to their boss stage at 16-9.
The catch is, Yoanna will be protected with a barrier that will only be disabled when the ‘Zeros’ are incapacitated.
They will be reactivated after a certain amount of time, however the amount of HP they’ll have when revived is negligible.
Simply clear the ‘Zeros’ whenever they revive and continue hammering away.
Raid Stage: 6-2
Tips:
The journey to the boss zone is pretty simple – clear the mobs spawned.
The boss, Kazeaze(!) has several attacks at her arsenal.
Fire Tornadoes: 2 tornadoes will be unleashed, damaging units in their path.
Scars of Thunder: Lightning will be summoned at random across the map. Units will receive more damage when struck.
Hell’s Swamp: Upon reaching a certain HP threshold, Kazeaze will generate a shield at random intervals.
If the shield is not removed in time, an area will be set on fire, damaging units within it.
Do not stay at one spot for too long when Kazeaze starts spawning Hell’s Swamp.
Too many spawns stacking on top of each other can be dangerous, when accounting for the damage received debuff.
However, Kazeaze helps with spacing out. If the unit with the highest attack is some distance away from her, she will teleport to them.
Raid Stage: 6-3
Tips:
Recommended Units: Lime, Lupus, Lire, Serdin, Elesis, Kanavan, Edel
The Librarian will summon wedges periodically, granting several effects to it.
There are 4 different colors: Red, Yellow, Blue and Purple.
Red: Strengthens the Librarian’s attacks
Yellow: Deal damage to party over time
Blue:Heals and protects the Librarian
Purple: Weakens party’s defenses
Note that the more wedges there are on the field, the more potent the effects will be.
Attacking the wedges will not do any damage to the Librarian.
While the Librarian does not do much damage on its own, it is the wedges that will make it a threat.
It can also release a flash of light that stuns.
The Librarian will create a blast if its casting is not disrupted.
It can be difficult to see the casting bar depending on the position of the units on the map.
However, the Librarian will have a purple outline while casting, which makes it easy to identify when it is casting.
Thankfully, the Librarian is rooted to one spot so Lire can use [Enhanced] Rain Arrow without concern.
Trivia: The wedges are named after the six realms of Samsara.
Red: Asura Yellow: Hell Blue: Heaven Purple: Preta
Raid Stage: 6-4
Tips:
Recommended Units: Elesis, Kanavan, Lupus, Serdin, Veigas, Zero, Ronan, Asin
There will be 3 zones to clear before getting to Tristan.
A timer will be running at every zone, and when the timer goes to 0, debris will fall onto the stage.
The location of where the debris will fall with be marked, and it will do high damage if it falls on a unit.
Upon reaching the last zone, there will be groups of mobs to handle before actually reaching Tristan.
Don’t be fooled – Tristan can actually snipe units despite being at the end of the zone.
It is advised to bring a tank for this stage as Tristan will target the unit with the highest attack.
It is most likely a guarantee that the unit will be killed in one shot if the unit marked is an archer or mage.
Raid Stage: 6-5
Tips:
Recommended Units: Ronan
Finally a challenging Raid stage in a long while.
Edna will start the stage by marking an area.
After a while, she will crash into the center of the area, and all units within the radius will be dragged in.
The final hit of the flurry of attacks will stun the unit.
Invulnerability and continuous cleanse will be able to prevent the unit from being dragged in.
If units are near Edna after the flurry of attacks, she will spin in a certain direction.
Units (plus summons) attacked by that attack will generate ‘Gale of Edna’ stacks, which will increase her movement and attack speed.
While it is difficult to determine the direction she will attack, be careful not to get too much of those stacks.
All of her attacks will be sped up, making it difficult to react to if the stacks are at a high amount.
Edna will occasionally drop a sword at a unit, dealing high damage and drawing them in.
Units around the sword will have their movement speed reduced.
The sword will also explode after a while, dealing high damage.
It is best to move away immediately after the sword lands.
The last notable attack she has is a three-strike charge.
Edna will mark a unit, and then charge towards them.
The attack will then repeat twice.
Units attacked will stagger, preventing them from moving.
It is highly likely that they will not be able to evade subsequent charges due to the stagger and proximity of the charges.
For each hit from this attack (hits to summons included), a ‘Rage of Edna’ stack will be generated.
It increases Edna’s damage dealt depending on the amount generated.
This is the most crucial attack to evade due to the stacks involved.
At times, Edna will create a seal.
While the seal is in effect, Edna will receive lesser damage.
Do not waste any skills or ultimates during this time.
About Duel at the center of the stage –
Stay away from him.
Units will be knocked back and silenced upon contact, and also receive high damage.
Raid Stage: 6-6
Tips:
Recommended Units: Elesis, Lire, Kanavan, Serdin, Veigas, Zero, Asin, Ronan
Nelia will be accompanied with Haggler, who will charge at a high speed.
Units that are attacked by the charge will be stunned, and he hits as hard as his 22-9 counterpart when the shields are off.
Players can either move out of the charge which will be marked, or tank it with continuous cleanse or immunity.
When the stage begins, Nelia will have a shield and a blue aura.
The shield can only be broken by either physical or magic damage depending on the color of the aura.
Blue: Physical Red: Magic
If the shield is not broken in time, Nelia will attack the party with a blast and gain stacks according to the number of units attacked.
Each stack will increase her damage dealt.
After a certain amount of time, Nelia will teleport to the center of the stage and summon 6 bats around her.
A specific bat will be casting, and must be interrupted.
Failure to do so will reduce the amount of damage Nelia will receive, and each unit will have a bat hovering above the unit.
The bat will eventually explode, dealing an absurd amount of damage. It is a guranteed instant kill at this point.
The lesser HP Nelia has, more bats will be casting whenever they are summoned.
At the last 10% of HP remanining, Nelia will summon 3 bats that will be casting.
Players can either burst her down, or use a combination of skills to cancel the casting.
Raid Stage: 6-7
Tips:
Recommended Units: Elesis, Lupus, Kanavan, Lire, Serdin, Mari, Veigas
For the last Raid stage, Pluton seems relatively simple.
Pluton will have a counter above him.
When the counter is empty, the subsequent attack will stun the unit attacked.
Upon reaching certain HP thresholds, Pluton will teleport to the center and be invulnerable while he summons the cards.
Depending on the color of the card summoned, the soldiers that he will summon will NOT receive a specific type of damage.
Blue: Magic Red: Physical
As such, bringing a Mage unit is recommended in this stage.
Solely relying on Serdin to deal with the red card summons will take too much time, distracting units from focusing on Pluton.
During this time, seals will be randomly summoned across the map.
If the seals are broken by the debris, Pluton will receive 2 stacks that increases the magic damage he deals.
It also reduces healing received for the party.
However, if a unit is standing below the debris, the unit will receive high damage, and prevent stacks from being generated.
Seals will be continuously summoned until one of these conditions are fulfilled:
- All summoned soldiers are cleared
- Pluton’s HP reaching the threshold where he will summon clones
Pluton will summon clones of himself upon reaching certain HP thresholds.
The seals will be broken regardless of a unit taking the hit, and units near the seals will receive damage.
Upon the seal breaking, a clone will emerge.
Clear the clones before they reach Pluton.
If they get to Pluton, they will act like the main Pluton, and will be able to stun units with their attacks.
When Pluton has 20% of his HP left, clones of himself will rush down in a line.
The path where the clones will be summoned will be marked on the field.
These summons will most likely instant kill any unit except Tanks when they come into contact.
Pluton will also deal significantly more damage during this phase.
Seals will also be summoned during this phase, so it is best to finish Pluton off asap.
If these tips helped you pass at least one raid boss, then share this grand chase raid guide with your friends.