What is King’s Raid?
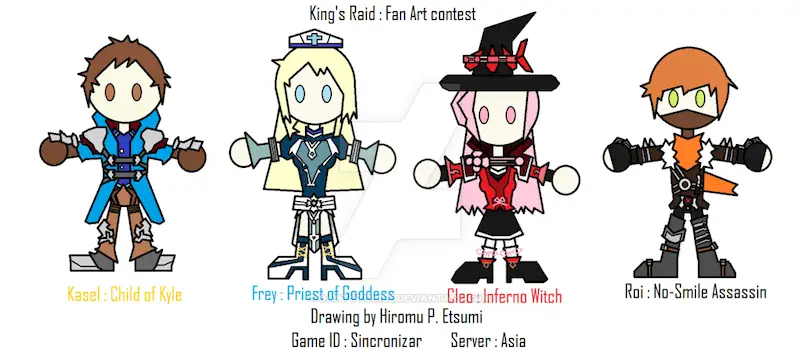
Waifu simulator. Husbando collector. Epis/Maria/Reina bewb physics simulator. Okay I’ll stop LOL. At its core, King’s Raid is a Korean RPG game developed by Vespa released in February of 2017. KR (short for King’s Raid) is a game where you develop a core team of four heroes by constantly farming for gear and fragments (evolution material) to awaken (evolve) them so that they could become stronger and stronger. In terms of the game’s mechanics, it revolves around a “Semi-manual” battle system, where your characters auto-attack enemies automatically while you input specific skills to use at certain times in the battle. I will go in-depth about the battle system later in the guide. The plot focuses on Kasel, your cookie-cutter protagonist Squire, Frey, some priest training under the guidance of the Goddess Lua, Cleo, EXPLOOOOOSIONNN (Konosuba reference for you anime people out there), the fire mage in training, and Cleo’s protector Roi, some edgy dank assassin who you’ll learn more about later in the game (Don’t want to spoil the plot). These four go on a journey throughout the lands of Orvelia with the the purpose of purging this “darkness” that has begun to plague the country, causing demons to invade, plunder, and pillage nearby settlements. Throughout their journey, they exchange in surprisingly very joyful and comedic banter (seriously, don’t skip the dialogue), experience dramatic moments of loss and grief, and meet the various races of Orvelia, ranging from Goblins and Centaurs, to the Orcs and the Undead.
First of all
- FIRSTLY, open settings, click on your Profile Avatar in the top left corner (If you’re just beginning the game, it should be a picture of Kasel. In here, you can change your Profile Avatar with the portraits of the Heroes and costumes you have acquired to your liking. You can also change your SFX settings, allowing you to play the game on mute while listening to your own music. One important thing to take away from the settings is to TURN OFF SKILL ANIMATIONS. You can do so by opening settings -> Game Options -> -Below the blue “Manage Block List” button there is a section called “Skill Camera”- -> CHECK THE BOX THAT SAYS “OFF.” Yes, it is definitely cool having a zoom up shot of your character casting their skills. However, once you reach Chapter 4 in Story Mode (In King’s Raid, it is more commonly known as Adventure Mode, or the PvE Mode for short), these animations will become a hindrance. Trust me on this.
- In the top right hand corner, click on the “calendar” like thing (it literally says “Calendar” below the icon) to open the Calendar. The calendar is actually a fairly useful tool. It shows you the Server Time, which allows you to match the server time with your local time. In addition, the Calendar, through the use of various symbols, also lets you know of the multitude of events that go on throughout the week. Make sure to always take advantage of events if you can, for they are never harmful and only beneficial to your progression.
- A bit of a side note, if you’re looking up information, I’d advise not to use the King’s Raid Wiki. It’s rampant with errors and misinformation, not to mention it’s barely kept up to pace with the game itself, so it’s both outdated and misinformed. Let’s make sure you aren’t!
Beginner’s Guide
- Tutorial
- Kasel, Frey, Cleo, and Roi
- Rubies: Beginner TRAPS
- Rubies: Efficient Spending
- Adventure Mode
- Orvel
Tutorial
Please, for the love of Lua, DO NOT skip tutorial. If you are familiar to these type of games, then ok, maybe skip some of the dialogue, but if you are new, I highly recommend not skipping it. Go through all the dialogue, you’ll be surprised how flushed out the story is for this mobile game. Not only is the plot line pretty interesting, there are a lot of game mechanics, gear upgrade information, skill upgrade information, etc. that the game explains. Although it may seem confusing at first, you’ll slowly grasp a better understanding of the information provided as you progress through the game (or you can read the entirety of this guide! ^_^)
Kasel, Frey, Cleo, and Roi
These are the first four Heroes that you gain access to in the game. They are more than capable of carrying you in Adventure Mode Chapters 1 & 2, maybe even the entire game (it has happened!). I would even recommend in awakening them to 3* or 4* to complete Chapter 3 Hard mode. However, they are not the most optimal to carry you into end game.
Rubies: Beginner TRAPS — DO NOT BUY
Rubies are the premium currency in this game. They are very useful and most definitely should not be wasted. Unless you are planning on becoming a Whale, The following are a few Beginner Ruby Spending Traps that you should definitely be wary of:

- DO NOT spend rubies on Heroes. YES I ADMIT it’s tempting to get New Heroes. Nevertheless, there are much better ways of getting Heroes, such as Hero’s Inn and Events where Vespa passes out free Hero Selector tickets. In addition to the four Heroes that you start out with, Vespa also gives you three more Heroes. I will go into depth about Hero Selector tickets later and the three additional Heroes later.
- DO NOT buy costumes. They are purely cosmetic. Yes, they give a boost in Gold or Experience, but they are not that significant compared to the Gold and Exp boosts provided by Vespa, such as Hot Time and Gold/Exp Scrolls. This is, of course, you’re playing to a casual T, in which case ignore this sentiment!
- A second exception is when costumes go on sale, or whether or not you’re willing to play P2P, in which case costumes may actually be a really great asset to you! Those boosts you get for Gold and XP stack, and even when you’re not wearing the costume, you still get the buffs, so you can get somewhere to around 100% increase to XP and/or Gold!
- DO NOT buy gold. Absolutely, DO NOT buy gold. I cannot stress this enough. You get gold so easily in this game, spending hard earned rubies on gold is like throwing money down the toilet. If you’re going to spend rubies on gold, you might as well quit this game. As much as Vespa would like you to give them money, I’m pretty sure they would rather you donate the money you would spend on King’s Raid to some Charity. Jokes aside, spending rubies on gold is wasteful and almost disgusting. Just don’t do it. Also also, you will hit some walls in terms of your gold, which is when this tip comes in strongest, no matter how lackluster you are with gold, there are ways to gain back your resources. For example, the Ancient Royal Vault and the Central Orvel current event, with the Abandoned Desert Gold Box, where you can auto for gold, it’s absurd!
- DO NOT buy “Summon Special Items x1 OR x10” in the Special Shop. Although there is a chance of getting a UW or UT, the chances of getting one is super slim (1% and for the 1x and 10x, and 3% for the 11th bonus pull for a 10x). And sometimes, you might end up getting an Artifact, which is another rare item you can equip onto your character that provides some bonus effect. Although good, the UW is still preferable. I would only buy if you are higher up in the P2P level or if you’re a whale. To show you how abysmal the rates are for a UW, this video shows a YouTuber Twin Fails (username checks out LOL) doing a 100k Ruby Pull. The video is a bit dated, but it still proves a point. However, there is about one exception to this, and it’s when there is an Event running where they increase the chance for either UWs or UTs, mostly by doubling the chances. Still not preferable, but if you’re sitting on an absolute chest full of rubies (somewhere around the 20k range?), you can give it a shot.
- DO NOT buy stamina potions. You essentially get them for free from Daily Quests, Lunch Hot Time, and Guild Shop. Also, stamina refreshes really quickly in this game at a rate of 1 stamina/min, which increases as your level up your team.
Rubies: Efficient Spending
So what are the most efficient way to spend rubies as a F2P/light-moderate P2P?
- Loot Boosters within select stages (Conquest & Upper Dungeon)
- Gear Reforges
Loot Boosters are great for getting more XP Bottles from Conquests, and also getting more Fragments from Upper Dungeons, but it’s preferable to use them strictly for the hardest one you can attempt.
Adventure Mode Guide
The bread and butter of the PvE experience in King’s Raid, topped with a pretty decent story. This is where you’ll be spending most of your time in the early game, grinding for Exp, Heroic Purple Gears, and later on in Chapter 6 Hard Mode, Red Gears. Please note that this is a Beginner’s guide, so I will mostly be covering the early to mid-game. Hell mode will only be briefly mentioned and elaborated.
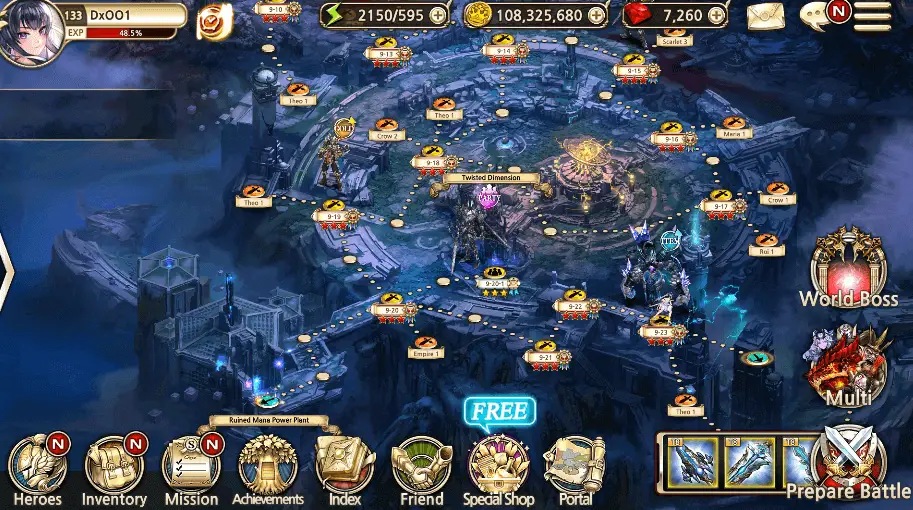
In Adventure Mode, the first thing you’ll notice is that your character is standing on this “circular, yellow shaped things.” To make it easier for me, let’s refer to these things as “nodes.” Each node gives you a lot of information, as broken down as follows:
- Amount of Stars – Represent how “cleanly” you were able to beat the level. If all three stars light up, you were able to beat it with no Heroes dying. If two stars light up, you were able to beat it with just one hero dying. If only one star lights up, two or more of your Heroes died. And finally, if there are no stars, you obviously haven’t beaten it.
- Color of Stars – Represents the level of difficulty you were able to complete the Node with. Silver stars = Easy Mode; Gold/Yellow Stars = Normal Mode; Red Stars = Hard Mode; Purple Stars = Hell Mode. This is also indicated by the medal placed right next to your stars.
As mentioned in the Color of Stars, there exists 4 difficulty levels per chapter: Easy, Normal, Hard, and Hell, respective to difficulty. You are able to unlock the next level of difficulty by clearing that specific node’s previous difficulty with three stars (no Heroes dying) e.g. beating 1-1 easy “perfectly” unlocks 1-1 normal (Keep in mind that I will be using #a – #b – #c more often now, #a being the Chapter, #b being the level, and #c being the sublevel) Notice how I said “specific node.” This is because you do not need to clear all of Chapter 1’s Easy Mode to unlock the first node for Chapter 1 Normal Mode. You only need to clear 1-1 Easy perfectly to unlock 1-1 Normal. This may be somewhat helpful later on in the game when you are stuck on Sub-bosses on a certain difficulty, but you team is strong enough to tackle higher difficulty nodes of lower levels e.g can’t beat 1-21 Normal, but can beat 1-1 Hard, so you can progress in Hard to farm more experience to tackle 1-21 Normal in the future.
Another thing that I highly recommend is to clear all of the difficulties, except for Hell, of a certain chapter BEFORE moving on to the next chapter. Although it isn’t necessary, I highly advise it for it forces you to slow down and grind a little. It makes your progression in the long run a bit more smooth, and allows you to pace yourself. Not to mention clearing all the difficulties grants you Difficulty Clear rewards, especially Chapter 1 Normal where you are given a 2-star hero selector (more on this later). The rewards can be obtained by tapping the Difficulty Icon below your Profile Portrait on the Adventure Mode map. It should have some #1 / #2 , with #1 being the amount of nodes you have cleared with that difficulty and #2 being the total number of nodes you need to clear before getting the Difficulty Clear reward. Hell mode, however, is different; it is unlocked for Ch. 1 – 6 when you complete Hard Mode 6-21.
Another reason for clearing all of the difficulties before moving onto the next chapter is because of Quest Rewards. Below the Difficulty Clear Reward Icon, there should be another icon below it that is labeled with a huge exclamation mark running down the diameter of the circle, labeled as “QUEST” near the bottom. Those are the Quest Rewards that you can obtain by performing various things during each chapter. These Quest rewards are pretty useful in the early stages of the game, but slowly become more of a burden to complete it later on. Rewards include equipment of varying rarity and awakening, gold, skill books, fragments, magic powder, and many other good stuff. The reason why it becomes a burden later on in the game because it forces you to do Arena (which is sort of a pain), Stockade, Orvel Castle, and Upper Dungeons during times that you don’t necessarily want to be doing them (Will elaborate what all of these are later, just bear with me). Sometimes, you just want to get Stockade done during the beginning of the day, so you don’t need to worry about them later on during the day, but the quests would sometimes tell you to do Stockade, but if you’ve already done them for the day, you have to wait until the next day to do them. For Orvel Castle and Upper Dungeons, there are specific times during the day that you want to be doing these dungeons, and sometimes, the Quests specifies which Upper Dungeons that you have to do, which is sometimes a pain because you do not need that specific fragment. Anyway, this tangent was mainly to tell you to do Quests if you can, but don’t go out of your way to do them.
Also notice that on some nodes in each chapter, there are these big “monsters” that are standing on top of it. Those are your Sub-bosses or the Final boss of the chapter, with Sub-bosses being in the middle nodes of the chapter and the Final boss, to no surprise, on the last node of the chapter (usually node 21 or 22). These nodes take up more stamina, and are significantly harder, and have more “rounds.” Usually there are two or three rounds in your average node, but these boss nodes contain usually four rounds. Also, when progressing through a chapter during your first time, you are essentially undergoing STORY mode. Story mode is basically easy mode (and it counts as easy mode completion); however, it could potentially contain more rounds and more DIFFICULT enemies.
Orvel
As with most games, King’s Raid immediately plunges you into battle with Adventure Mode. But I want to give a quick mention to Orvel. Before you go into Adventure Mode stage 1-1, you’ll notice there is a castle-like structure in the previous node, known as Orvel. Once you beat a few stages in adventure mode, you’ll be able to access it. Orvel is basically a player town/hub where you can access many of the daily farming dungeons, along with the Hero’s Inn, Arena, Forge, Guild, Stockade, Central Shop, Central Orvel, and Orvel Castle. I will elaborate more on these later in sections Progression and Events, Socials, and Dailies
Best Team Composition
- What is Meta or Tier List?
- King’s Raid Meta
- Team Framework
- Classes
- Magic Team vs Physical Team
- Magic Team
- Physical Team
- Balanced Team
This is probably the most important part of the guide. Most questions that I see on forums are “Is my team good?” “Help me with my team build!” “Who should I build next” “Help me I’m a dumb whale who has money but no brains!” Well, this is the section you are looking for. Once again, I want to emphasize that this guide is focused more on the PvE aspects of the game, considering the meta for PvP shifts more drastically that that of PvE.
What is Heroes Meta?
I probably should’ve placed this in section General Knowledge, but I feel like most people would just skip that section and come directly here. Having a strong understanding of “Meta” is very important in these type of games, so I believe defining Meta deserves its own subsection.
Abbreviation of Most Effective Tactic Available. Mostly used when comparing tactics in a game, but can be used in other things as well. It can change over time as new tactics are explored or can change by a change in the rules of a game or availability of new resources… In computer games this is done by patching to balance the game or fix bugs.
I want to stress that this is a GAME. You don’t have to follow a meta, you can play the game however you like, and don’t let anybody tell you how YOU should ENJOY a game. Everyone enjoys the same game differently, like I implied in the beginning of the introduction. However, if you are reading this guide, I’m pretty sure you are in the camp of “I want to follow the meta,” so please, read on!
King’s Raid Hero Guide
King’s Raid Tier List currently consists of teams that contain the same type of damage, either physical damage or magic damage. The reason for this is to take advantage of the “synergy” that can be created in team compositions. As a result, full magic teams or full physical teams are favored over “balanced” teams, which contain both magic and physical (there are some exceptions, but very few). Magic teams overall are favored over physical teams due to the current mid-end game content that is available (Chapter six and beyond, Raids, World Boss).
TO EXPLAIN: Alright, I just want to elaborate for the sake of simplicity, the information provided above is really superficial and simplistic, but to TL;DR an explanation, the synergy being referred to here is normally referring to buffs and CC structure within the game. For example Hero X has an amplifier for Magic Dmg (will be referring to amplifier as amps), however Hero Y does Physical Dmg, making him inapplicable for the amp. If you have issues to similar to this, chances are the “synergy” of your team is slightly skewed.
Team Framework
Before I go further in elaborating on the specific physical and magic teams, I want to first provide a general overview of what the meta team framework is right now in raids. Please once again keep in mind that this is a Beginner’s Guide, I fully understand that is is possible to run teams of different frameworks later on in the game e.g. no healer, 3 DPS, 1 Tank team comps. However, I would argue that those frameworks are not reliable in early stages of the game, and will only put a strain on a beginner’s resources (in particular fragments) to build wider, more diversified team compositions to combat other type of content. Anyway, the current Meta team framework is modeled as follows:
Support -> DPS -> SubDPS -> Tank
- The Support, usually a healer, makes sure your team is healthy and able to survive prolonged fights by providing heals and buffs e.g. Frey, Laias, Kaulah.
- The DPS is the one who dishes out the most damage, but is one of the squishiest (easiest to die) on the team e.g. Selene, Nyx, Aisha, Luna.
- The SubDPS can also dish out damage, but just not as well as your Main DPS. The SubDPS is also the one who is usually in charge of CC and sometimes buffing your main DPS’s damage e.g. Maria, Pavel, Dimael, Priscilla.
- The Tank is your team’s frontline. The job of the tank is to soak up all the damage so that your DPS and SubDPS can continue doing their job. Usually if a tank dies, the rest of the team is screwed. Tanks usually provide CC and have skills that can amplify their team’s damage or defense e.g. Clause, Phillop, Jane, Morrah.
Classes
As you may have noticed, all Heroes fall under a certain category or class. There are currently seven different classes in King’s Raid (the roles that they usually fill are listed to the right):
- Knight
- Warrior
- Assassin
- Archer
- Mechanic
- Wizard
- Priest
As of a patch in early October 2017, a new world boss Protianus was introduced. This WB happens to be weaker to Physical damage than Magic damage. As a result, Physical teams are beginning to become more comparable to Magic teams. Do realize however that World Boss is end game content, so the argument that Magic teams are better than Physical teams in the early to mid stages of the game still stands.
Best Magic Team List
The following is a sample magic team that is often run for PvE:
(Note that for all the compositions that I will be listing out, I will list them out in the same framework that was mentioned previously)
Frey -> Epis -> Maria -> Jane
Please note that the support is the most flexible spot, followed by the SubDPS. But I’m just going to use Frey for now because she is given out for free to everyone.
Let’s break down how the team works. The entire team does magic damage. Epis is able to dish out amazing damage with S1 w/ Def ignore, and increase magic dmg with S2. Frey is able to use S2 to shield the entire team, but most importantly to provide CC immunity to Maria so that she would not be CC’d out of her own CC cast durations. Maria can use S3 to bring all the enemy mobs close together, allowing Epis S2 to have minimal movement in between targets (potentially hitting many targets at the same time), thereby increasing DPS. Additionally, Maria can use S1 to push enemies away to protect Aisha, or S2 to amplify magic damage. And finally Jane S2 amplifies magic damage on all enemy targets, making her a staple to magic teams. She is also able to sustain herself with S3 and use S1 whenever to disrupt enemies. Once again, I want to stress, that, in particular at end game, there are many more teams that can be just as viable. But this is a Beginner’s Guide, so those of you with your Annette and Viska just CHILL.
Best Physical Team List
The following is a sample Physical team that can run in PvE:
Mediana -> Selene -> Miruru -> Clause
To make this guide a slight bit shorter, you can check out this link, where the user Rashar explains his reasoning behind this build. I personally agree with it, and used it myself, and it definitely works. Overall, he explains this comp way better than I do, so I advise you to check his comment out! The only part I disagree with is having to buy Mediana from the Special Shop, mainly because there are many other uses for those wonderful gems. Before going for the second DPS (Yanne, Mitra) you should definitely find Mediana beforehand!
In early November 2017, the hero Mediana was released, the first ever physical damage support. The previous statement still stands, however. The reason for this is because a healer’s DPS is considered irrelevant in very early-mid stages of the game.
As of September 2018, Leo joined Mediana to be the second physical damage support, which to be quite frank should’ve been where he was in the first place, but that’s tangential at this point.
Once again, I want to stress that the above is true for early-mid stages of the game, and even the beginning of late game. Once you reach late-late game (Okay I tried finding better ways in describing the stages of the game, but can’t think of anything xD), that’s when a Support’s DPS may matter. Annette and Mediana can both reach insane amounts of DPS, comparable to that of a SubDPS, and even a main DPS if geared correctly. However, if you’re reading this guide, you are probably just starting the game, so you fall in the early-mid stages of the game 🙂
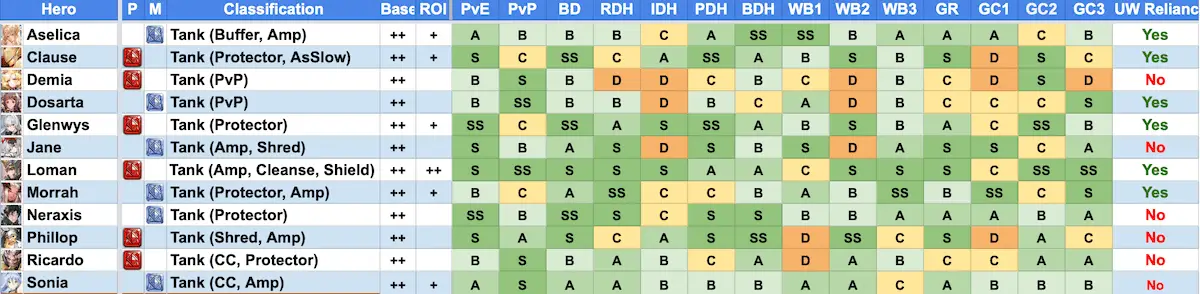
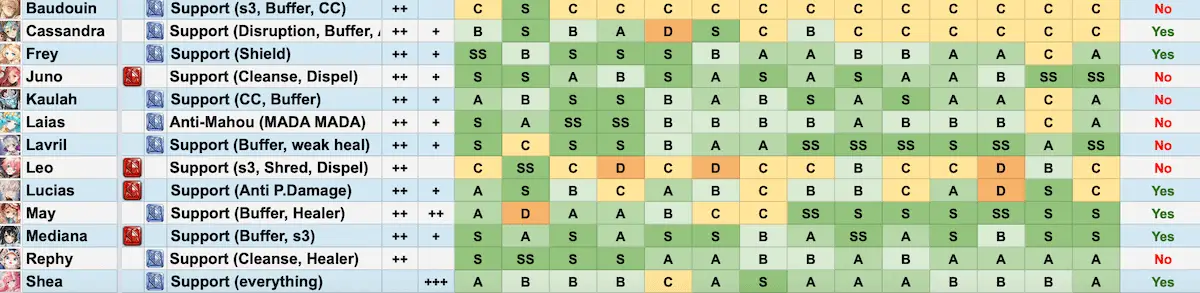
King’s Raid Tier List Meta — Best Heroes [UPDATED in 2020]
Updated 03 December 2019
This tier list of Kings Raid is based on 1*-2* UWs.Use Base and ROI as an idea how much better they do with higher investments such as 5* UWs and UTs. They DO NOT say how good a unit is but ask advise to you.
Legend
- SS: Best for their Role overall
- S: Core unit
- A: Exceptional
- B: Good
- C: Usable
- D: Bad
- F: Actually unusable
Knights
Warriors
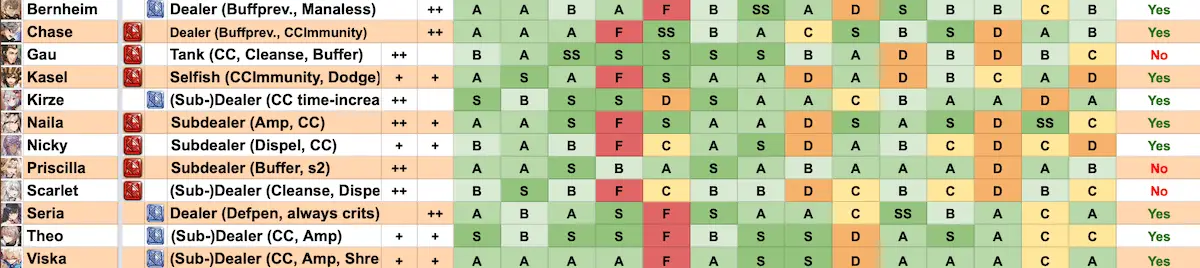
Assassins
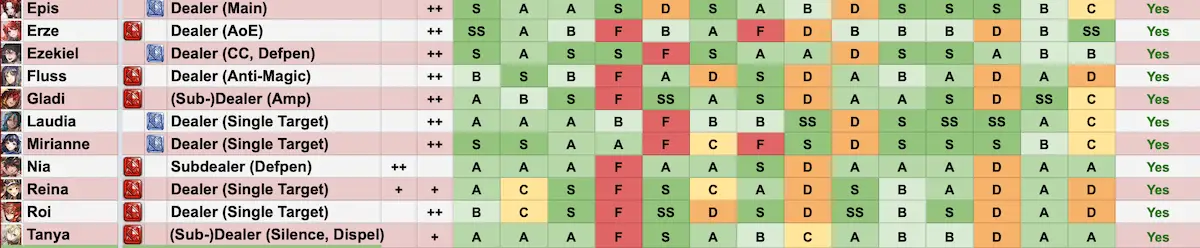
Archers

Mechanics
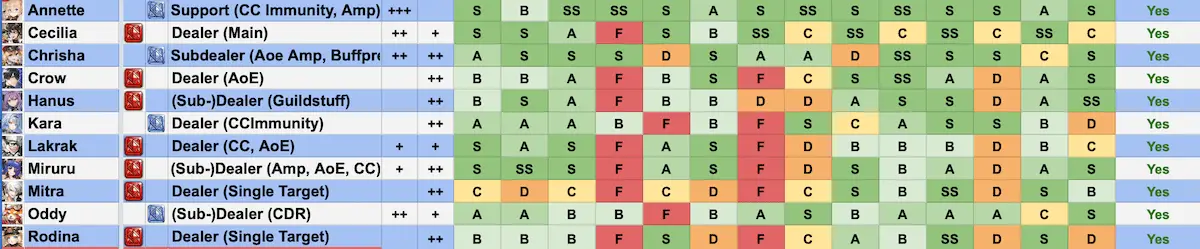
Wizards
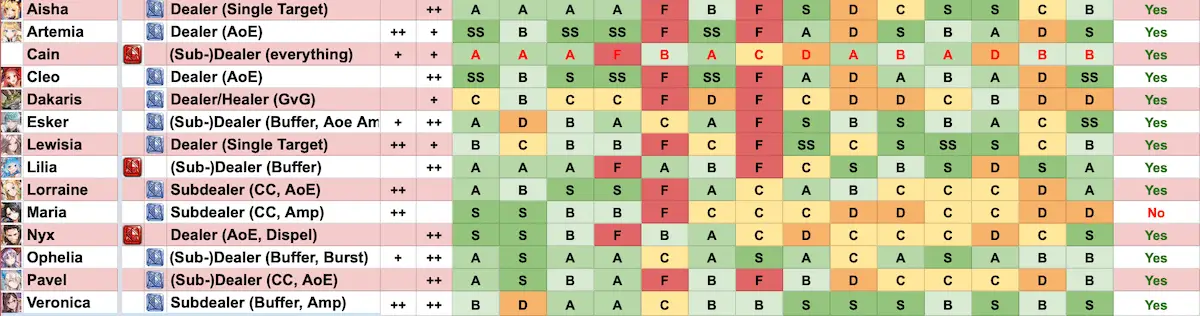
Priests
Balanced/Hybrid Team
Although balanced teams are not part of the meta right now, I still think it is fairly important to go over them, because it does have its uses in the early game. I personally ran a balanced team until I reached Chapter 6 easy, so my experience is basically proof that balanced teams CAN work, and in fact, is in some sense more advantageous, that is, until you reach chapter 6. The reasons for this is because of enemies with Physical immune, and enemies with Magic immune. You’ll run into some of these enemies in the early chapters, but they only become a nuisance when you reach around Chapter 5. In Chapter 5, in the later nodes, many monsters acquire TEMPORARY magic immunity, meaning, they take no magic damage. As a result, if you were running a full magic team, you will run into a wall, where you have to either “git gud” with the timing of your CC’s (which is pretty hard ngl) or you can grind and over-gear yourself for the content, which of course, takes time. Then why not just go with a physical team? The reason for this is because of Physical immune monsters that you encounter earlier than Chapter 5. And in Chapter 6 and 7, there also exists physical immune monsters. And the problem with these monsters is that they are *PERMANENTLY* physical immune, not temporarily immune. As a result, if you were running a full physical team, you will literally be unable to kill a physical immune ghost spider halfway through a stage… which is kind of sad when you think about it.
Now, because the monsters in Chapter 5 are temporarily magic immune, some people argue that is still more viable to run full Magic teams than run a Balanced team. This is true, as shown by this video by the YouTuber LeonZai.
However, if you were to skip to near the end of the video (3:46), you will see him showcase his equips. His team is running fully enhanced Heroic (purples) and somewhat awakened, and some red armor. However, the most important thing to notice are his weapons. All four of his characters in his team have their UWs. UW damage scaling is INSANE. Essentially, he was able to beat the node through the use of brute force and whaling, which the average person is most likely unable to do. This is why I would say balanced teams are not necessarily all bad.
PvE
- Adventure Mode Types
- Upper Dungeons
- Conquest
- Tower of Challenge
- Tower of Ordeals
- Adventure Mode Walls
- Dragon Raids
- Guild Raids
- Word Boss
Adventure Mode Types
I’ve already mentioned most of what you already need to know about adventure mode in section Getting Started, so I will just talk briefly about the other types of PvE content that you should be aware of: Upper Dungeons, Conquest, Tower of Challenge, Tower of Ordeals, and Walls.
Upper Dungeons
So how do I raise my 1-star Hero to a 2-star Hero? The answer is to use Fragments. Awakening Heroes is probably the most “grind heavy” part of the game. To awaken a hero, three different types of fragments of varying amounts are needed for different awakening levels. Before I get into the exact amounts, I’ll first introduce the seven different types of fragments (and their transcendence counterpart are called Essences):
- Justice
- Force
- Wisdom
- Strategy
- Patience
- Harmony
- Luck/Fortune
You need to farm these fragments to awaken your Heroes. Most of the “farming and grinding” is present in this part of the game. You farm these fragments in Upper Dungeons (UD). UDs are in each chapter. You may notice that the Ch. 1 UD gives three fragments, Ch. 2 gives five, Ch. 3 gives six, 4 gives seven, 5 gives eight, 6 gives ten, and 7 gives fifteen. So why is this the “grindiest” part of the game? As of a patch in early 2018, UD runs are now independent from chapter, so that means you can run UD five times for each chapter everyday! But this still doesn’t change the fact that it is still a pain in the ass due to the increasing amount of fragments needed to awaken Heroes. I will go in depth about it later.
Conquest
After you reach around the middle of Ch. 2, you’ll run into your first Conquest dungeon. These dungeons give out a lot of EXP, along with EXP potions as loot. Increasing difficulties increase the amount of EXP gained. Ch. 3 – 7 all have their respective Conquest Dungeons.Once again, as of a patch in early 2018, Vespa has not only made Conquest Dungeons independent from chapter, but also increased the number of runs from three to FIVE! I will go over the most efficient way to tackle these dungeons later.
Tower of Challenge
Also around Ch. 2, you’ll unlock the Tower of Challenge. Five tickets are handed out once you unlock ToC, and each ticket allows you to attempt one floor. One ticket is refreshed every two hours. These floors give out one time rewards of fragments, gold, rubies, and artifact pieces. By collecting 1000 pieces, you can restore an Artifact. Artifacts are valuable gear that becomes somewhat essential when you reach later stages in the game (e.g. Ch. 6). There are many different types of artifacts to the point where I can’t list them all. But by the time you get one, you should be able to comprehend what it’s able to do, for the bonuses it provides are pretty self-explanatory. Also not that artifacts can also be obtained through the Special Item Summon (Red Pulls) at a very low rate. The floors go from 1 to 75. Eventually, you’ll reach a wall. Once that happens, you want to farm the highest level floor that you can do easily to get artifact fragments, so that you could restore artifacts quicker. After you receive the first clear rewards of a floor, artifact fragments, at very low amounts, are given out for subsequent clears. ToC resets every month, allowing you to obtain the first clear rewards again.
Tower of Ordeals
Once you awaken one of your Heroes to 5-Star, you will unlock the Tower of Ordeals, ToO, in the Hall of Heroes, which is located in Ch. 1. ToO also has a similar “floor-by-floor” progression of ToC, but it you’re not allowed to play the same floor another time. You can keep moving up the floors, as long as you are able to beat the enemies of each floor. A one time rewards is given each time a new floor is cleared: Fragments, Essences, but most importantly, Fragments of Infinity are given out as rewards. By collecting 1000 fragments of Infinity, you can craft (right-most tab in Inventory) a Stone of Infinity. Crafting this infinity stone also takes 500,000 gold to craft, in addition to waiting 48 hours. It is used to transcend your Heroes, awaken them beyond 5-stars. More on this later. ToO ranges from floor 1 to 25, and resets every week, allowing you to farm the rewards again.
Adventure Mode Walls
There are a few Walls in adventure mode that I would like to point out in the early stages of the game (Ch. 5 and before):
- Jane 4-14
- Literal wall, Needs high CC to conquer
- Malduk 4-21
- Jane + Stupid Death Bomb by Malduk
- El Rosed 5-21
- Need high DPS to bypass
Dragon Raids
Unlocked when you level a Hero to 30, and is one of the end-game contents of King’s Raid. Dragon Raids are where you farm your Legendary (Yellow) gear. The thing with Legendary gear is that it can be enhanced all the way to +20, and it has an additional set effect (also present in Ancient Gear). Fire Dragon (FD) gives Crit, Ice Dragon (ID) gives HP%, Poison Dragon (PD) gives Crit Resistance, and Black Dragon (BD, the hardest Dragon Raid) gives MP Recovery/Atk. In terms of importance, they rank as follow: BD > FD > ID > PD. BD gear is used by so many Heroes in the current meta and is what everyone should farm for. FD is for Heroes who rely more on crit, and less on mana. ID can potentially be used on tanks. PD is just garbage and should be deleted from the game LOL. These set effects come at two tiers, with the first tier unlocked at having two parts of the set, and the last tier unlocked at having four parts. These dragon raids can be run solo, but the higher level dragon raids are run usually with a group. In terms of FD, a total of 6 Heroes can be brought. For BD, 9 Heroes (there is a huge difference in difficulty).
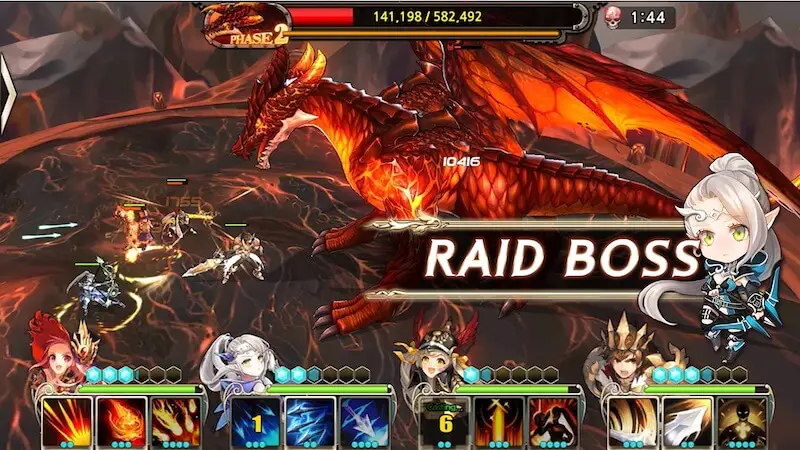
Dragons also level up. They all start at level 35, their weakest stage, and continue to level up each time you beat them. For example, if you beat the 35 FD, you can level it up to 36 by changing it in “room settings” (Only the room leader can change dragon level). Also remember that the room host is the one who determines and gains dragon levels. For example, if two people had 35 FD and ran it together, only the room host would have the FD level up to 36. Also, let’s say the room host only has FD 35, but his teammate has FD 60. The highest FD that can be attempted under that same host is still 35. Leveling dragons is important because of the different tiers of loot and amount. Increased amount of loot is given in intervals of five, until that loot is tiered up at intervals of ten. For example, 35 FD will drop T3 loot, 40 FD will drop T4 loot, but at lesser amounts. Then 45 will drop T4 loot at greater amounts, but at 50 FD, T5 loot will drop, but at lesser amounts. It’s important to at least level up your FD and BD to level 50-60, for at T5 and T6 (preferably T6) are the gear that you want to farm for end game. Doing these raids also give you Raid points. With these points, you can buy Dragon Raid gear of various tiers at the Forge.
Whenever a Dragon Raid is completed, all participants of the Raid are brought to the bid screen. You have roughly a little bit less than a minute to essentially “choose” the item you desire, or, you can choose to retract your bid by “abandoning.” This doesn’t mean you do not get loot; it just means you don’t care what loot you want to get, and you’ll end up getting the loot that people don’t bid for.
Obtaining loot is also completely random. Yes, you can bid for a particular item, but if someone else also bids for that specific item, it becomes a 50/50 chance between you and the other bidder in getting the item. This brings me to the next topic of Raid Etiquette.
Raid Etiquette is basically revolves around “who gets to bid first.” The carry should always be allowed to do first, for they are the one doing all the work. If there is no carry, the host of the Raid is next in line to bid. The host is the one who opened up the room to you, therefore they hold priority. After the host, it’s essentially fair game for the rest of the Raid members.
As mentioned before, yes, you can bid on an item that another person has bidded on. However, if that person has bid priority over you, it is considered very rude. I highly discourage you from doing so if you want the person you teamed up with to continue raiding with you.
As of the 9/22/17 Patch, Vespa added in Dragon Raid Hard Mode. This is extreme end game material and drops enchantment scrolls as loot, which is a material that is used in extreme end game to give your equipment one line of enchantment, in a way similar to gear options. Hard mode is unlocked once the level 75 dragon of that respective raid is completed e.g. defeat 75 BD to unlock hard mode BD.
Guild Raids
Guild Raids can be attempted after one joins a Guild. As a beginner, you really won’t be doing any damage to these enemies, for they are much harder than the Dragon Raids, have much more HP, and can only be done with your team of 4. However, still do these guild raids, for even if you lose, you still going free gold and guild activity points, with the latter often requested by most guilds. More on guild activity points later.
World Boss
Unlocked at once a Hero reaches level 60. Basically, don’t worry about it until you reach end game. As a beginner, you won’t be reaching Rank 50+ anytime soon, which is where the good rewards are (TONS OF RUBIES). However, still participate, for you will still be given some free rubies and this “orange prism-shaped” currency that allows you to purchase artifacts in Orvel Castle.
PvP
- Arena
- Arena Points
- Notable Heroes
- The Gold V/Plat I Sink
Arena
Arena is the PvP aspect of King’s Raid, Currently, you are only allowed to PvP in teams of four, with possible bigger teams to be released by Vespa in the future. You win by either killing the entire enemy team, having more Heroes standing than the enemy team, or having more HP than the enemy team, in that order. Winning increases you rank. You begin at Bronze I, and slowly climb up the ladder. Each League (Bronze, Silver, Gold, and so on) has five divisions. Rewards are given daily depending on which league and division you place in. You also get a one time achievement award of various amounts of rubies for achieving higher leagues. The amount of rubies and Arena points given at each league/division can be found within the game. Arena records also reset every week, and if you’re higher than Plat I, you reset to depending on your current ranking (Note: Changed to this as of a patch in 2017. Previously, all those above Plat I would reset to Plat I)
Arena Points
Arena Points are acquired daily from the rewards given out depending on your Arena ranking. The only use for Arena points is to purchase UWs from the Arena shop. All types of UWs can be purchased, granted you have 30,000 Arena points. However, UWs for newly released Heroes are not available in the Arena shop until newer Heroes are released. An exception to this are the NPC Heroes, like May and Gladi, which were released around September and October 2017. Their UWs are obtained by accumulating friendship points by giving them presents (Extreme End game/Whale content).
Notable Heroes
PvP is very different to PvE in terms of team composition. I do know of a few, but I feel like it is better to just name the Heroes that are OP and why:
- Arch – Destroys backline, Magic immunity utility.
- Baudouin – 7 Sec Shield IMMUNE TO ALL DAMAGE (Just disgusting).
- Leo – Dispel (remove all buffs) and Silence (prevents enemies from using their Skills) (Even more disgusting).
- Scarlet – Dispel and Cleanse. It’s like Gau and the trap Leo had a baby. She was a hero released 12/21/2017. Currently she is the most OP Hero in PvP with the skill set she brings. Destroys all Leos and Baudouins.
- Naila – CRAZY CC, especially with UW. Completely disrupts the backline and screws up all forms of positioning.
- Assassins, except Reina & Roi 🙁 – Since most people play King’s Raid for PvE, many of the PvE teams are vulnerable to backline divers. Assassins are especially good at this, and can simply bypass the frontline tank(s) and destroy the DPS backline.
Please note that the Meta is CONSTANTLY SHIFTING. In particularly for PvP, which is the most sensitive to meta shifts.
The Gold V / Plat I Sink
Once you get to Plat I, you will slowly start to notice that it becomes very hard to climb, especially after a weekly reset in arena. This is because of how arena resets work. Although there was a patch in around late 2017 that tried to alleviate the problem, the problem still exists, which is that those of higher divisions are reset to lower divisions, making it so that it’s difficult for those who are legitimately Plat 1 to climb the ranks. Thus, you’ll have these 4* Heroes trying to kill these T5 Heroes who don’t even need to use a Skill, and end up auto-ing you to death. It is definitely discouraging, and I call this the Gold III/Plat I Sink. There’s really nothing you can do about it, but try your best to continue doing your Daily and Weekly Quests.
Progression
- Awakening
- Transcendence
- Stockade
- Gear (Purples, Reds, and Legendaries)
- Prime Lines
- Runes
- Hot Time (Noon and before Reset)
- Conquest
- Orvel Castle
- Hero’s Inn
- Guilds
Most of the topics in Progression have already been touched on in previous sections, but I will just elaborate a little further on a few more specific points.
Awakening
As mentioned in section PvE, fragments are used to awaken your heroes. Awakening Heroes essentially increases the Hero’s level cap, allowing them to further bolster their stats by leveling up. Now, you may notice that after awakening your Kasel, it only took 5 fragments each of the 3 types listed, that isn’t too bad… right? The thing is, the number of fragments required to awaken Heroes increases as the number of stars increase. It starts out slow going from 5 fragments each, to 20, then it slowly builds up to 80, and then a whopping 280 each to raise a 4-star to a 5-star. Now, if you remember from the maximum amount of fragments you can get a day, it’s going to take you a while to farm these fragments. For example, at Ch 4. you only get 7 fragments per run. With 5 runs, the max you can get is 35. 280/35 = 8. So that means it’ll take at least eight days for you to farm a total of 280 fragments. And this is only one of the three types of fragments needed to awaken a Hero! So what is the most efficient way to farm fragments? As hinted in section Getting Started, the best way to farm fragments is to spend 500 rubies to buy a loot booster. A loot booster essentially doubles whatever loot you pick up for one hour. By popping a loot booster at the last 30 minutes before server reset, which resets the amount of runs you can do for UD, get as many runs as possible in during those 30 minutes to maximize the number of fragments you get. The first UD reset costs 100 rubies, 2nd costs 200, and 3rd costs 400. Usually people don’t go past the 3rd due to the increasing cost, and they also run out of time if they were to get more than 20 runs in (5 from original, 15 from 3 resets). By getting 20 runs during the first half hour, wait for server reset. After the server resets, you are granted another 5 runs, and the reset cost to run UD is also reset. In the remaining 30 min of your loot boost, get your next 20 runs in. If all 40 runs are done in the one hour period of a loot boost right before and after reset, one can net a total of 20*40 = 800 fragments (10 fragments are gained per run in Ch 6, with loot boost, that is increased to 20). As you can see, this greatly increases the amount of fragments that can be obtained. Do realize that with this strategy, you are only able to farm for fragments every OTHER day. This is because you take advantage of the UD runs provided for two days.
Transcendence Guide
Just when you think the fragment farming stops, it continues after 5-star. Transcendence is worse than awakening, for it takes 10 fragments to craft its respective essence. And T1 takes 30 essences, totaling to 300 fragments. Not to mention it also costs 20,000 gold per essence crafted. Also, an infinity stone, as mentioned before, costs 500,000 gold to craft, requires you to wait 48 hours, and requires 1,000 Fragments of Infinity. You can either farm these Fragments of Infinity through ToO, or you can craft them with 10 fragments each, once again, costing even more gold.
However, by transcending your Heroes, your Heroes are able to gain *transcendence perks*. T1 grants your first transcendence perk, which is the same for all Heroes: boost in Attack, HP, P. Def, or M. Def. T2 perks and so on begin to differ depending on which class the Hero belongs to. You can search up the optimal perks and combinations through the specific Hero posts that float around in this subreddit and community forums. By transcending your Hero to T1, you also raise their level cap to 80.
Stockade
Stockade is one of your main sources of skill books. Before I get into skill books, let me first explain the growth of skills.
Skills not only grow by level, as in each time your Hero levels up, you can also level up the skill by paying some gold, but it also grows by *Mastery*. Mastery maxes at the third tier, and costs and whopping 200 skill books to max; 20 to get mastery 1, 60 to get mastery 2, and finally 120 to get mastery 3.
There are 4 different tiers of skill books. I simply just call them grey, blue, green, and purple. Grey raises S1, Blue raises S2, Green S3, and purple S4 passive. What makes this part grind heavy as well is that Skill books are also different depending on class. So if you want to raise your Jane’s S1, you have to farm Knight Skill books. Warrior and Assassin skill books, even if you have a bunch, will not be usable on Jane. Skill books specific to a certain class are also only farmable during certain days of the week. A full schedule can be found on the the side of this subreddit. Additionally, stockade monsters are very annoying. Some have ridiculous HP region, some are magic/physical immune, some are completely immune to damage unless CC’d, some constantly regain health, some constantly deal damage, some permanently CC your frontline. Overall, you’ll need a strong frontline, CC Hero, Magic and Physical DPS, to be able to attempt and completely these stockade dungeons.
Gear Guide (Heroics, Ancients, Legendaries)
In adventure mode, you mostly be running into grey, green, blue, and purple gear. The only gear worth farming for is Purple/Heroic. In fact, a full set of Purple gear, awakened a few times, can easily carry you to Ch 6. It is in Ch 6. that you want to begin farming for Reds or Legendaries. The distinct thing about Reds/Ancients and Legendaries is that they have set effects. The set effects of Legendaries are preferable over that of Reds. Only the “Hysteria” Red Set effect which gives additional Attack %, can sometimes be used over Legendaries. The set effect of Legendaries have already been mentioned somewhere above in this guide.
Now you’re probably confused as to what “Awakening” means in terms of gears. You’ve probably noticed that some of the gear you have has “Stars” on it. These are awakened gears. By spending some money at the Forge, you can awaken gears by fusing the same type of gear together. For example, by fusing two of the same gear together, one disappears and the other gains one star. Then by fusing this one star gear to another one star gear of the EXACT SAME KIND, you can get it to 2-stars. The reason you do this is to raise the stat cap that the gear provides, essentially improving the gear.
If you just want to fuse safely, meaning no chance of failure, then you want to fuse items with the same amount of stars. This guarantees the fusion to be successful 100%. For example, by fusing a no star gear to a 1-star gear, this is a 50% chance of failure. Failure means that you lose the item you are trying to fuse along with the gold you spent. This failure rate increases as the difference in stars increases. Awakening also caps at 5-stars.
Gear Lines
Gear also comes with Gear options. Green gear comes with 1 line, blue with 2, purple with 3, and red and yellow with 4. In the beginning of the game, you don’t care that much about lines. As long as you have one or two lines that are good for your Hero, it should be good enough to progress to Ch. 4. But once you reach Ch 5, you want to start farming purples with at least 2-3 lines that are good for your Hero. What I mean by this is that DPS Heroes should have DPS lines, and Tank Heroes should have tank lines. Purples are also preferred over blues and yellows because their max enhancement caps at 15, and not 5 or 10. Although yellows can go up to 20, it’s not gold efficient to farm for them during this stage of the game, for they will be easily replaced later by T6 gear. I say start farming for purples in Ch. 5 because it’s a huge difference going from Ch. 5 to Ch. 6. Ch 5. Requires you to essentially have a full 5-star team to complete. Ch. 6 on the other hand, requires T1 Heroes to fully clear hard mode. Thus, farming purples to clear Ch. 6, and then using those purples to farm T6 yellows is how you should progress.
Below are some examples as to what role should aim for what type of lines, in no particular order (the one in parentheses is, however, the lowest priority). Please note that this is a “general” guide for prime lines, and different Heroes actually want different lines depending on their Skills and overall playstyle.
- Support: Attack, Crit, Crit Dmg, HP%
- DPS: Attack, Crit, Crit Dmg, Attack Speed
- SubDPS: Attack, Crit, Crit Dmg, Attack Spd
- Tank: HP%,P. Block/P. Dodge, M. Block/M. Dodge, Block, Dodge
For supports, attack and crit is prioritized for the heal amount scales off of attack and crit. For DPS and SubDPS, the lines are self-explanatory, for you want as much damage as possible. For tanks, P. Block and P. Dodge are interchangeable, depending on what type of tank you want to run/have e.g. Clause wants P. Block, Naila wants P. Dodge.
Runes
Runes are very important once you reach around chapter 6. They are very similar to gear options in the sense that they enhance your stats. However, in terms of the variations of runes, it is not as flexible as gear options.
For gear options, all gear options are available for all types of gear. For example, you have an equal chance of getting an *Attack* line on all gears, including Orbs and Accessories. However, in the case of runes, runes can only go on weapons, armor, and secondary armor, and runes can only be placed on gear that are Heroic (purple) rarity and above. Additionally, weapons, armor, and secondary armor have different runes that can be slotted into them, and they can only have one rune slotted into them at a time. Unique Weapons are the only forms of gear that can have **three** runes slotted in, and that’s another reason why UWs are so powerful.
Before I get into what runes can be slotted into what gear, let’s first classify the runes into three different categories:
- Red = Offensive (Attack, Crit, Crit Dmg, Penetration, Accuracy)
- Blue = Defensive (M. Tough, M. Block, M. Block DEF, P. Tough, P. Block, P. Dodge, etc.)
- Green = Utility (Mana Recovery/Attack, Mana Recovery/Damage, Lifesteal, Max HP%, CC Resist)
In addition to these three categories, there are also different tiers of runes, similar to gear. The runes with grey background are common, green are uncommon, blue are rare, purple are heroic, and red being ancient. The runes you want to be keeping are Heroic runes, which can be obtained through hard mode in the later chapters, and hell mode. Ancient are on tier higher than Heroic, and can only be obtained through crafting using Rune Codex (obtained from Hell mode farming and guild raid), Rune Crafting scroll (ToC and May’s General Shop), and Rune Fragments (grinding runes). The higher tier the rune, the greater the stat boosts, for example, a Heroic Attack rune gives 15% attack, whereas the ancient counterpart gives 20% Attack.
As a beginner, don’t worry about ancient runes; just save and use your heroic runes and grind the others for fragments so you can craft ancient runes in the future. I would argue to not bother using runes below rare, but if you need those extra stats to progress, feel free to attach a rune onto whatever Hero needs it.
Also note that once you attach a rune, removing the rune would be a hassle if you want to keep the rune. If you want to keep the rune, you have to pay 250 rubies so keep the rune. If you don’t, then the rune is removed and automatically destroyed. Also remember that if you grind/sell a gear with a rune on it, the rune is not returned to you and disappears along with the gear you sold/grinded with no extra reward.
As for which runes can go on which gear, you can figure that out by reading the rune description. For example, Attack runes can usually only be equipped on weapons. If you look at your attack runes, you’ll see in the description that it says Runes for Weapons. Attack runes only exists for weapons in this case. As for Crit runes it only exists for secondary armor, and can only be attached to Secondary Gear.
Now you are probably wondering what runes should I put on? There is no right answer for this, for it depends on what Hero you have and what stat it needs, but in general, DPS want DPS runes, and an example is shown below:
- Weapon: Attack
- Primary Armor: Crit Dmg
- Secondary Armor: Crit
As for SubDPS, you want something similar to what your main DPS has. As for tanks you want defensive runes (blue) and Healers, you want a mixture of DPS (Attack runes increase heal amount) and some survivability/utility.
Some staple runes that I want to point out are the utility Mana/Attack and Mana/Dmg runes. These runes are very important for your DPS and Tanks respectively. Mana/Attack runes allow your DPS to gain mana quickly, allowing them to case spells earlier (important in PvP and boosts DPS in PvE). Mana/Dmg runes increases the amount of mana you gain from taking damage. This is very important for tanks like Jane, who’s skills costs a lot of Mana.
Overall, runes are very flexible, in the sense that you can slot in what your Hero lacks, yet limiting, because certain runes can only go on certain gears.
Hot Time
As of a patch in Early 2018, Hot time no longer exists. Instead, Vespa has changed it so that you can decide when you want to begin your hot time. In the Missions -> Event Tab, you are allowed to trigger a one hour 2x Gold Boost and one hour 2x Exp Boost three times a day. You also don’t need to activate both at the same time. For example, you can activate the gold boost first, then farm for gold in the Orvel Castle. After you finish that, you can then activate your 2x EXP boost to start farming conquest. This is a HUGE quality of life improvement, so thank you Vespa for that 😀 For now, I will refer to these 2x Gold/EXP boosts from the Missions -> Event tab as Hot time boosts to differentiate them from the 1 Hour Gold/EXP boosts that you get from the special shop. This brings me to the point that hot time boosts CAN stack with 1 Hour Gold/EXP Boost and 7 Day/1 Day Gold/EXP Boost (1 day doesn’t stack with 7 day, it simply increases the length of the 7 day boost and vice versa) By stacking all these boosts together, crazy amounts of EXP and Gold can be obtained. Previously, Hot Time occurs everyday from 12:00 – 14:00 Server Time (Lunch Hot Time) and 20:00 – 23:00 Server Time (Hot Time before reset). But as explained previously, hot time no longer exists, but logging on during these times will still give you stamina potions and some fragments, which are always helpful. If you want to be an efficient raider, take advantage of these times.
Conquest
The first thing that you must take advantage with your Hot Time boosts is Conquest. Once again, Hot time can be stacked with 1 hour EXP boost and 7 Day/1 Day EXP boost. I can’t stress how important Conquests runs are, especially when you’re just starting the game. It is key to your progression.
Orvel Castle
Similar to Conquest, Orvel Castle should be run with Hot Time boosts. Orvel castle is also designed in a floor-by-floor type of scenario, in which you have to beat the previous floor to progress to the next floor. You are granted five “keys” to access Orvel Castles various floors each day, and the the higher you go, the more gold you can get. Orvel castle goes from Floor 1 to Floor 45. Once again, Hot Time boosts can be stacked with 1 hour Gold boosts and 7 Day/1 Day Gold boosts.
Hero’s Inn
Within Orvel, you can also access the Hero’s Inn. To F2P players, this is a Lua-send. In the Hero’s Inn, random Heroes show up everyday after server reset. You can decide whether or not to start a relationship with these Heroes. By doing so, you can send them gifts, gold, and amity: One Free Conversation, One gift of 60,000 gold, and one gift of 240 amity. This will net you around 50-70 relationship points a day, and in about 2-4 weeks, depending on your luck and the natural base star level of the hero (Arch is natural base 3\*, Miruru would be natural base 2\*), the Hero will join your roster! Of course, if an unwanted Hero joins your Inn, you can simply wait for server reset, and a new random Hero will join enter your inn.
Guilds
Guilds are also part of the game that you should take advantage of. Guilds provide various buffs in Atk, Defense, HP, EXP gain, Gold gain, etc, depending on the guild level. Many high level guilds usually have EXP and Gold fully maxed out, and you would be able to benefit greatly from those bonuses. However, those guilds usually have stricter application requirements, such as 1000 activity points a day and daily participation in guild raids.
Activity points are the main form of currency that guilds use to upgrade their guild skills. Activity points is simply earned by having members in the guild do Adventure Mode, Dragon Raids, Guild Raids, and the like. Whatever costs stamina will contribute to Guild Activity. A maximum of 1000 guild activity points can be accumulated a day, with a bonus (500?) from doing guild raids.
One important thing about Guilds is that you can use the guild shop to purchase stamina potions, which happen to very cheap in the guild shop. You can also buy fragments and heroic level runes, but those are lot more expensive. The general consensus is to spend guild points on the stamina potions so that you can constantly refresh your stamina to do raids and/or Adventure Mode.
Some higher leveled guilds are also able to complete Guild Raids. By completing Guild Raids, guild members can purchase Raid loot. Raid loot include various fragments, rune codex, skill books, magic powder, and manticore equipment. Spending your guild points on these would most definitely help with your progression, so joining a guild that is able to clear these guild raids would be extremely beneficial to you.
There’s also a new mode called Guild Conquest which is essentially and endgame content of sorts that pits Guilds against one another where they damage 2 bosses, whoever does the most damage wins. You can either A) Team up with 1-2 other players, with each of you able to put down a max of 3 heroes, with 7 heroes being the max amount of slots available, and the other option is B) Solo it, bringing 6 heroes, akin to World Boss, where half of them are for you to Manual, and the other 3 are for Auto. Each player in the guild gets 2 tickets, however if you go for Solo, you automatically waste both of your tickets, so think wisely about what choice you make, whether which heroes you put into GC, or who you pair with.
Also, do note that leaving a guild will impose a penalty on your account. It will restrict you from contributing to the guild for an increasing amount of time, adding every time you do it. So don’t just join random guilds for the sake of joining guilds. As a beginner, if you join a good guild, your progression can be sped up tremendously, whereas a bad guild with inactives will only be marginally beneficial.