This article will summarize the main recommendations on passing the Adventures, which should help newcomers in mastering this mode.
Adventures is a pet upgrade mode that is available from level 40 of the team. For the most successful completion of each map, you need a team of 3 people. Each player will go their own way and end up contributing significantly to the victory.
The main rules of passing
- The moves during the adventure do not replenish over time. You will have a limited number of moves, which you must schedule correctly.
- Portal Spheres – Currency to enter. Each day you get 1 orb.
- All players on the adventure take different paths, otherwise you won’t be able to gather resources for chests and there’s a chance that not all of the boosts will be taken off the boss.
- If you have circumstances that force you to leave the adventure early, this can be done through the “Log”, “Leaving the adventure”.
Map Structure
- Enemy unit – the point where enemy heroes are concentrated. Very often it will be reinforced by the Eye of the Messenger. It is necessary to destroy the Eye to remove the reinforcement.
- The Eye of the Messenger is a tower where enemy heroes are concentrated that strengthens other points and the Boss. To kill the Boss you will always need to destroy all of the Herald’s Eyes that enhance him. Visually it looks like a Tower with a beam emanating to the point it enhances.
- The Altar is the point that strengthens your team. There are always three reinforcements to choose from, but you can only choose one. From each Altar you can choose one amplification. Amplifications last until the Boss is killed.
- The Boss is an enhanced nasty hero who has enhanced abilities. He is always boosted by the Eye of the Herald, which must first be destroyed. Killing the Boss completes the adventure with a victory and allows you to open the 4th chest.
Adventure walkthrough maps
Adventure 1
Siege of Strongford
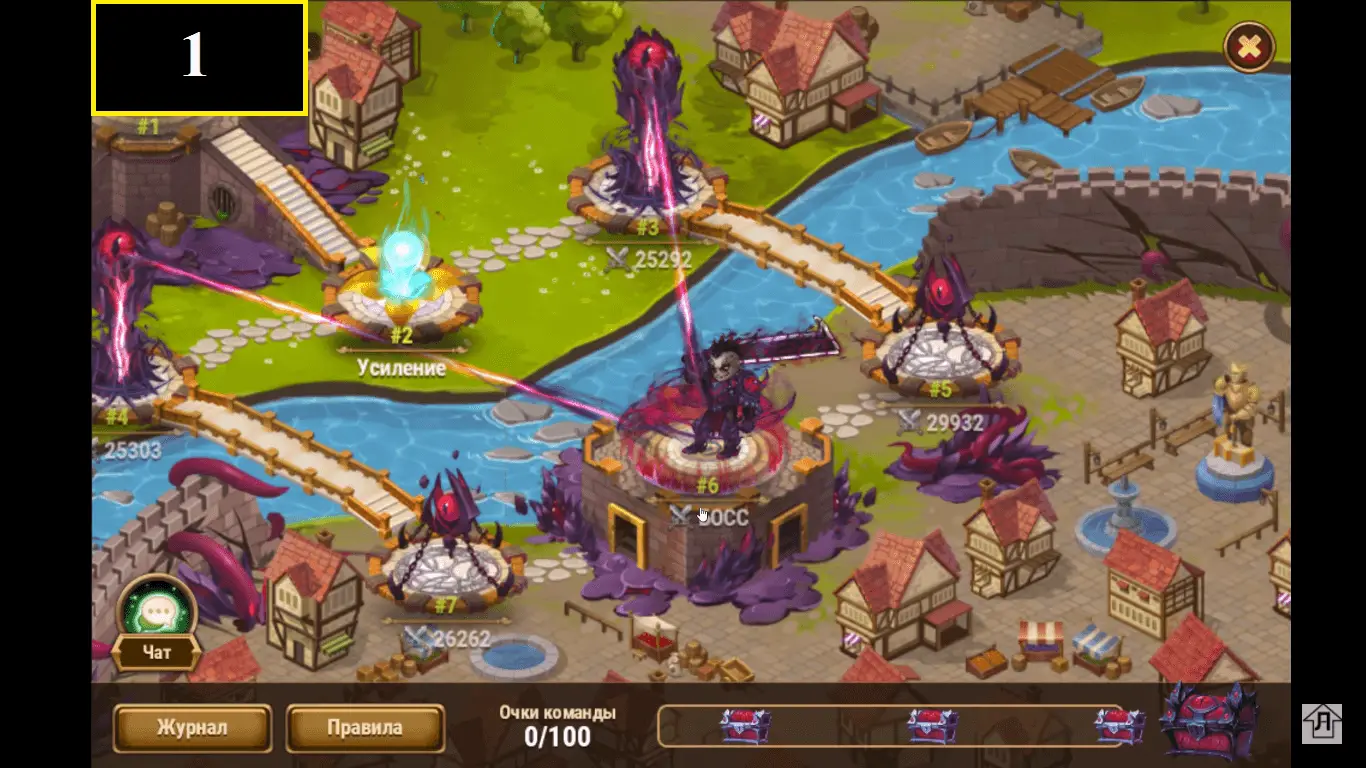
Walkthrough
1 player is #2, #3, #5.
Then waits for another player to pass on the second path to remove reinforcement from #4
Player 2 – #2, #4, #7.
After that, you can attack the boss.
Player 3 – can pass on any path, since there are only 2 paths on the first map.
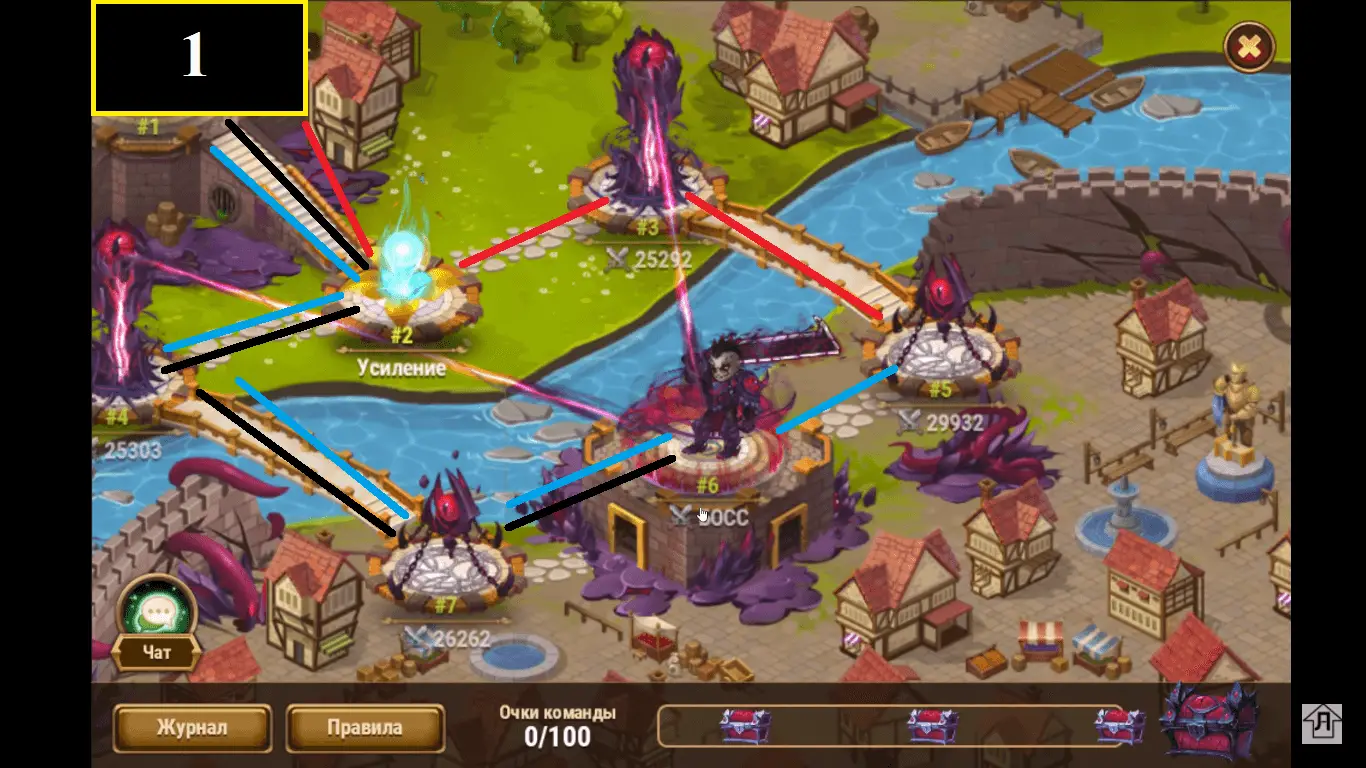
Black – second player
Blue – third player
Adventure 2
Valley of the Elements

Walkthrough
As seen on the map, Eye of the Herald #6 strengthens units #7 and #5.
1 player is #3, #6, #9.
After that, waits until the other players remove reinforcements from the boss, which are located under #8 and #10 and only then attacks the Boss.
Player 2 – #2, #5, #8, #9.
Then waits for the third player to remove the reinforcement from the Boss, which is located under and #10, and only then attacks the Boss.
Player 3 – #4, #7, #10, #9
After that, players may attack the Boss.
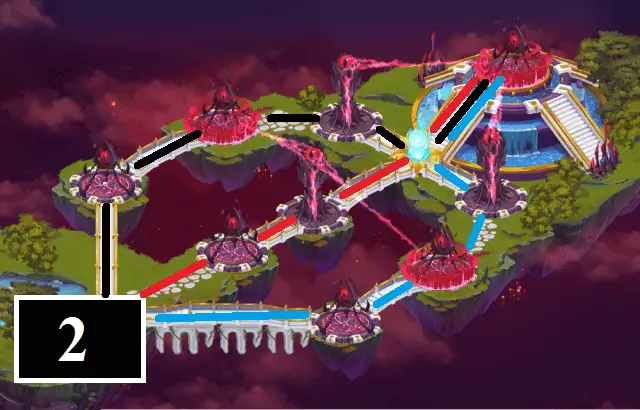
Black – second player
Blue – third player
Alternative Passage:

Black – second player
Blue – third player
Adventure 3
The Depths of Girville City
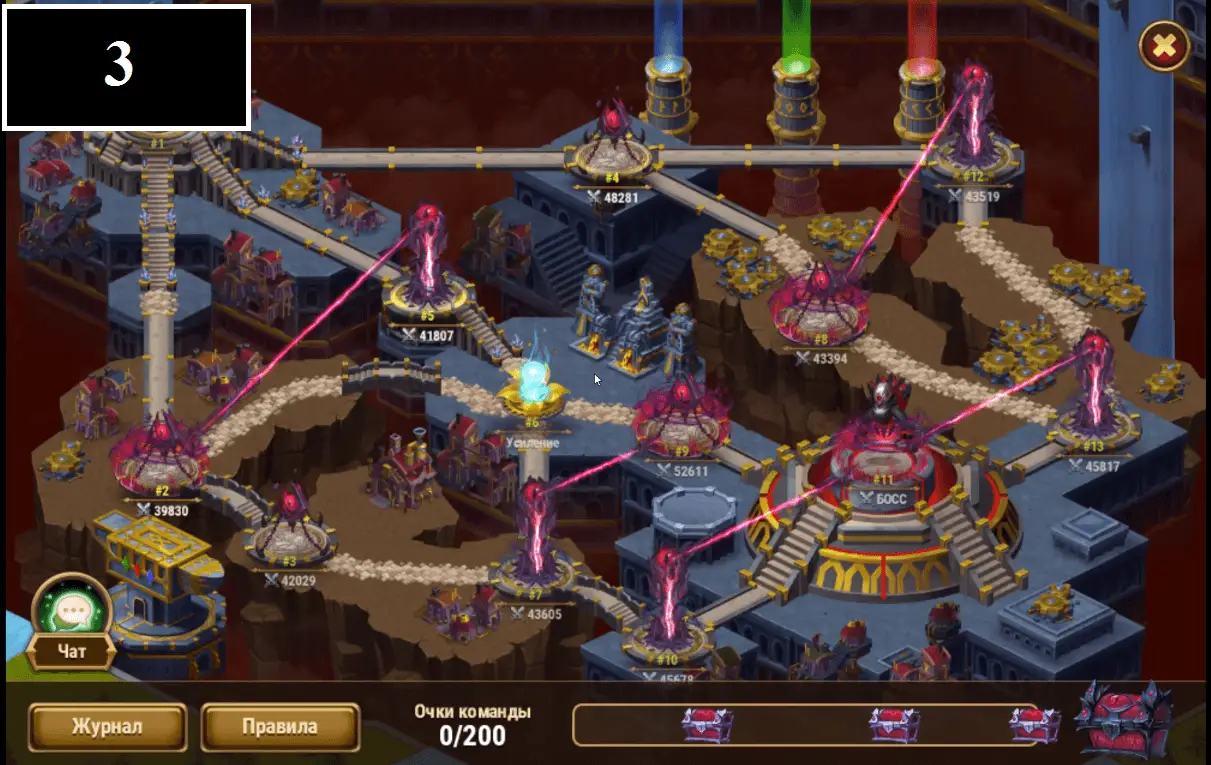
Walkthrough
1 player – #4, #12, #13,#8.
Player 2 – #5, #6.
Then waits for the third player to remove the reinforcement from #9 if there is a chance of not passing with the reinforcement point.
After that, #9, #11.
Player 3 – #2, #3, #7, #10.
After that, players may attack the boss.
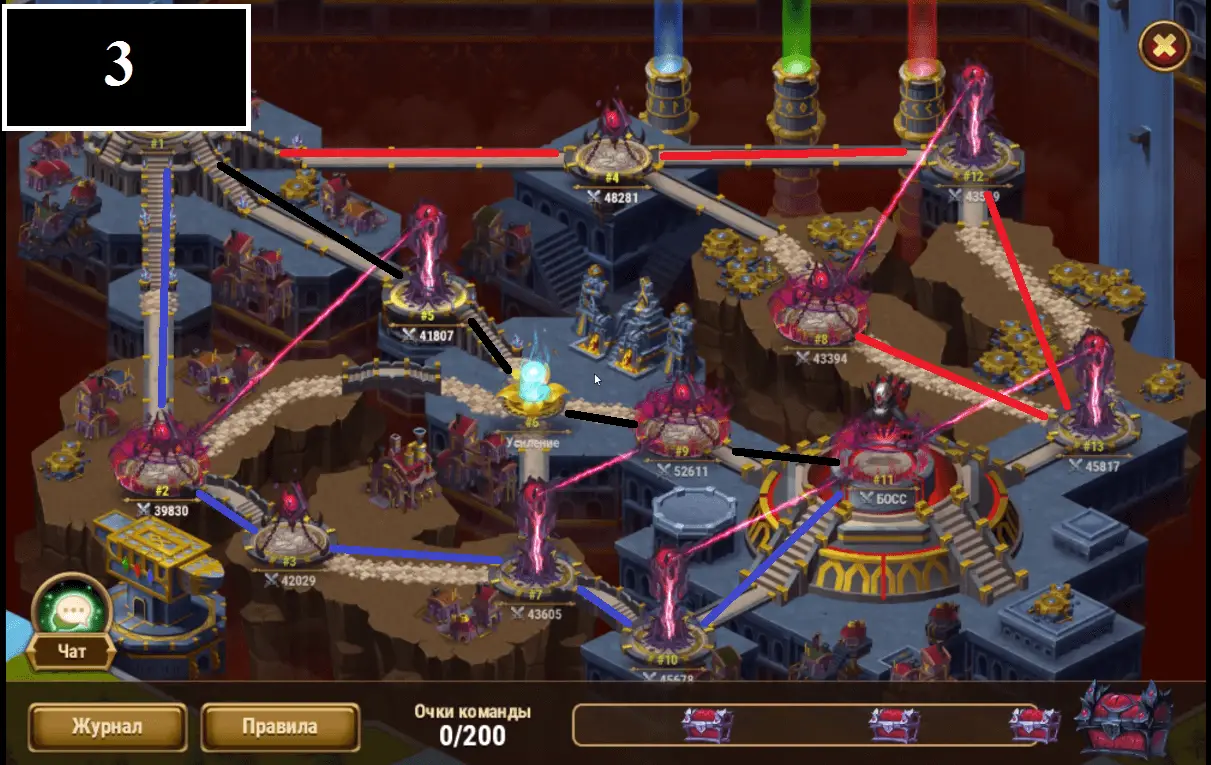
Black – second player
Blue – third player
Adventure 4
The Fall of Heavenly City

1 player – #2, #4, #7,#18.
After that, wait for the third player to remove reinforcement from #8 if there is a chance of not passing with the reinforcement point.
After that, #8, #12, #19, #22 and wait for the second player to remove reinforcement from Boss #21.
Player 2 – #3, #6, #11, #17.
Then waits for the third player to remove the reinforcement from #10 if there is a chance of not passing with the reinforcement point.
After that, #10, #16 #21, #22.
After that, players can attack the boss.
Player 3 – #5, #24, #25, #9, #14, #15, #20, #22

Black – second player
Blue – third player
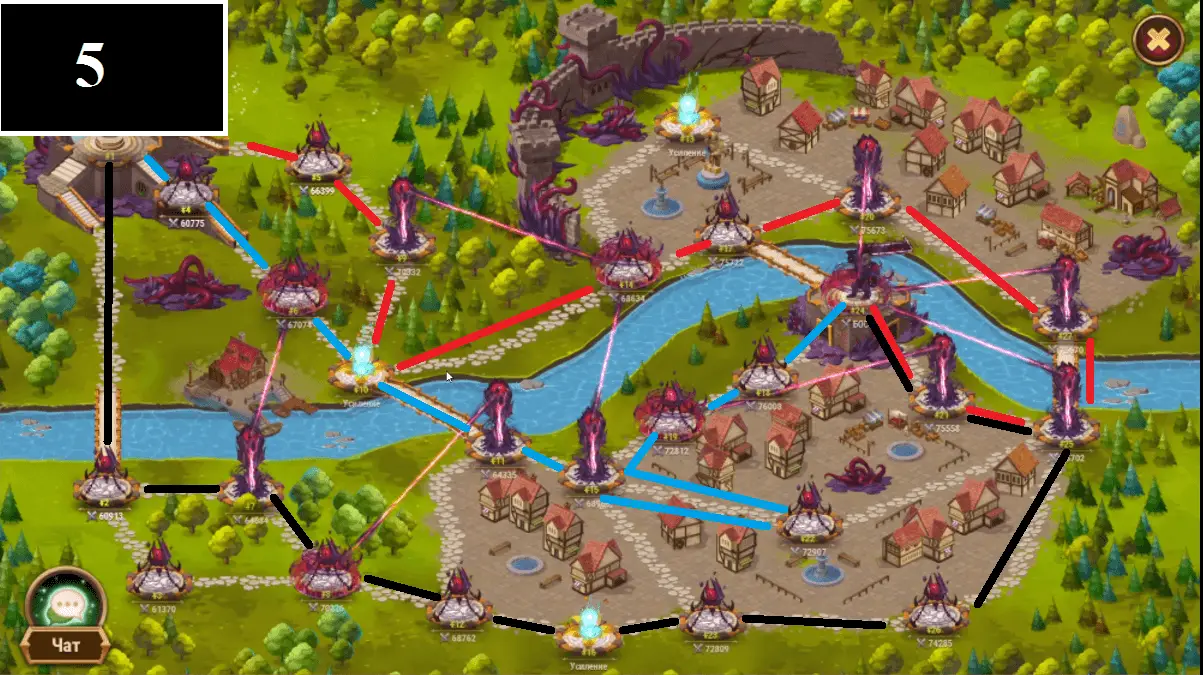
Adventure 5
Siege of Strongford

Walkthrough
1 player – #5, #9, #10, #14, #17, #20, #27, #25, #21, #24
Player 2 – #2, #7, #8, #12, #16, #23, #26, #25, #21, #24
Player 3 – #4, #6, #10, #11, #15, #22, #15, #19, #18, #24
Adventure 6
Valley of the Elements
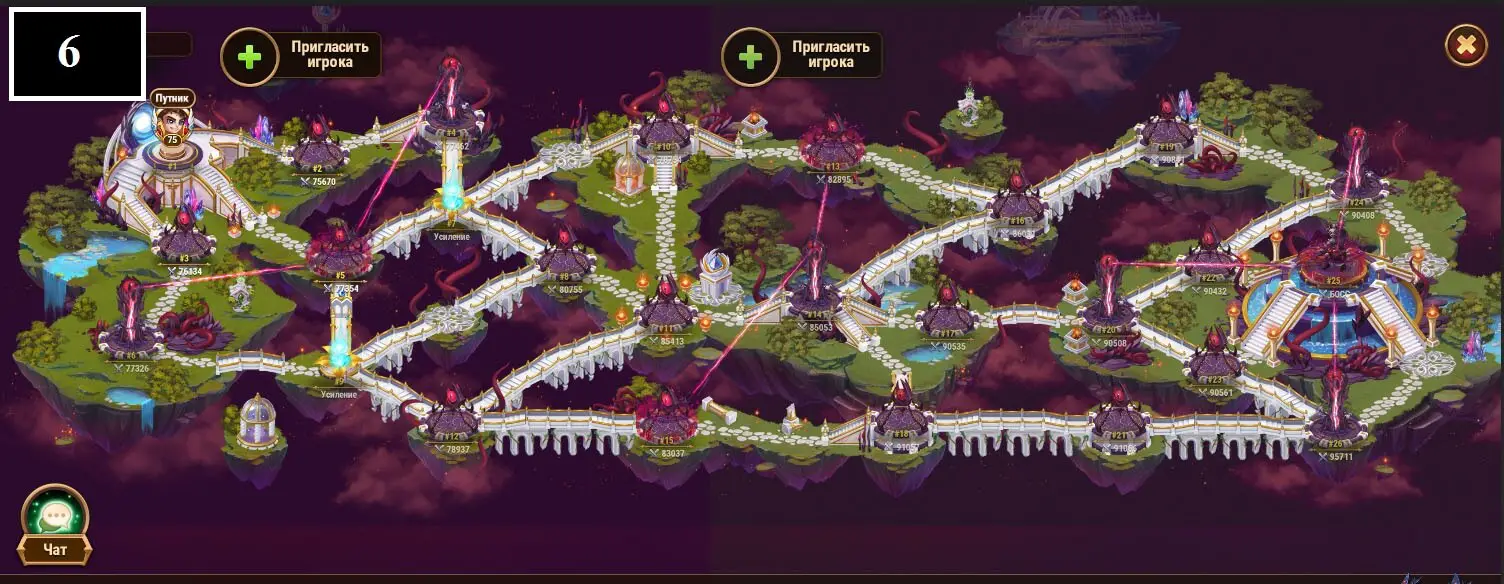
Walkthrough
1 player – #2, #4, #7, #10, #13, #16, #19, #24, #22
Player 2 – #3, #6, #9, #12, #15, #18, #21, #26, #23
Player 3 – #5, #7, #8, #1 , #14, #17, #20
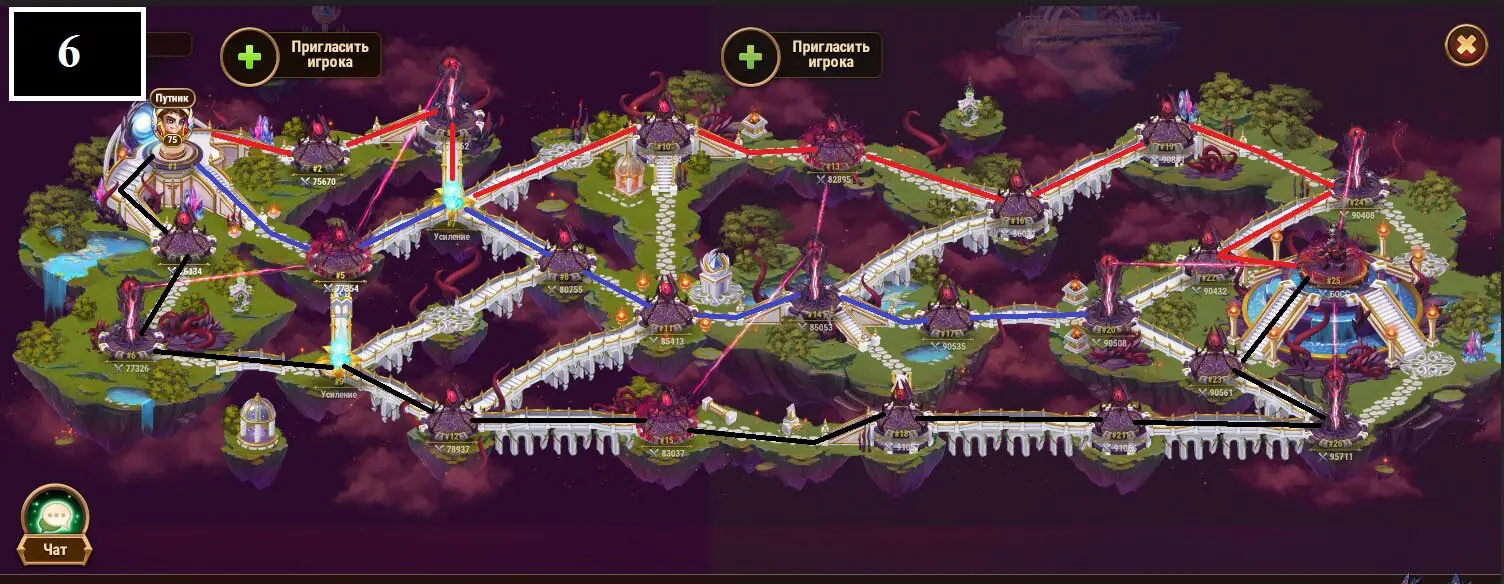
Black – second player
Blue – third player
Adventure 7
The Depths of Girville City
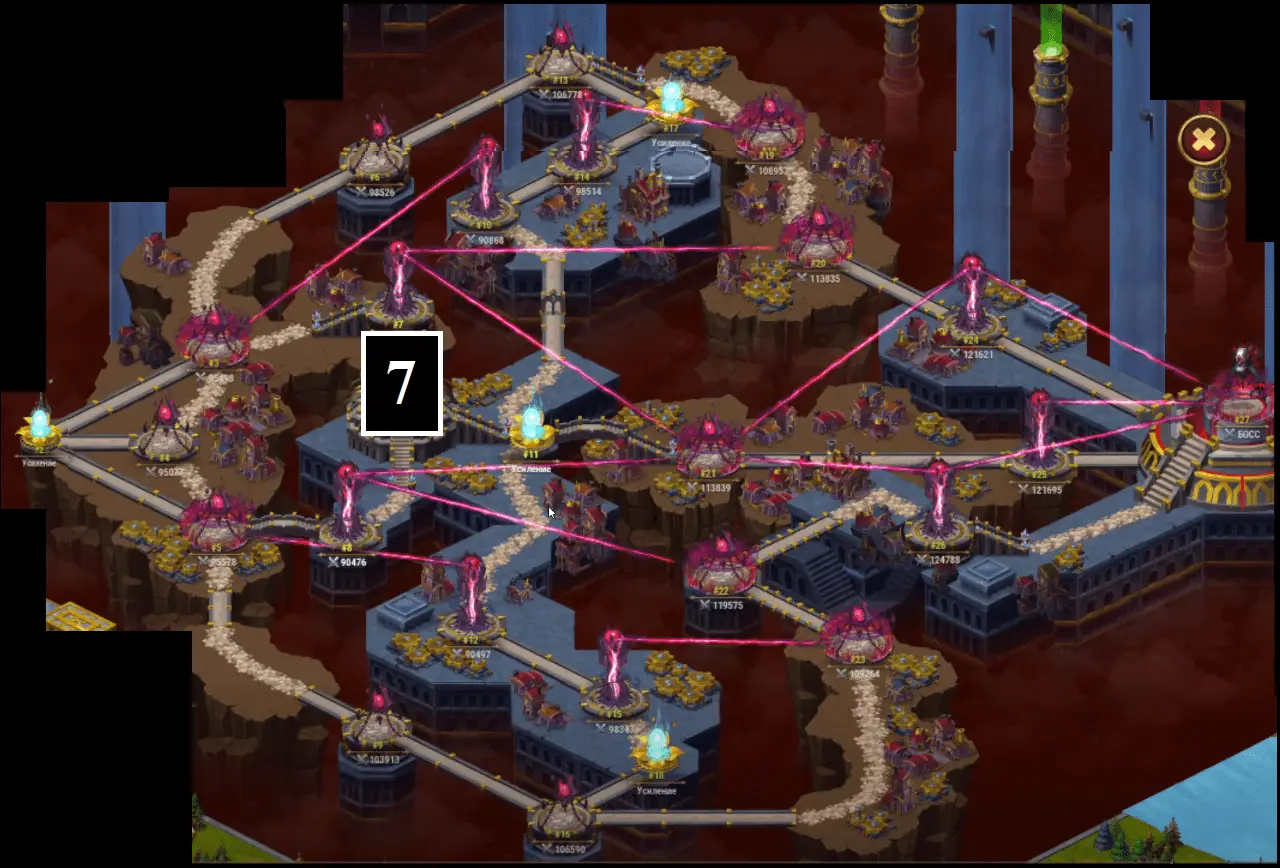
There are two basic passing schemes:
The first option for passing
(safer to pass).
1 player – #8, #1, #11, #12, #15, #12, #11, #21, #25
2nd player – #11, #10, #14, #17, #13, #19, #20, #24
Player 3 – #7, #3, #4, #5, #9, #16, #23, #22, #26
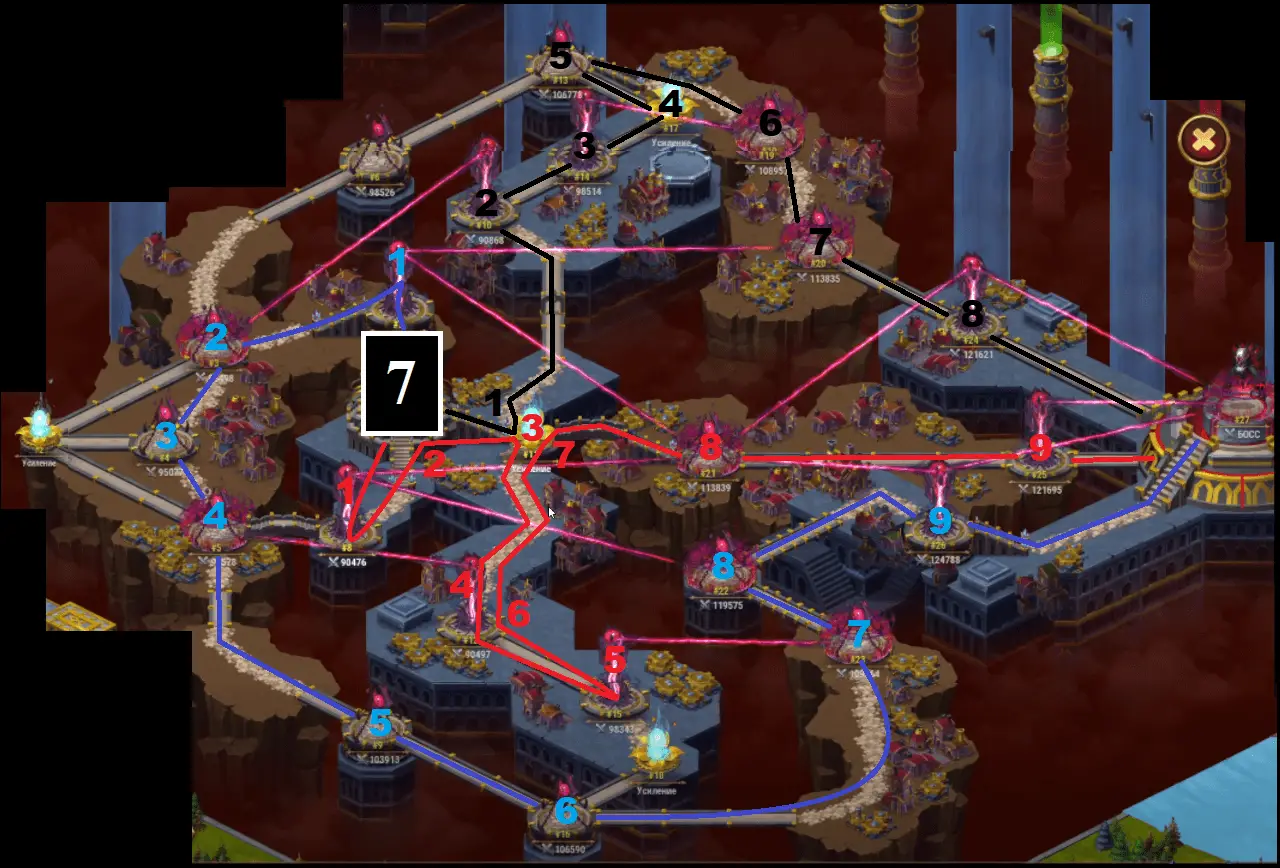
Black – second player
Blue – third player
Second Passage Variation
If the second player can destroy point #19 under reinforcement, then this one:
Player 1 – #11, #10, #11, #12, #15, #12, #11, #21, #25
2 player – #7, #3, #4, #3, #6, #13, #19, #20, #24
Player 3 – #8, #5, #9, #16, #23, #22, #26
(More attempts to destroy the boss)
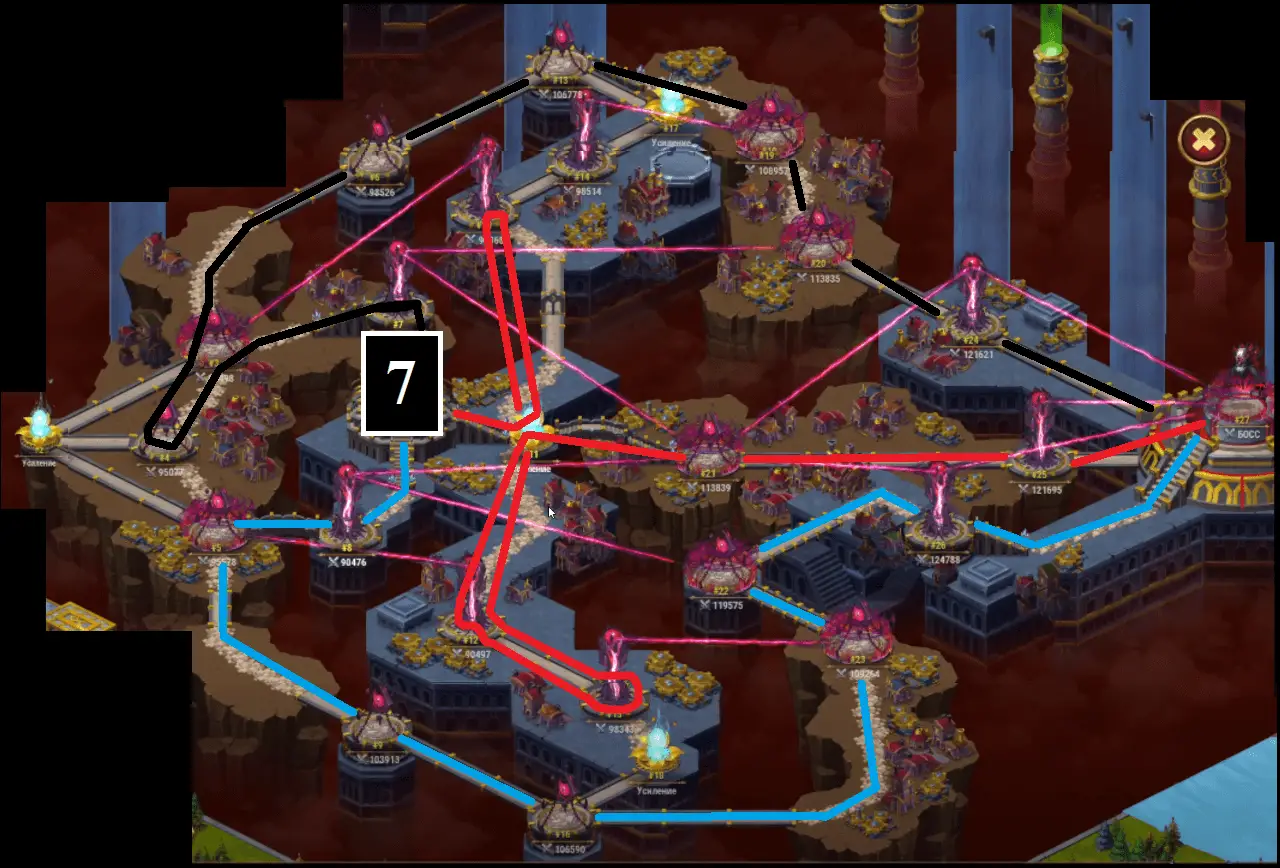
Black – second player
Blue – third player
Adventure 8
The Fall of Heavenly City

Walkthrough
1 player – #03, #02, #06, #07, #09, #10, #13, #17, #16, #20, #22, #21, #28
Player 2 – #03, #04 , #08 , #07 , #09 , #11 , #15 , #19 , #20 , #22 , #23 , #31
3rd player – #03, #05, #07, #09, #11, #14, #18, #20, #22, #24, #27, #30, #26, #29, #25
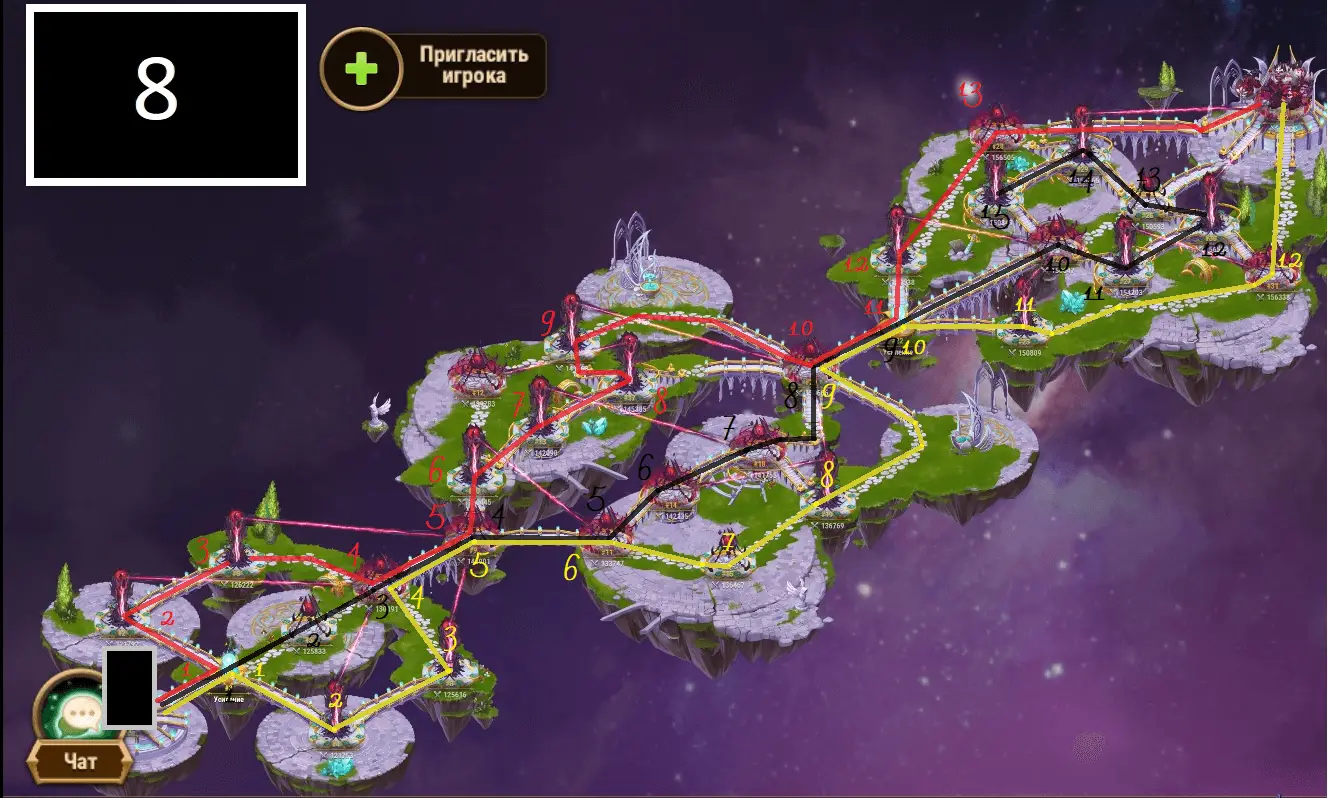
Yellow – second player
Black – third player
Adventure 9
Siege of Strongford
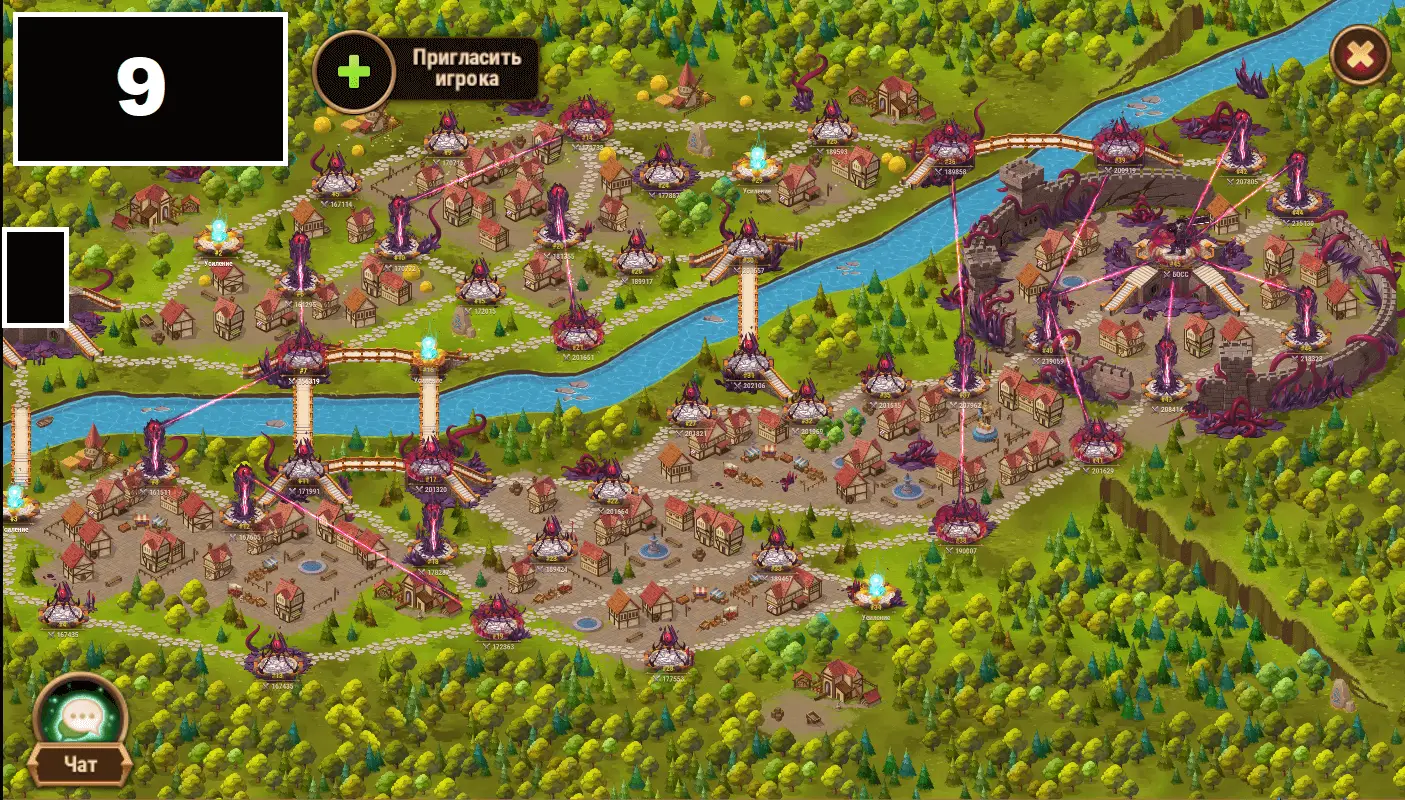
The difficulty of this adventure is that there are 3 points whose reinforcements cannot be removed. Because of this, passing paths will depend on your teams.
Walkthrough
1 player – #3, #8, #12, #11, #18, #19, #28, #34, #33, #38, #41, #43, #46
Player 2 – #2, #6, #10, #15, #7, #16, #17, #23, #22, #27, #32, #35, #37, #40
Player 3 – #2, #5, #9, #14, #20, #26, #21, #30, #36, #39, #42, #44
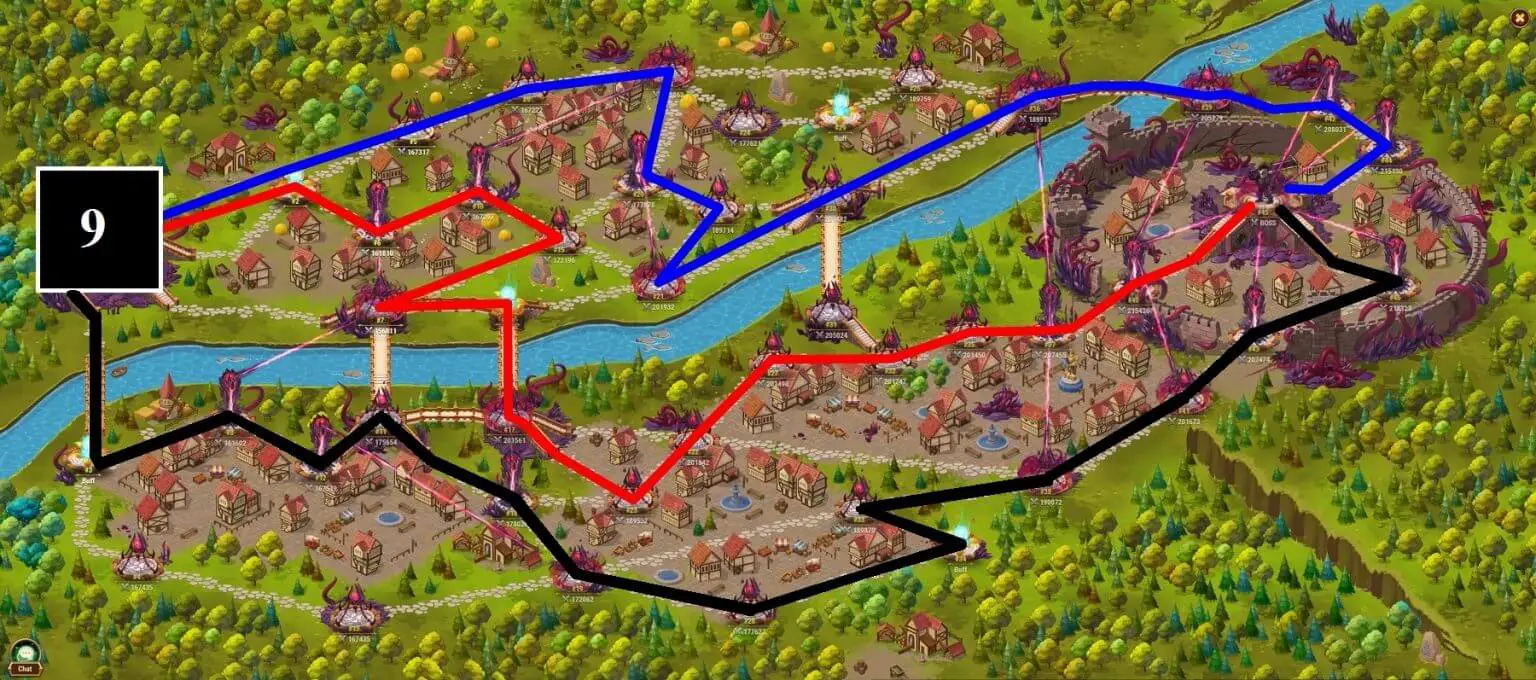
Red – second player
Blue – third player
Adventure 10
Valley of the Elements
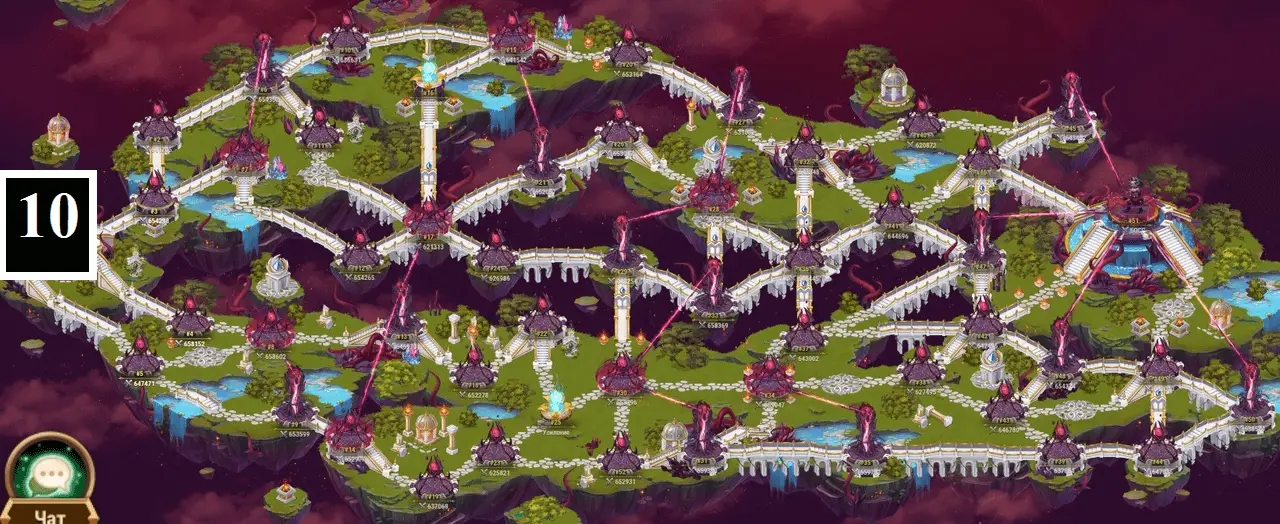
Walkthrough
Like the previous one, this Adventure has points that you can’t remove reinforcements from, so you have to choose a path depending on the composition of your team:
1 player – #5, #9, #14, #19, #23, #27, #32, #37, #42, #48, #51, #50, #49, #46
A physical team with no net damage is recommended.
(Reduced incoming net damage #46, Reduced incoming magic damage #23, #50)
Player 2 – #4, #8, #13, #18, #22, #26, #31, #36, #40, #45, #44, #43, #38, #33, #28
A magic command with no net damage is recommended.
(Reduce incoming net damage #22, Reduce incoming physical damage #44)
Player 3 – #3, #2, #6, #11, #17, #25, #30, #35, #34, #29, #24, #21, #17, #12, #7
Recommended magic command.
(Reduce incoming physical damage #17)
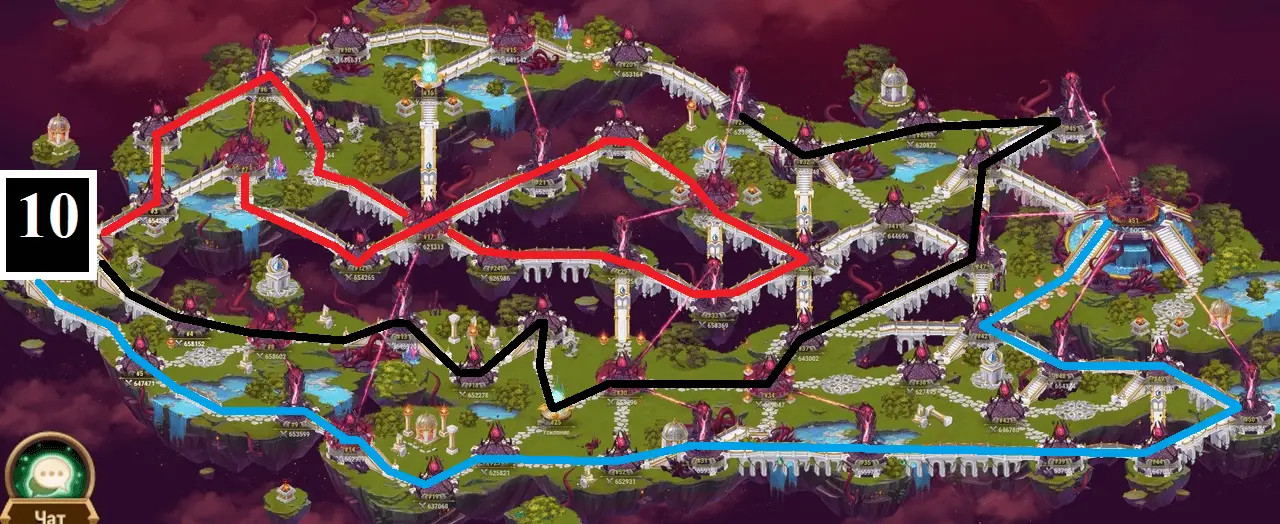
Black – second player
Red – third player
Adventure 11
The Depths of Girville City
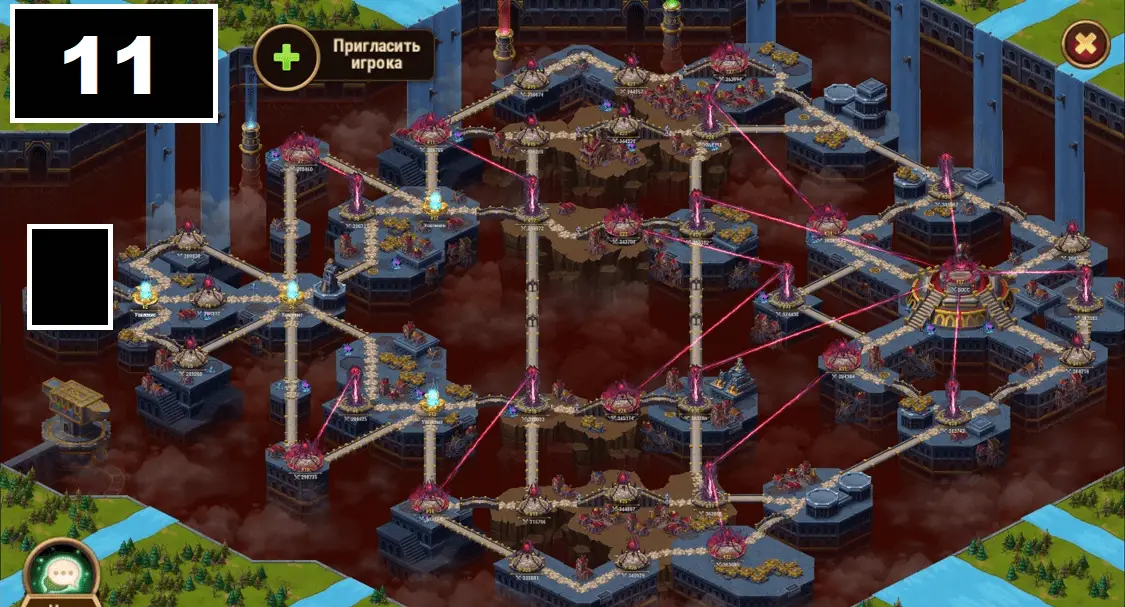
Walkthrough
1 player – #2, #4, #6 , #9, #13, #18, #17, #16, #22, #28, #29, #30, #31, #25, #19
Clean damage command is recommended.
(Reduce incoming magic damage #25, Reduce incoming physical damage #22)
Player 2 – #2, #5, #6, #10, #13, #14, #20, #26, #32, #38, #41, #40, #39
Recommended physical command with no net damage
(Reduce incoming pure damage #39, #41 Reduce incoming magic damage #26)
Player 3 – #2, #3, #6, #8, #12, #11, #15, #21, #27, #36, #34, #33, #35
Recommended magic command.
(Reduce incoming physical damage #21)
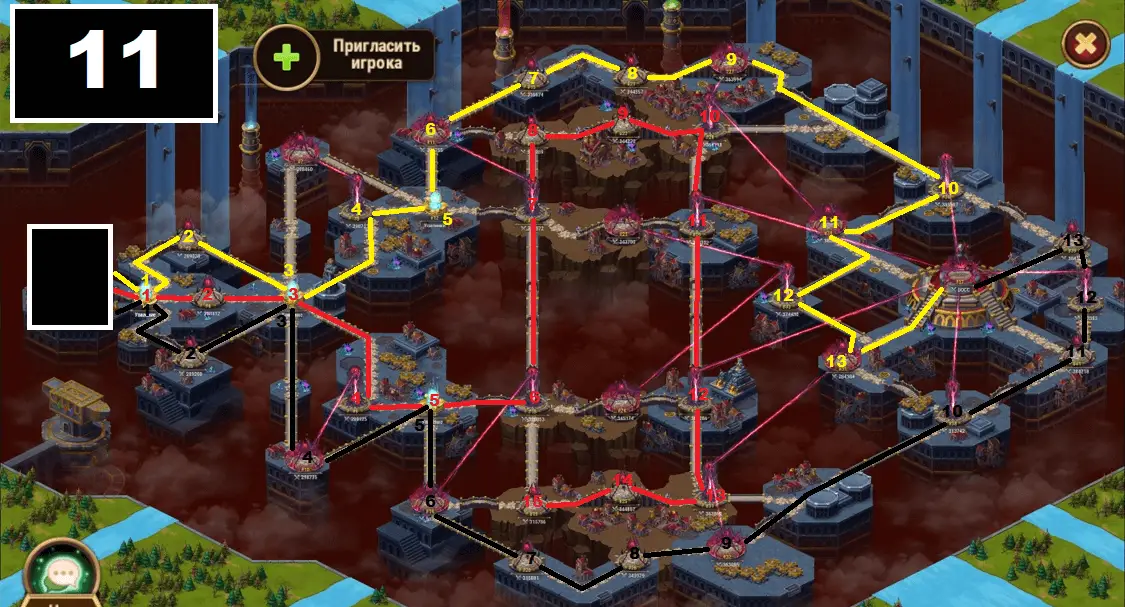
Black – second player
Yellow – third player
Adventure 12
The Fall of Heavenly City
Walkthrough 1
Player 1 – #2, #8, #11, #7, #4, #16, #23, #32, #33, #25, #34, #29, #35, #36
Player 2 – #3, #9, #13, #10, #6, #22, #31, #30, #21, #15, #28, #20
3rd player – #5, #12, #14, #24, #17, #25, #26, #18, #19, #20
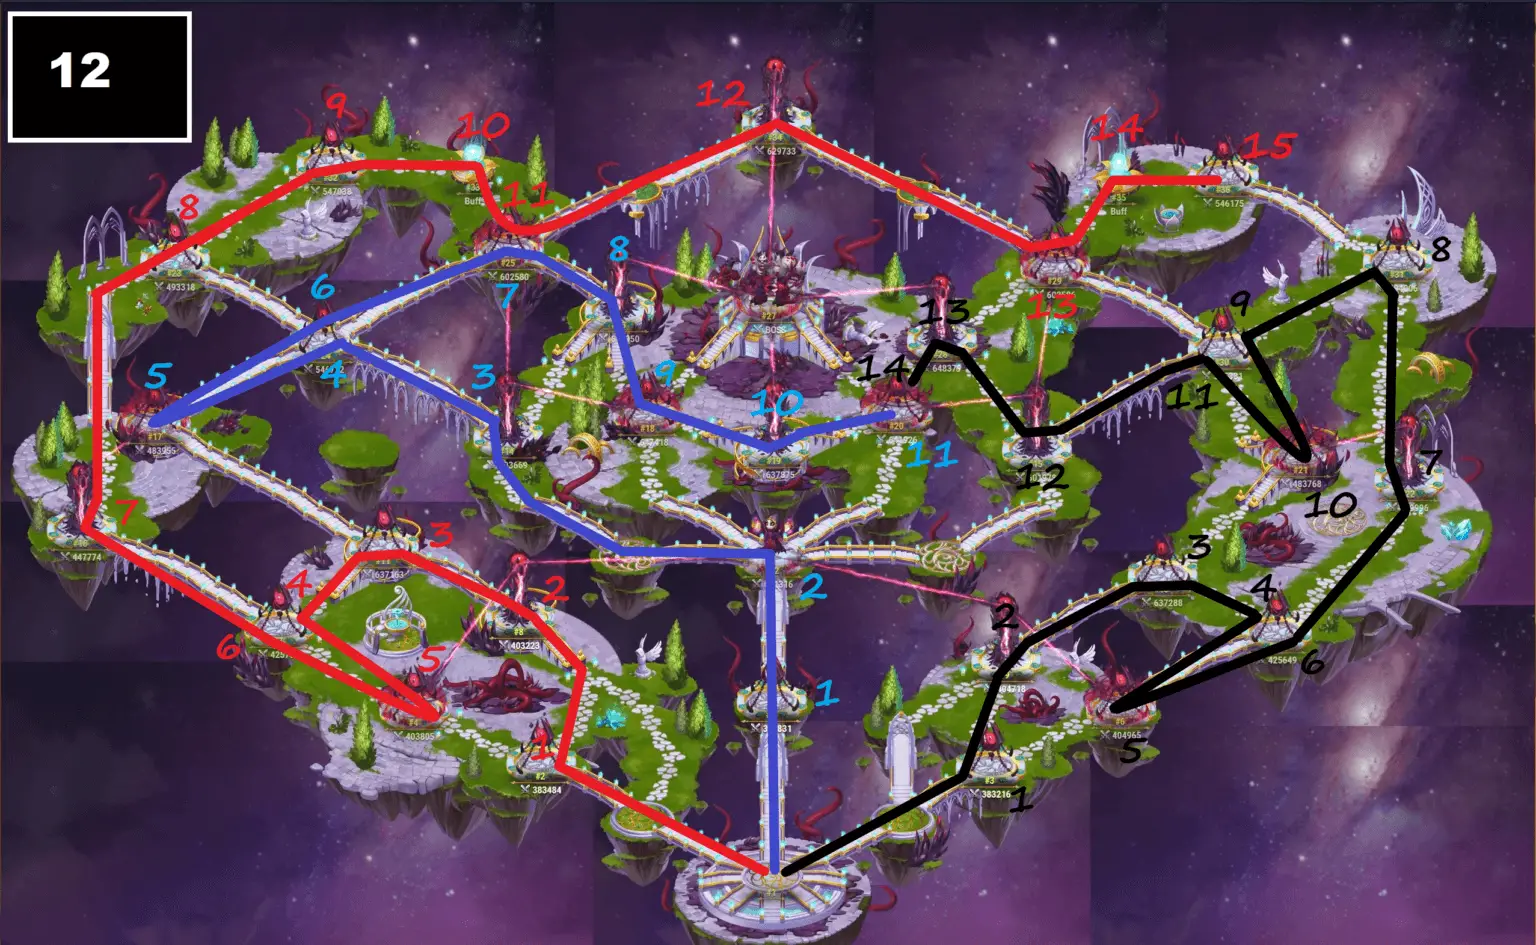
Black – second player
Blue – third player
Walkthrough 2 (Alternate)
1 player – #8, #2, #4, #7, #11, #7, #16, #23, #32, #23, #24, #17, #24, #25, #34
Player 2 – #9, #3, #6, #10, #13, #10, #22, #31, #36, #31, #30, #15, #28, #29, #34
Player 3 – #5, #12, #14, #26, #18, #19, #20

Black – second player
Blue – third player
Result
Adventure 1
| 1 player | 2, #3, #5. |
| 2 player | 2, #4, #7. |
| 3 player | 2, #4, #7 / #2, #3, #5. |
Adventure 2
| 1 player | 3, #6, #9. |
| 2 player | 2, #5, #8, #9. |
| 3 player | 4, #7, #10, #9 |
Adventure 3
| 1 player | #4, #12, #13,#8. |
| 2 player | #5, #6, #9, #11. |
| 3 player | #2, #3, #7, #10. |
Adventure 4
| 1 player | #2, #4, #7,#18, #8, #12, #19, #22. |
| 2 player | #3, #6, #11, #17, #10, #16 #21, #22. |
| 3 player | #5, #24, #25, #9, #14, #15, #20, #22. |
Adventure 5
| 1 player | #5, #9, #10, #14, #17, #20, #27, #25, #21, #24 |
| 2 player | #2, #7, #8, #12, #16, #23, #26, #25, #21, #24 |
| 3 player | #4, #6, #10, #11, #15, #22, #15, #19, #18, #24 |
Adventure 6
| 1 player | #2 , #4, # 7, # 10 , #13 , #16 , #19 , #24 , #22 |
| 2 player | #3, #6 , #9, #12, #15, #18, #21, #26, #23 |
| 3 player | #5, #7, #8, #1 , #14, #17, #20 |
Adventure 7
| 1 player | #8, #1, # 11, # 12, # 15, # 12, # 11, # 21, # 25 |
| 2 player | #11 , #10 , #14 , #17 , #13 , #19 , #20 , #24 |
| 3 player | #7 , #3 , #4 , #5, #9, #16 , #23 , #22 , #26 |
Adventure 8
| 1 player | #03, #02, # 06, # 07, #09, #10, #13, #17, #16, #20, #22, #21, #28 |
| 2 player | #03, #04 , #08 , #07 , #09 , #11 , #15 , #19 , #20 , #22 , #23 , #31 |
| 3 player | #03, #05, #07, #09, #11, #14, #18, #20, #22, #24, #27, #30, #26, #29, #25 |
Adventure 9
| 1 player | #3, #8, #12, #11, #18, #19, #28, #34, #33, #38, #41, #43, #46 |
| 2 player | #2, #6, #10, #15, #7, #16, #17, #23, #22, #27, #32, #35, #37, #40 |
| 3 player | #2, #5, #9, #14, #20, #26, #21, #30, #36, #39, #42, #44 |
Adventure 10
| 1 player | #5, #9, #14, #19, #23, #27, #32, #37, #42, #48, #51, #50, #49, #46 #3, #8, #12, #11, #18, #19, #28, #34, #33, #38, #41, #43, #46 |
| 2 player | #4, #8, #13, #18, #22, #26, #31, #36, #40, #45, #44, #43, #38, #33, #28 |
| 3 player | #3, #2, #6, #11, #17, #25, #30, #35, #34, #29, #24, #21, #17, #12, #7 |
Adventure 11
| 1 player | #2, #4, #6 , #9, #13, #18, #17, #16, #22, #28, #29, #30, #31, #25, #19 |
| 2 player | #2, #5, # 6, # 10, # 13, # 14, # 20, # 26, # 32, # 38, # 41, # 40, # 39 |
| 3 player | #2, #3, #6, #8, # 12, # 11, # 15, # 21, # 27, # 36, #34, #33, #35 |
Adventure 12
| 1 player | #2, #8, #11, #7, #4, #7, #16, #23, #32, #33, #25, #34, #29, #35, #36 |
| 2 player | #3, #9, #13, #10, #6, #10, #22, #31, #30, #21, #30, #15, #28, #20 |
| 3 player | #5, #12, #14, #24, #17, #24, #25, #26, #18, #19, #20 |